- 232 pages
- English
- ePUB (mobile friendly)
- Available on iOS & Android
eBook - ePub
About this book
Packed with all the studio tips and tricks you'll need it's easier than ever to create pro-quality music at home. This book is the only reference you'll ever need to start producing and engineering your music, or other artists' music, in your own home studio.
Covering less than ideal acoustics, solving problems before they occur, tools of the editing phase and much more you can gain the knowledge and know how to make your recordings sound like pro recordings- understand the technology, use it in the right way and you can make a good recording great.
Information
FINE-TUNING YOUR STUDIO
When you are putting together and building your home or project studio, there are many things you can do to improve the quality of recorded sound. Having the best equipment does not necessarily capture the best quality of audio. Knowing how to make the most out of your acoustic space and minimizing any problems will benefit the tracks in the long run.
Choosing appropriate monitors
When first putting a studio together, many first-time engineers will make the mistake of not choosing suitable monitors. There are places in the studio where you can save money, but the proper choice of monitors is going to affect the quality of sound from the tracking through the mixing. These are speakers that you’re going to have to listen to, for hours at a time. Monitors are classified as near-field, mid-field, or far-field. This designates the distance of the listener from the monitors. Most home studios will utilize near-field monitors, as you may not have enough space in the control room to place mid-field or far-field monitors.
POWERED VERSUS UNPOWERED MONITORS
There are two types of monitors that you can select for your studio. The first is the standard unpowered monitor. This will require a separate amplifier to bring the line level up to speaker level. Unpowered monitors allow you to choose which sort of application you wish to use with them. They require more cabling, but many monitors used in professional studios are unpowered.
More recently, power monitors have become standard in many studios. These will have the application built in, so they will only require a line-level signal. Many of these powered monitors will even accept a digital input, so it will take care of the analog to digital conversion as well as amplification. These monitors can accept both balanced and unbalanced signals, but they will also require A/C power to feed the amplifier built inside. Powered monitors will also have the ability to adjust the high and low frequencies by manipulating a few switches on the back. Some powered monitors are actually self-calibrating, such as the JBL LSR 4300 series, which will contour the sound based on the way the speakers sound in the room. These models will often come with a dedicated microphone and software with which to perform the calibration.
Calibration for each of these different types of monitors can be done with an external equalizer. A graphic equalizer can be used to fine-tune the sound of a room; however, you can do more damage to the sound of the room if you do not know what you are doing. If you are in doubt, leave the fine-tuning of the monitors alone, and make adjustments only to the high-frequency and low-frequency adjustments of a powered monitor.
PLACEMENT OF THE MONITORS
The placement of monitors, in a studio, can make a dramatic difference in sound to the engineer. Monitors should be placed carefully, such that the two monitors and the engineer form an equilateral triangle. This means that there should be a 60-degree angle between the two monitors as well as from each monitor to the next. If you are looking straight ahead, the monitor should be 30 degrees to the right and to the left of the center.
Monitors will have multiple drivers in them. There can be midrange drivers as well as tweeters. Since high frequencies are more directional, be sure that these drivers are directed toward the listening position at ear level. Depending on the layout of the studio, there can be issues with reflecting high frequencies off flat surfaces. These can come off a desk or control surface in front of the engineer. It is best to angle the speakers in such a way that they do not create too many direct reflections off the surfaces.
CALIBRATING THE MONITORS
The monitors should sound balanced across low and high frequencies. Mixing to monitors that are lacking in high frequencies, whether it is a result of the acoustics or placement of the monitors, will result in mixes that are too bright. If the high frequencies are too hyped, then the mixes will come across as sounding dull. The same holds true for the low frequencies. If the low frequencies from the monitors are too loud, the mixes will be lacking in low-end, while the reverse is true for not having enough low-frequency gain. This is where the calibration of the monitors is important.
The calibration can be done by using a sound pressure level (SPL) meter, and by playing back a consistent level from your digital audio workstation (DAW). This can be done by creating an oscillator, with a sine wave at 1 kHz, which is the standard reference level, and taking a reading of that level. Then switch the oscillator to 10 kHz. If the reading is the same as the 1-kHz level, then the monitors do not need any adjustment on the high frequencies. If the readings do not match, then adjust the high-frequency playback on the monitors or a parametric equalizer that is placed across the monitor path. Do the same thing with 100 Hz.
More often than not, the calibration can be done by ear. When listening back to the mixes on a different sound system, if they are sounding a little too dull, then reduce the high frequencies of the monitors. Do the same thing with the low frequencies, and then listen to how your mixes come across after the adjustments.
Acoustic treatment of the control room
The control room is your first and primary source for listening to the quality of the recorded audio. Creating a neutral listening environment will help make the mixes sound as good as possible. Control rooms, in a home studio, are generally in rooms that are not ideal for listening back to professional audio, compared to a professionally designed space. Oftentimes they are in a basement, which may have hard tile floors, painted concrete walls, and low ceilings.
In a small space, the listening environment can be improved by absorbing much of the acoustic sound. The room does not necessarily need to sound completely dead, as no one will be listening to the music in a completely dead space. Concrete and tile are very reflective surfaces. Placing carpet, even an area rug, will absorb a good deal of the sound. The walls can be treated with professional acoustic foam. This can be expensive, but this investment will make it worthwhile in the long run. Wood is a semireflective surface. Placing wood along the walls is a good way of absorbing some of the sound, while maintaining a realistic listening environment. Bass traps can be placed in the corners to help eliminate or reduce any low-frequency room nodes that may exist in the control room.
ACOUSTICS IN THE STUDIO
Controlling the acoustics in the studio, while the recording is taking place, is important so that there is no unnecessary room noise that can detract from the sound of the recording. Professional recording studios will have different rooms. Some rooms are made out of wood, so that the room sound is semireflective. A room like this will sound good when recording most instruments. Some studios will also have a tiled room, which will contribute more reflections of the room into microphones. Recording drums in a tiled room will capture more reflections of the room. It is especially beneficial when recording the sound of the room itself. The third type of space used in a recording studio is an isolation booth (Figure 1.1). This is a dead-sounding room, designed to absorb most of the frequencies. These rooms are used when recording the voice for vocals or voiceovers. It can also be used for capturing soul instruments such as a saxophone, acoustic guitar, or any instrument that does not necessarily need to have the sound of the room to be picked up by the microphones.
FIGURE 1.1
An isolation room for single-instrument or vocal recording.
An isolation room for single-instrument or vocal recording.
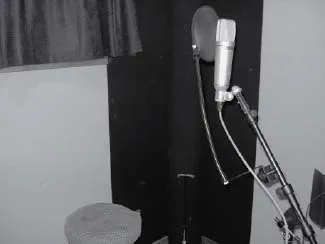
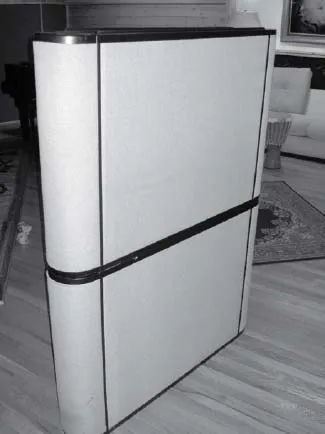
FIGURE 1.2
Portable gobos for isolating specific instruments in a room.
Portable gobos for isolating specific instruments in a room.
A home recording studio may not have the luxury of having separate rooms to record in. The acoustics of the room can be tailored with portable gobos that can be maneuvered around the room (Figure 1.2). Having a vocalist surrounded by these gobos, which are designed to absorb sound, will help prevent unwanted room sound from creeping into the microphone. The louder the vocalist sings, the more apt there is to be captured room noise in the microphone.
Heating and air conditioning can also create unwanted noise in both the studio and control room. It may not be feasible to reroute the heating and air conditioning in a home or project studio, so make sure that the heating and air conditioning is shut off when recording, especially with softer instruments, which will require more gain from the microphone preamplifiers.
WORKING WITH MUSICIANS
When making a record, one of the first and foremost things that you can do to have a great-sounding final product is to have the best musicians possible. Studio musicians are highly paid musicians because they can walk in and out of the studio, get their parts done, and make the producer happy with the end result. Most bands that come into the studio are not studio musicians, so it takes work to make them comfortable with the studio. The key to a successful recording is to prepare the musicians in advance.
Good preparation will help make a band make the most of their time while they are in the studio. As an engineer, you may not have the time or availability to work with a band as they rehearse for the studio, but what you can do is let them know what to expect when they walk in the door. If they have never been in a studio, meet with them and explain the process to them in advance. This may help to answer questions and relieve anxieties that an artist can feel before walking into the studio for a new project. There is no such thing as overpreparing for the recording studio. There are many ways in which you can prepare a band as a whole, as well as the individual musicians, for the recording process. This is especially true for bands that have never been in a studio before. Educating them in advance about the studio process is an important part of the process of making them feel comfortable with recording.
Preparing for a recording during rehearsal
It is very useful to work with an artist, if possible, during rehearsal and prior to recording, to make the most of your studio time.
THE ARRANGEMENT
Finalizing the arrangement of the song prior to entering the studio is very important. If you take an artist into the studio and then start rearranging the songs, the artist is not making the most out of his or her studio time.
For many reasons, it is helpful to do a simple recording of the band as a whole during rehearsal. A simple two-track recording using something like a CD recorder or MP3 recorder can suffice. Many musicians are more focused on their parts during rehearsal and not listening to the performance as a whole. This gives the band the opportunity to point out trouble spots, whether they are problems with the arrangement or tempo fluctuations during various parts of the song.
Recording the song will also tell you the length of it and whether the duration fits within the band’s appropriate goals for that song. If you are looking to have a radio-friendly pop ...
Table of contents
- Front Cover
- Half Title
- Title Page
- Copyright
- Contents
- ACKNOWLEDGMENTS
- INTRODUCTION: WHAT DO I MEAN BY THE SECRETS OF RECORDING?
- CHAPTER 1 • Creating a Great Recording from the Start
- CHAPTER 2 • Timing Correction
- CHAPTER 3 • Replacing Sounds
- CHAPTER 4 • Pitch Correction
- CHAPTER 5 • Emulated Effects
- CHAPTER 6 • Adding MIDI Tracks to Recordings
- CHAPTER 7 • Mixing Techniques
- CHAPTER 8 • Mastering the Recording
- CONCLUSION: A FINAL WORD
- INDEX
Frequently asked questions
Yes, you can cancel anytime from the Subscription tab in your account settings on the Perlego website. Your subscription will stay active until the end of your current billing period. Learn how to cancel your subscription
No, books cannot be downloaded as external files, such as PDFs, for use outside of Perlego. However, you can download books within the Perlego app for offline reading on mobile or tablet. Learn how to download books offline
Perlego offers two plans: Essential and Complete
- Essential is ideal for learners and professionals who enjoy exploring a wide range of subjects. Access the Essential Library with 800,000+ trusted titles and best-sellers across business, personal growth, and the humanities. Includes unlimited reading time and Standard Read Aloud voice.
- Complete: Perfect for advanced learners and researchers needing full, unrestricted access. Unlock 1.4M+ books across hundreds of subjects, including academic and specialized titles. The Complete Plan also includes advanced features like Premium Read Aloud and Research Assistant.
We are an online textbook subscription service, where you can get access to an entire online library for less than the price of a single book per month. With over 1 million books across 990+ topics, we’ve got you covered! Learn about our mission
Look out for the read-aloud symbol on your next book to see if you can listen to it. The read-aloud tool reads text aloud for you, highlighting the text as it is being read. You can pause it, speed it up and slow it down. Learn more about Read Aloud
Yes! You can use the Perlego app on both iOS and Android devices to read anytime, anywhere — even offline. Perfect for commutes or when you’re on the go.
Please note we cannot support devices running on iOS 13 and Android 7 or earlier. Learn more about using the app
Please note we cannot support devices running on iOS 13 and Android 7 or earlier. Learn more about using the app
Yes, you can access Secrets of Recording by Lorne Bregitzer in PDF and/or ePUB format, as well as other popular books in Technik & Maschinenbau & Akustiktechnik. We have over one million books available in our catalogue for you to explore.