- 124 pages
- English
- ePUB (mobile friendly)
- Available on iOS & Android
eBook - ePub
Atlas of the English Civil War
About this book
Originally published in 1985 the English Civil War is a subject which continues to excite enormous interest throughout the world. This atlas consists of over fifty maps illustrating all the major - and many of the minor - bloody campaigns and battles of the War, including the campaigns of Montrose, the battle of Edgehill and Langport.
Providing a complete introductory history to the turbulent period, it also includes maps giving essential background information; detailed accompanying explanations; a useful context to events.
Tools to learn more effectively

Saving Books

Keyword Search

Annotating Text

Listen to it instead
Information
MAP 1
Scotland in 1639–1640 and the Bishops’ Wars

The root cause of the armed confrontations between Charles I and part of his Scottish subjects lay in his policy of anglicisation and their fears that the union of the two crowns was leading them into subjugation. As early as 1637 there were hopes of a closer, parliamentary union, to offset the personal union represented by Charles, but internal divisions and contradictions led Scotland first to ally with Parliament in 1643, then to revert to loyalty to the Crown and, as a consequence, to end up as a military occupied country from 1651 until 1660. Nevertheless, Scottish resistance to the King encouraged that of Englishmen in 1642, as did the inability of the King effectively to counter Scottish insurgence. By February 1639 ‘hostilities’ had begun in Scotland: at Inverness royalist arms supplies raised for the marquis of Huntly were seized, and shortly afterwards covenanting troops drove royalist forces off from Turriff. Aberdeen was surrendered to Montrose, a covenanting general, and only Threave and Caerlaverock Castles on the border remained in loyal hands. Charles intended to raise 30,000 men to take into Scotland, but recruiting was slow, and he was advised to wait a year. Despite the advice, Charles was determined to invade Scotland, and to send the marquis of Hamilton by sea to the Firth of Forth. Charles was at York on 30 March, whilst Hamilton lay at Yarmouth with 5,000 men ready to sail. He anchored before Leith on 1 May but the covenanters were obdurate, and the King hesitated in his plans. On 14 May he reached Newcastle, whilst Scottish royalists occupied Turriff and Aberdeen (the latter briefly). On the 30th Charles lay at Birks near Berwick with 20,000 men, with forward troops across the border at Duns. This manoeuvre caused the Covenanters to advance on Kelso, which they held on 3 June against a counterattack. Two days later the Scottish army came to Duns and offered to negotiate with Charles, who agreed, but away north Aberdeen was again occupied by royalist troops and had to be stormed by Montrose on 18 and 19 June. On the 18th, the two sides reached agreement at Berwick, termed a treaty but to all intents and purposes merely a truce. When the Short Parliament met on 13 April 1640 plans for the reduction of Scotland were laid before it. The Commons proved unwilling to be coerced into sanctioning further military efforts, and Parliament was dissolved on 5 May. Urged on by Strafford, Charles was bent upon the suppression of Scotland, raising a new army under the earl of Northumberland. Within Scotland, only Threave, Caerlaverock, Edinburgh and Dum-barton were in royalist hands, and on the day that the Short Parliament was dissolved covenanting troops entered Aberdeen, centre of royalist resistance. With the Scottish Parliament sitting against royal wishes, and forces being raised, Covenanters overran Atholl, Badenoch and Lochaber in June, causing Montrose, suspicious of the Covenanters’ objectives, to side with the threatened royalist Lord Ogilvie.
Meanwhile the main Scottish army began to assemble on the border with England, and the invasion of England was decided upon on 3 August. This finally drove Montrose and other former Covenanters into open rift with their party, but too late to alter the course of events. On 20 August, as the King left London for the north, the Scottish army rolled across the border into Northumberland and came to Newburn on the Tyne on 27 August. Resistance from the English troops was patchy and ineffectual, and on 30 August Newcastle upon Tyne was occupied without difficulty by the Scottish army. In their rear, Dumbarton had fallen, Caerlaverock was undergoing vigorous siege, and in September Lord Ettrick was to surrender Edinburgh into covenanting hands. Helpless, Charles summoned a Great Council to York for 24 September, Parliament was summoned to meet on 3 November, and on 2 October negotiations began at Ripon with the Scots which were to lead to the Treaty of Ripon. By this, the Scots occupied Northumberland and Durham with a daily subsidy of £850 to support them until problems were finally hammered out with the sitting of Parliament in London.
MAP 2
Flashpoints of Civil War in the Summer of 1642
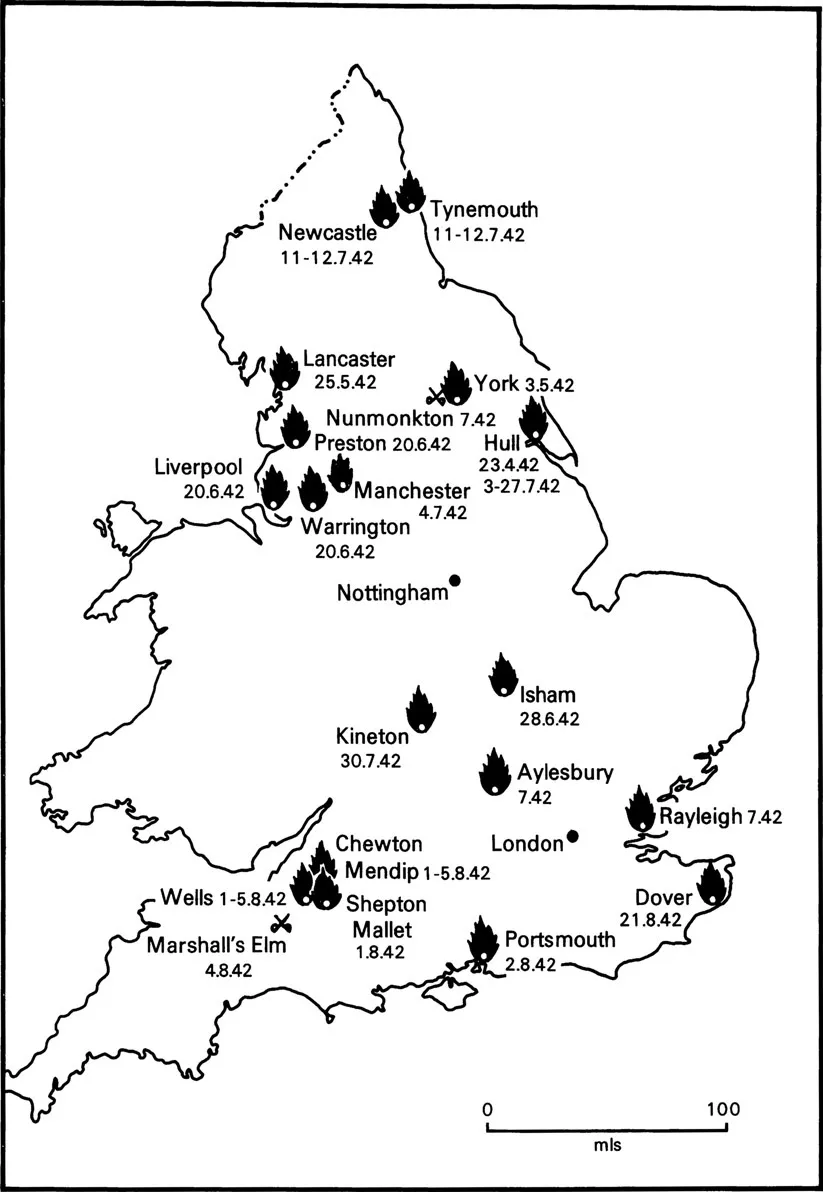
Although civil war did not formally break out until the King raised his standard on 22 August 1642 at Nottingham, the summer had seen both sides flexing their muscles and striving for advantage on a localised level. The physical division between the King and his Parliament came in March, when Charles arrived in the city of York on the 18th ment’s friends gathered at Shepton Mallet. On 1 August occurred an ugly brawl in the latter town when Sir Ralph Hopton met up with William Strode MP. This developed into an armed confrontation between local country people, raised by the Sheriff as a posse comitatus, and the royalist forces. Nothing came of it, but Hertford’s commission as lieutenant general became official on 2 August, and on the 3rd he sent troops into Shepton Mallet and beyond to the foot of the Mendips in a show of strength. After plundering the town of weapons, the royalists withdrew to Wells. Elsewhere in the county, Strode and John Pyne on behalf of the Parliament were seeking to combine their separate forces, to move against Wells. The royalists acted pre-emptively to prevent their conjunction, and at the battle of Marshall’s Elm fought on 4 August, the royalists routed and destroyed Pyne’s column of 600 men although outnumbered by them. Nevertheless, the Parliament’s local forces began to muster at Chewton Mendip to the number of 10,000 to 12,000, far more than Hertford could dispose of to resist them. On the 5th, therefore, the marquess withdrew without offering battle, making his way towards Glastonbury.
As well as these formalised developments, there were reports of riots and affrays in Rayleigh, Essex; Aylesbury, Buckinghamshire; and Isham in Northamptonshire. On 30 July royalist supporters gathered together on Kineton Heath in Warwick-shire to prevent the parliamentary gentry from removing artillery from Banbury to Warwick Castle. Confrontation was avoided when the parliamentary commander, Lord Brooke, agreed to leave the guns in Banbury. Elsewhere on 2 August, George Goring the governor of Portsmouth delivered the port up to the King’s supporters, but for no apparent reason he was to abandon it in September and become a field commander for the King. Dover Castle was taken by Parliament on 21 August, the day before the royal standard was unfurled.
MAP 3
1642: Prelude to Edgehill
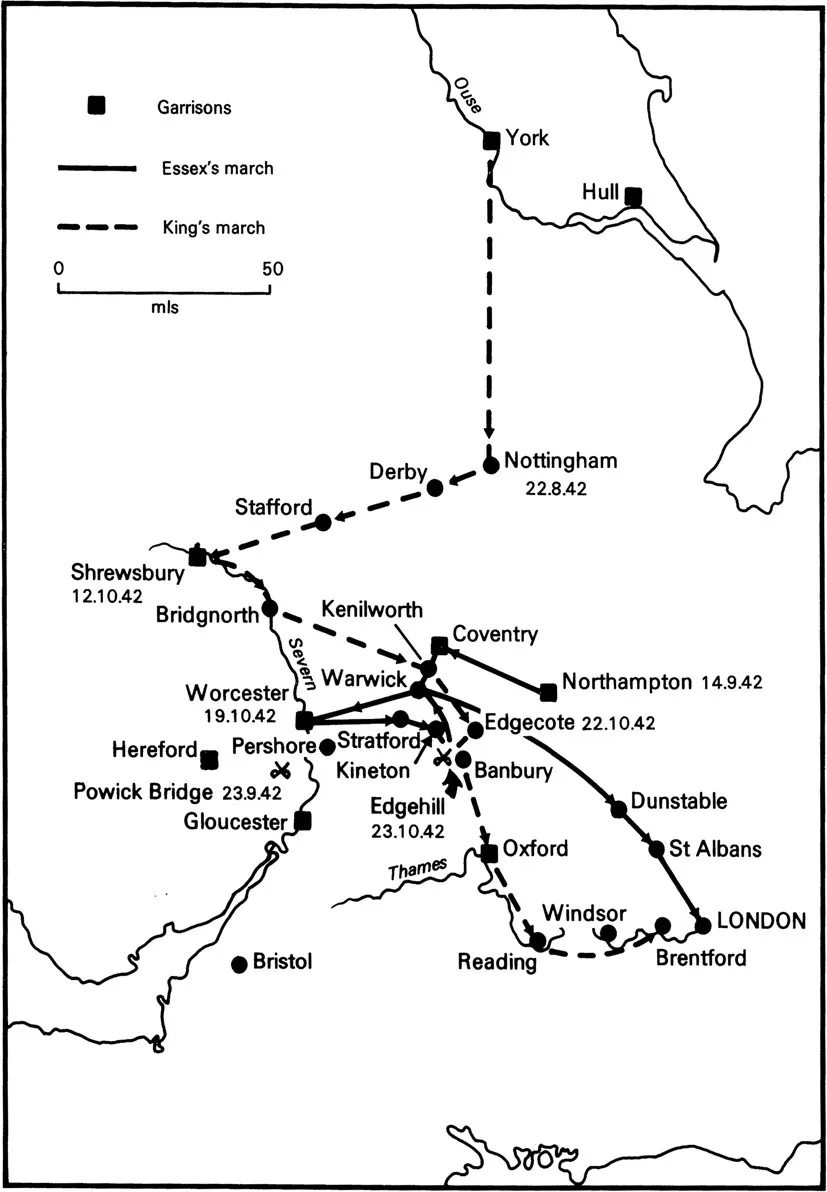
With the raising of the royal standard on 22 August at Nottingham, amidst inauspicious beginnings, formal war was declared on the Parliament. After recruiting forces at York, the King had moved to Nottingham to increase his power, preparatory to a march on London and an anticipated rapid victory. From Nottingham, however, he marched westwards to Shrewsbury, to the rich recruiting grounds of Wales and the borders. The army of the Parliament under the earl of Essex, appointed Captain General on 13 July, was drawn largely from London and the Home Counties, and when mustered at Northampton (an ideal place for securing footwear for the men) on 14 September (six days before the King entered Shrewsbury) was superior in strength to its opponents. Morale was another question. The first real test for detachments of the two armies was to take place on 23 September.
Although lying between London and the King, the earl of Essex determined to move west also, and to take the city of Worcester. The King initially sought to strengthen the city by sending Prince Rupert with mounted troops to reinforce Sir John Byron there, but the defences were wholly inadequate, and Rupert ordered withdrawal. To forestall a surprise attack during the evacuation, Rupert moved his forces forward to Powick Bridge. Unknown to him, at the same time a parliamentarian force of about the same strength under Colonel John Brown, was detached from Essex’s army to rendezvous with Gloucestershire forces reported to be advancing on Worcester. Early on 23 September, Brown’s forces appeared south of
Powick Bridge but were ignorant of the proximity of the Prince, as he was of their presence. There were counsels of caution for Brown, but he determined to march on, since the main army of the Parliament was itself drawing closer to the city. As the parliamentarian advance guard crossed the bridge, they were met by fierce musket fire, under cover of which the royalist cavalry mounted up ready for action. Edwin Sandys, commanding the parliamentary vanguard, pushed on, and was charged with devastating effect as he sought to deploy beyond the bridge. Scattered at one blow, the fugitives of the vanguard collided with Brown’s main body, and in their panic fled until they came up with the earl of Essex’s Lifeguard regiment near Pershore. John Brown was able to hinder royalist pursuit, but the damage was done, and the first cavalry victory had gone to Rupert.
Powick Bridge was a much-needed morale booster for the royal army, and saw the birth of the legend of Rupert’s invincibility. King Charles, encouraged by the success and the captured colours brought to him, set out from Shrewsbury on 12 October, again aiming for London. Although his army was still smaller than that of Essex, the earl’s strength was depleted by his need to garrison strategic towns — Worcester, Hereford, Northampton and Coventry — and the earl showed a fateful indecisiveness. There was also the problem to be overcome of facing the King in arms in the field, and the consequence of failure once that was done. The ear) quit Worcester on 19 October to put himself again between the King and London, and both armies now moved slowly, bogged down by treacherous weather conditions. It was also evident that neither side quite knew where the other was, and the factor of poor intelligence dogged both sides throughout the civil war.
On 22 October royalist forces entered Edgecote near Banbury, and a rest was ordered for twenty-four hours, whilst forces were to be detached to assault the enemy garrison at Banbury. Whilst the royalists prepared to establish billets in the general vicinity, a party of Prince Rupert’s foragers clashed with parliamentary foragers at Wormleighton. The royalists had the advantage of surprise, and a reconnaissance party set out for Kineton. They discovered the proximity of the bulk of Essex’s army, and reported back. Orders were issued for the royalist army to draw into battle order on Edgehill on 23 October.
MAP 4 & 5
The Battle of Edgehill, 23 October 1642
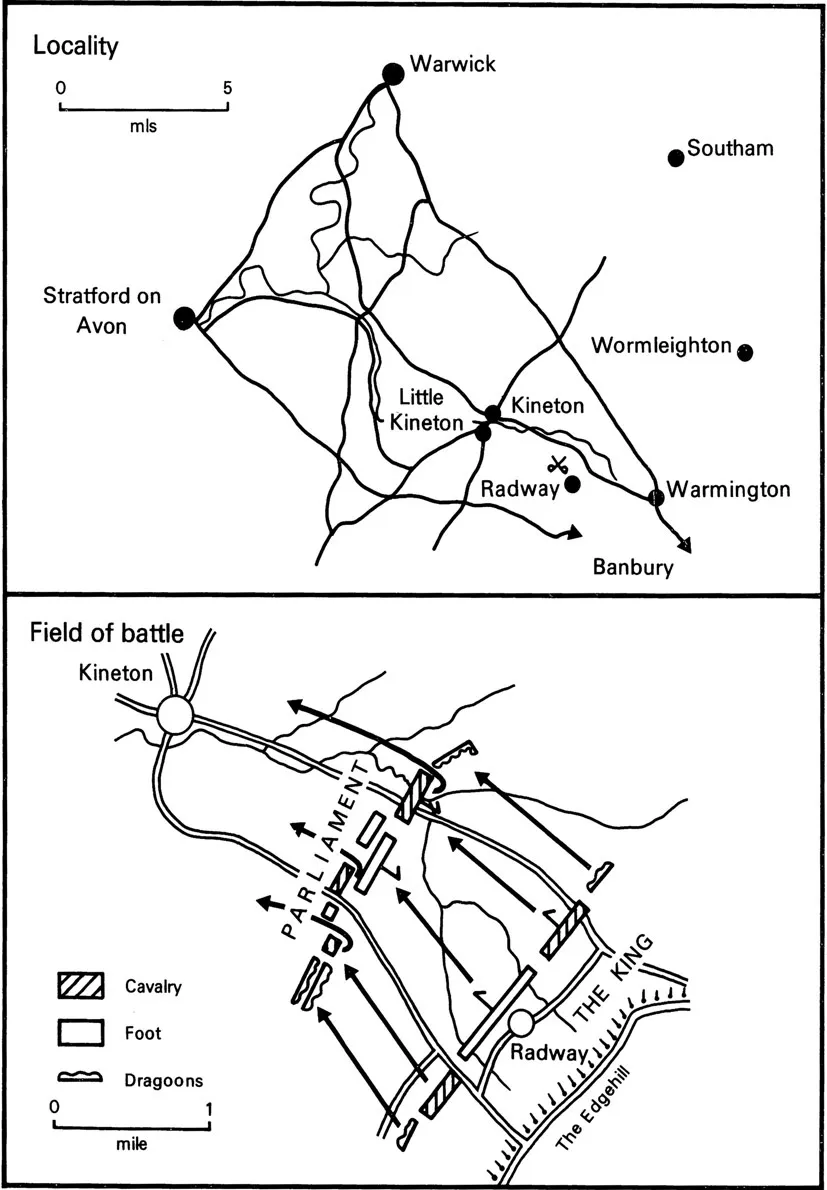
Battle between the two armies was inevitable, but the time and place a matter of chance. From the bare Edgehill a plain ran down towards Kineton township, giving the royalist commanders overall view of the field, but obstructed by enclosures near Kineton itself. Prince Rupert rode to the ridge early in the morning, his cavalry were in place shortly before noon, and the infantry came into position by about two o’clock. Essex’s surprise may be indicated by the fact that the royal army was now drawn up between him and London, the position in which the earl had sought to put himself. Nevertheless, the King could not advance with Essex left unharmed in his rear. The earl was advised of the royalist dispositions by eight in the morning, but his own army was strung out in various quarters, and he was in no hurry to fight. Reinforcements were also anticipated. If the worst came to the worst he could fall back on Warwick, whilst Banbury garrison remained unmolested.
The leisurely way in which battle was prepared for allowed time for the rival commanders to concentrate upon tactics, many of the royalists at least having had considerable European war experience. Prince Rupert succeeded in offending the King’s Lord General, the earl of Lindsey, in an argument about the merits of employing the Dutch or Swedish tactical plans: Lindsey resigned and went to join his regiment as a mere colonel, when the King supported Rupert. The Prince then moved to join the royalist right wing of cavalry, whilst Henry Wilmot commanded the left. After a desultory cannonade from both sides causing few casualties but much smoke and noise, royalist dragoons moved forward to clear parliamentarian musketeers from hedges on the flanks of the parliamentary army, and then Rupert advanced his wing. The cavalry opposed to him, that of Sir James Ramsey, at first stood stock still, then turned and fled after one of their troops changed sides. Rupert advanced into Kineton where there was considerable killing, whilst his second line under Sir John Byron, galloped off wildly in pursuit of the fugitives. On the left, Wilmot’s cavalry scattered the regiment of Lord Feilding, and Wilmot’s second in command, Lord Digby, imitated Byron, giving pursuit with gusto. Thus the bulk of the royalist cavalry to all intents and purposes galloped off the field.
The royalist foot advanced under Sir Jacob Astley, and the parliamentary foot under Charles Essex broke before they engaged. Fresh troops under Thomas Ballard filled the gap, and two cavalry units, unaffected by Rupert’s or Wilmot’s charges, were brought into use against Astley’s infantry. There was general disruption as some of the parliamentary horse succeeded in reaching and disabling some of the royalist artillery in the rear, but they soon fell back, only to be fired upon by their own men who mistook them for royalists.
The earl of Essex launched a severe assault on the brigade of Sir Nicholas Byron, and in this fighting the earl of Lindsey was killed, his son standing guard over the body until he fell into parliamentary hands. The royal standard was cut from the hands of its bearer, Sir Edmund Verney, and carried away. A royalist charge under Sir Charles Lucas became caught up in the pursuit of fugitives, and came to nothing. Captain John Smith, separated from Lucas’s formation, ran into a party of parliamentarian soldiers carrying the royal standard away, attacked single-handed and recaptured the flag. Meanwhile, meeting resistance from some parliamentarian forces, Prince Rupert’s cavalry began to drift back to the battlefield, and their presence caused the infantry to stiffen. Despite advice to the contrary, Rupert chose not to charge again, and night fell on what is generally considered to have been a stalemated battlefield, where total losses were about 3,000 men in all. On the day following, the earl of Essex retreated to Warwick, leaving the road to London wide open to the King’s army. In essence, if he could now capitalise upon it, Charles I had won a strategic advantage.
MAP 6
1642–1643: War in Yorkshire and the North-East

From the summer of 1642, Northumberland and Durham were firmly under royalist control, and until 1644 Yorkshire was the scene of actual fighting. When the King left York, the royalist commander, the earl of Cumberland, proved himself loyal but incapable of resisting the Fairfaxes and their allies. Until December 1642, the royalists were on the defensive, but as a result of an agreement between Yorkshire royalists and the earl of Newcastle, the latter marched into the county in that month to take overall control. He brought a well disciplined and well trained army, and the parliamentary forces hovered around their strongholds — Scarborough, Hull and the West Riding cloth towns — instead of raiding at will. The earl’s objective was ostensibly to destroy resistance in the county, and then march south towards London in support of the King’s army. To this end he set up major garrisons to divide Hull from the cloth towns, and pushed down into Lincolnshire and Nottinghamshire. On 23 January 1643, however, Sir Thomas Fairfax struck back, taking Leeds. The earl was deflected for a while by the arrival at Bridlington of the Queen with arms and munitions for the main army, but her arrival led to the defection of Sir Hugh Cholmeley from the Parliament, and Scarborough passed into royalist hands. In Hull, the Hothams were thought to be considering a similar move. Lord Fairfax consolidated around Leed...
Table of contents
- Cover
- Half Title
- Title Page
- Copyright Page
- Original Title Page
- Original Copyright Page
- Contents
- Introduction
- Map 1 Scotland in 1639—1640 and the Bishops’ Wars
- Map 2 Flashpoints of Civil War in the Summer of 1642
- Map 3 1642: Prelude to Edgehill
- Map 4 The Battle of Edgehill, 23 October 1642: Locality
- Map 6 1642-1643: War in Yorkshire and the North-East
- Map 7 1642-1643: War in Lancashire and the North-West
- Map 8 1642-1643: War in the East and East Midlands
- Map 9 1642-1643: War in the Centre
- Map 10 1642-1643: War in the West
- Map 11 1643: Roundway Down and the Fall of Bristol
- Map 12 1642-1643: War in Wales and the Borders
- Map 13 The Military Situation in Late 1643
- Map 14 War in the North: The Scottish Invasion, January to April 1644
- Map 15 1644: War in Cheshire and the Relief of Newark
- Map 16 War in the North: Fighting in Yorkshire, January to April 1644
- Map 17 1643-1644: The Fight Against Essex and Waller
- Map 18 The Battle of Cheriton, 29 March 1644: Locality
- Map 20 1644: The Campaigns of the Oxford Army, to July
- Map 21 1644: The Siege of York and War in the North-East
- Map 22 1644: Rupert’s Relief March to York
- Map 23 The Battle of Marston Moor, 2 July 1644: Locality
- Map 25 1644: The Campaign to Lostwithiel, July to September
- Map 26 Events Leading to the Second Battle of Newbury
- Map 27 The Second Battle of Newbury, 27 October 1644: Locality
- Map 29 The Military Situation in Late 1644
- Map 30 Developments in Early 1645
- Map 31 The Campaigns of the Marquess of Montrose
- Map 32 1644-1645: The War in the North
- Map 33 1645: The Naseby Campaign
- Map 34 The Battle of Naseby, 14 June 1645: Locality
- Map 36 1645: War in the West and the Battle of Langport
- Map 37 1644-1645: The Risings of the Clubmen
- Map 38 The Fall of Bristol and the Marches of the King
- Map 39 The End of the War: The Battle of Torrington, 16 February 1646
- Map 40 The King, the Scots and the Discontented Army
- Map 41 1648: The Second Civil War: Royalists and Ex-parliamentarians
- Map 42 1648: The Second Civil War: The Royalists and the Scots
- Pride’s Purge and the King’s Execution
- Map 43 1641-1649: Civil War in Ireland
- Map 44 1649-1650: Cromwell in Ireland
- Map 45 The Rump Parliament and Interregnum Government
- Map 46 1650-1651: The Outbreak of the Third Civil War
- Map 47 1650: The Dunbar Campaign
- Map 48 The Battle of Dunbar, 3 September 1650 and Its Aftermath
- Map 49 1651: The Worcester Campaign
- Map 50 The Battle of Worcester, 3 September 1651: Locality
- Map 52 The Flight of Charles II after Worcester
- Map 53 Royalist Conspiracy and the Risings of 1655
- Map 54 The Rule of the Major Generals
- Map 55 1659: Sir George Booth’s Rising
- Map 56 1660: George Monck’s March South and the Restoration of Charles II
- Bibliography
- Index
Frequently asked questions
Yes, you can cancel anytime from the Subscription tab in your account settings on the Perlego website. Your subscription will stay active until the end of your current billing period. Learn how to cancel your subscription
No, books cannot be downloaded as external files, such as PDFs, for use outside of Perlego. However, you can download books within the Perlego app for offline reading on mobile or tablet. Learn how to download books offline
Perlego offers two plans: Essential and Complete
- Essential is ideal for learners and professionals who enjoy exploring a wide range of subjects. Access the Essential Library with 800,000+ trusted titles and best-sellers across business, personal growth, and the humanities. Includes unlimited reading time and Standard Read Aloud voice.
- Complete: Perfect for advanced learners and researchers needing full, unrestricted access. Unlock 1.4M+ books across hundreds of subjects, including academic and specialized titles. The Complete Plan also includes advanced features like Premium Read Aloud and Research Assistant.
We are an online textbook subscription service, where you can get access to an entire online library for less than the price of a single book per month. With over 1 million books across 990+ topics, we’ve got you covered! Learn about our mission
Look out for the read-aloud symbol on your next book to see if you can listen to it. The read-aloud tool reads text aloud for you, highlighting the text as it is being read. You can pause it, speed it up and slow it down. Learn more about Read Aloud
Yes! You can use the Perlego app on both iOS and Android devices to read anytime, anywhere — even offline. Perfect for commutes or when you’re on the go.
Please note we cannot support devices running on iOS 13 and Android 7 or earlier. Learn more about using the app
Please note we cannot support devices running on iOS 13 and Android 7 or earlier. Learn more about using the app
Yes, you can access Atlas of the English Civil War by Peter Newman in PDF and/or ePUB format, as well as other popular books in History & British History. We have over one million books available in our catalogue for you to explore.