Creating Games with Unity, Substance Painter, & Maya
eBook - ePub

Creating Games with Unity, Substance Painter, & Maya

Models, Textures, Animation, & Code

  1. 746 pages
  2. English
  3. ePUB (mobile friendly)
  4. Available on iOS & Android
eBook - ePub

Creating Games with Unity, Substance Painter, & Maya

Models, Textures, Animation, & Code

Book details
Book preview
Table of contents
Citations

About This Book

This tutorial-based book allows readers to create a first-person game from start to finish using industry-standard (and free to student) tools of Unity, Substance Painter, and Maya. The first half of the book lays out the basics of using Maya and Substance Painter to create game-ready assets. This includes polygonal modeling, UV layout, and custom texture painting. The book then covers rigging and animation solutions to create assets to be placed in the game, including animated first-person assets and motion-captured NPC animations. Finally, readers can put it all together and build interactivity that allows the player to create a finished game using the assets built and animated earlier in the book.

• Written by industry professionals with real-world experience in building assets and games

• Build a complete game from start to finish

• Learn what the pros use: construct all assets using the tools used at game studios across the world

• All software used are free to students

• When complete, students will have a playable version of an FPS game

Jingtian Li is a graduate of China's Central Academy of Fine Arts and New York's School of Visual Arts, where he earned an MFA in Computer Art. He currently is an Assistant Professor of 3D Animation & Game Design at the University of the Incarnate Word in San Antonio, Texas.

Adam Watkins is a 20-year veteran of 3D education. He holds an MFA in 3D Animation and a BFA in Theatre Arts from Utah State University. He currently is the Coordinator and Professor of the 3D Animation & Game Department at the University of the Incarnate Word in San Antonio, Texas.

Kassandra Arevalo is an instructor of 3D Animation & Game Design at the University of the Incarnate Word in San Antonio, Texas. She previously worked as an animator at Immersed Games.

Matt Tovar is an industry veteran animator. He has worked at Naughty Dog, Infinity Ward, and Sony Interactive on such games as The Last of Us, Call of Duty: Modern Warfare, and most recently Marvel's Avengers with Crystal Dynamics. He is an Assistant Professor of 3D Animation at the University of the Incarnate Word in San Antonio, Texas.

Frequently asked questions

Simply head over to the account section in settings and click on “Cancel Subscription” - it’s as simple as that. After you cancel, your membership will stay active for the remainder of the time you’ve paid for. Learn more here.
At the moment all of our mobile-responsive ePub books are available to download via the app. Most of our PDFs are also available to download and we're working on making the final remaining ones downloadable now. Learn more here.
Both plans give you full access to the library and all of Perlego’s features. The only differences are the price and subscription period: With the annual plan you’ll save around 30% compared to 12 months on the monthly plan.
We are an online textbook subscription service, where you can get access to an entire online library for less than the price of a single book per month. With over 1 million books across 1000+ topics, we’ve got you covered! Learn more here.
Look out for the read-aloud symbol on your next book to see if you can listen to it. The read-aloud tool reads text aloud for you, highlighting the text as it is being read. You can pause it, speed it up and slow it down. Learn more here.
Yes, you can access Creating Games with Unity, Substance Painter, & Maya by Jingtian Li, Adam Watkins, Kassandra Arevalo, Matthew Tovar in PDF and/or ePUB format, as well as other popular books in Computer Science & Programming Games. We have over one million books available in our catalogue for you to explore.

Information

Publisher
CRC Press
Year
2021
ISBN
9781000282016
Edition
1

CHAPTER 1

Maya Modeling
We will jump into the production by discussing modeling. 3D models are the foundation of the graphics of modern games. They encompass the environment and characters you see on the screen. An eye-catching visual is one of the key components for a game to succeed. In this chapter, we will discuss in detail about how they are built.

Basics of Navigation

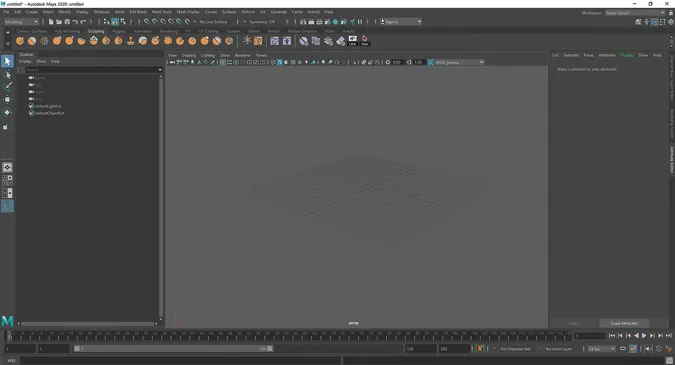
Autodesk Maya will be our tool of choice for modeling. It is not the best modeling tool on the market, but it is the most used over the entire production pipeline, especially for animation. So, let us get Maya up and running on your machine. The UI (user interface) will look like Figure 1.1. The large region in the middle of the UI is the viewport; this is where we see our models. It is currently empty, with just a grid in the middle to indicate the center of the world. The center of this grid is called the origin.
image
FIGURE 1.1 Maya’s user interface. The origin is the area at the center of the grid.
To Navigate around the viewport, hold down Alt key and drag the left-mouse button to look around the viewport. To zoom in and out, hold down the Alt key and drag the right-mouse button. To pan left and right, hold down the Alt key and drag the middle-mouse button.
A 3D space has width, height, and depth, each represented on three axes called the X, Y, and Z axes. The lower left corner of the viewport shows the directions of these axes.

Rendering

The shape is drawn by the Graphic API, but the lighting is calculated by the Fragment Shader written by the game engine programmer. It is a complicated process, and we do not have to understand the details and math behind it. It is enough to know that the renderer is the tool drawing whatever you see on screen. Maya’s interactive renderer (that shows you what is currently in your scene) is called Viewport 2.0.

What is a 3D Model?

In the menus, go to Create->Polygon Primitives->Plane. This will create a shape in the middle of the viewport. On the right side of the UI, look for the Channel Box. This is a brief list of essential attributes we can tweak for the object. Under the INPUTS section, click on the polyPlane1 to open it and change the Subdivisions Width and Subdivisions Height to 1 to make the plane only one polygon (sometimes called a “face”).
What we are seeing now is the building block of any model – a face with four corners that we typically call a rectangle in geometry classes; in 3D graphic terms, we call this a quad. Any complicated shape can be composed by assembling many quads together to create 3D forms.

Translation

On the right side of the UI, there is a column of manipulation tools. You can try and use the Q, W, E, and R buttons to switch between these tools: Q for the select tool, W for the move tool, E for the rotation tool, R for the scale tool.
To select the model, simply left-click on it or drag a selection box over it. To deselect the model, click in the empty space, or hold down Ctrl and click on the model, or drag a selection box over it.
To move the model, after selecting it, hit the W button. This will display new handles (called gizmos) that will allow you to move the object. Try dragging the various arrows to move it only along a particular axis. Look carefully at the gizmo, and you will see squares that can be dragged to move it along two axes at the same time; you can even drag the cyan square in the middle to move it freely along all axes in the 3D space.
To rotate the model, after selecting it, hit the E button, drag the circles on the gizmo to rotate it around different axes. You can also drag the yellow one on the outside to rotate it around a plane that is perpendicular to the angle of the viewport.
To scale the model, hit the R button, and drag the various boxes to scale it along their respective axes. You can also drag the various squares to scale it along two axes at the same time; you can even drag the yellow box in the middle to scale it up along all axes, essentially making it bigger.
There are more tricks about this sort of manipulation that we will cover later on when we jump into modeling.

Anatomy of a Model

Edge

Hold down the right mouse button on the model, and you will see a pop-up menu we call a Marking Menu. Here, we can see various parts of the form we can switch to. With the marking menu active, slide up and chose Edge; the four edges around the face now appear to be in a lighter blue color. You can click on any of the edges to select them. When an edge is selected, it will be highlighted with orange color. Once selected, you can change to the Move tool (hit W on the keyboard) and drag the three arrows to move the edge along the respective direction.

Vertex

You can also hold the right mouse button again and chose Vertex. Four purple points will show up on the corner of this face. These are the vertices where edges meet. You can click to select any of them and move them around just like how you can move an edge.

Face

Hold down the right mouse button again and chose Face; you can now select the face and move it around as well.
Edge, Vertex, and Face are the three important elements of any 3D form’s polygons. We can add and tweak these elements to create any shape we want.

Object Mode

Hold down the right mouse button again. This time, we chose Object Mode. This will allow us to move the model altogether. Object, Vertex, Edge, and Face are the primary modes we keep switching between while making a model.

Normal

Use the alt-left, -middle, and/or -right mouse drag to rotate your camera to look at the bottom of the face. You can see it appears to be black. Any face in 3D has a front side and a back side. The front side will appear normal, while the back side will be black or invisible (depending on the rendering engine). Maya makes the back of the face black in the default setting. To view this, using the top menus find Display->Polygons->Face Normals.
Press the Q button to switch to the select mode to get rid of the Move tool handles. We can now see a green line sticking out from the front face of the model. In general, the front of the polygon should face outwards. It is possible though to render both sides of the face. Consider a situation like rendering a piece of paper. Here we would definitely want both sides of the polygons seen, but otherwise we want to avoid rendering both sides, if possible, to avoid performance ...

Table of contents

  1. Cover
  2. Half Title
  3. Title Page
  4. Copyright Page
  5. Dedication
  6. Table of Contents
  7. Acknowledgments
  8. Authors
  9. Introduction
  10. Chapter 1: Maya Modeling
  11. Chapter 2: Maya Set UV
  12. Chapter 3: Set Texturing
  13. Chapter 4: Unity Asset Creation
  14. Chapter 5: Unity Level Creation
  15. Chapter 6: Lighting and Baking
  16. Chapter 7: Character Modeling
  17. Chapter 8: UV Mapping
  18. Chapter 9: Character Texture Painting
  19. Chapter 10: Rigging
  20. Chapter 11: FPS Animation in Maya
  21. Chapter 12: Auto Rigging
  22. Chapter 13: Introduction to C#
  23. Chapter 14: FPS Animations
  24. Chapter 15: Raycasting and Render Textures
  25. Chapter 16: Weapons
  26. Chapter 17: AI
  27. Chapter 18: Health and Inventory
  28. Chapter 19: UI
  29. Chapter 20: Boss Battle
  30. Index