One of the hottest consumer trends is the new importance on outdoor living, and nothing brings the outdoor home to life like a greenhouse and other accessories to help grow and nurture landscape greenery. This book has plans and step by step for constructing and appointing greenhouses of several varieties, from glass-wall to hoophouse; some from kits, some from scratch; also includes plans and steps for other garden structures and accessories. Includes projects suitable to homes and landscapes of all types—urban, suburban, and rural.
Trusted by 375,005 students
Access to over 1.5 million titles for a fair monthly price.
In this section you’ll find thirty DIY projects to meet your gardening needs and make your hobby a more pleasant pursuit. You’ll also find that each project remains true to the homegrown spirit of gardening in more than one way: Not only are the materials and construction simple and inexpensive, but most of the designs are also highly customizable, so you can alter the given dimensions and details to suit your needs. If the trellis we show is better sized for pole beans than for the melons you want to grow, simply change the dimensions of the parts that matter to create something that fits just right.
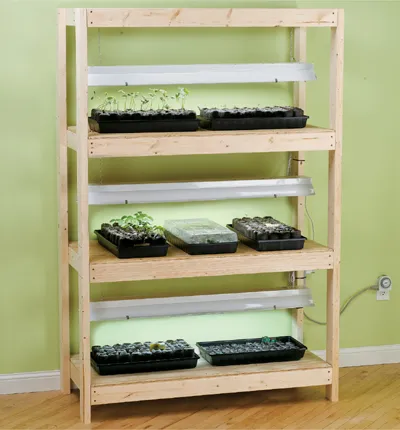
Seed Starter Rack
A seed starter rack provides a spot for you to germinate seeds and grow seedlings indoors, any time of the year (in particular, immediately before the start of the outdoor growing season). Starting your own seeds can save money over buying established plants each growing season. And in many cases, it also lets you grow less-common varieties that might not be locally available in plant form.
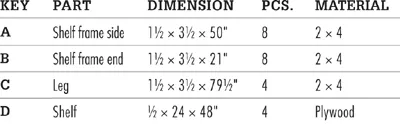
This simple starter rack is perfect for a basement or utility room. The basic structure is built with 2 × 4s and has shelves made from 1/2" plywood. Plants that need the warmest temperatures should go on the upper shelf.
Each shelf of the rack measures 24 × 48"—plenty of room for four full-size seedling flats. Two fluorescent shop lights illuminate each shelf and are fully height-adjustable so you can raise or lower them as needed to provide plants with the right amounts of light and heat at different stages of development (see page 38 for tips on choosing light bulbs for your fixtures). Because seeds and seedlings can require as much as 20 hours of light per day, it’s most convenient to control the lights with an automatic timer. This should be plugged into a GFCI-protected receptacle, due to all of the water used in the area. Even so, it’s best to remove flats before misting or watering, to keep water away from the lights.
As with many projects in this book, you can easily modify the dimensions of the rack as shown to suit your specific needs. For a smaller unit, switch to 2-ft. or 3-ft. lights and re-size the shelves accordingly, or make the shelves half as deep and use a single fixture for each. For a larger rack, you can make the shelves square and hang four 4-ft. lights over each shelf. Another option is to bypass the construction and use a store-bought shelving unit for the basic structure (see Variation, below).
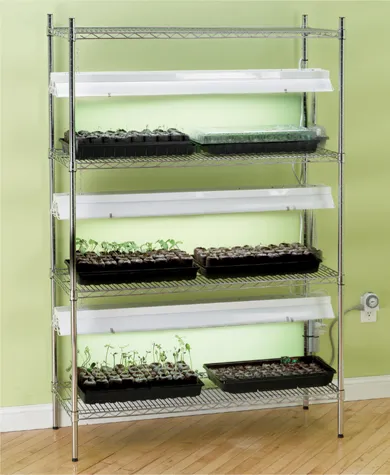
This easy-to-build starter rack (left) holds up to 12 full-size seedling flats or trays and can be located practically anywhere with an accessible electrical outlet. The top shelf offers a handy space for storing extra flats and other supplies. Wire utility shelving (above) offers an easy-to-assemble alternative to building your own rack. Most inexpensive units are only 14" deep and can accommodate one row of seedling flats per shelf. Use one or two light fixtures above each shelf, as appropriate for your needs.
Seed Starter Rack
Tools & Materials
Circular saw
Drill/driver
Framing square
(2) 10-ft. 2 × 4
(8) 8-ft. 2 × 4
(1) 1/2" × 4 × 8 ft. plywood
3-1/2", 2-1/2" and 1-5/8" deck screws
(3) 48" fluorescent light fixtures with two 40W lamp capacity and plug-in cord
Chain (10 linear ft.)
(6) s-hooks
Grounded power strip
Grounded automatic timer
Eye and ear protection
Work gloves
Cutting List
How to Build a Seed Starter Rack
Cut all of the wood parts for the shelf frames, using a circular saw or power miter saw. Cut one shelf frame side and two shelf frame ends from each of four 8-ft. 2 × 4s, and cut the remaining four shelf frame sides from two 10-ft. 2 × 4s. Cut each of the four legs from an 8-ft. 2 × 4.
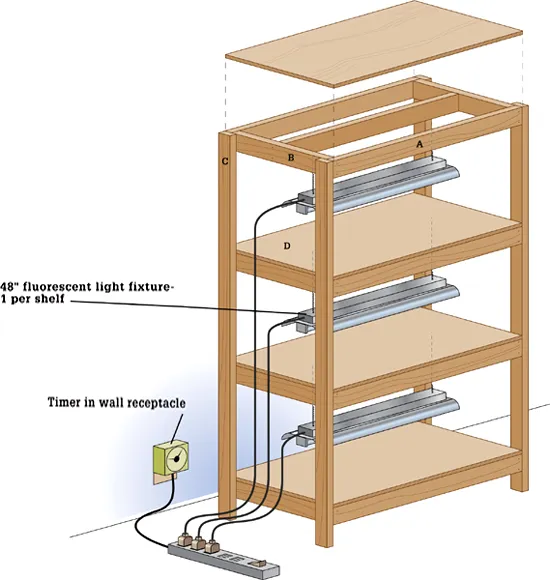
Assemble the shelf frames with 3-1/2" deck screws. Position the side pieces of each frame over the ends of the end pieces and so their top edges are flush. Drill pilot holes and drive two screws through the sides and into the ends. Complete all four shelf frames using the same technique.
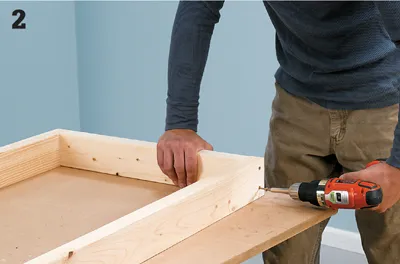
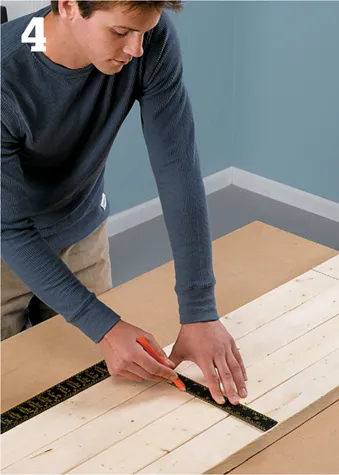
Add the shelves. Cut four shelves at 24 × 48", using a circular saw and straightedge cutting guide. Check each shelf frame with a framing square, then lay the shelf over the top so it’s centered side-to-side and end-to-end. Fasten the shelf to the frame with 1-5/8" deck screws.
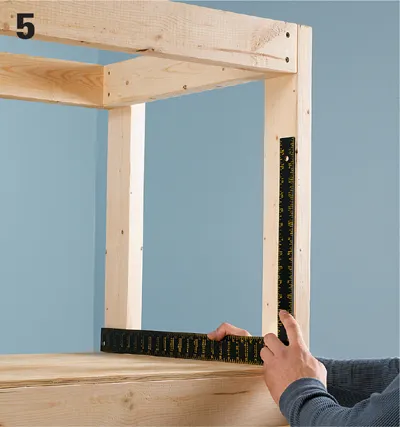
Mark the shelf locations onto the legs. Measuring from the bottom of one leg, make marks at 7-1/2", 31-1/2", and 55-1/2". These marks represent the top edges of the shelves; the top shelf is installed flush with the top ends of the legs. Use the framing square to transfer the layout marks to the remaining three legs.
Fasten the shelves to each leg with two 2-1/2" deck screws driven through the shelf ends and into the legs. The top edges of each shelf should be on its layout marks (or flush with the ends of the legs), and the front and rear sides should be flush with the outside edges of the legs. Use a square to make sure the shelf and legs are perpendicular before fastening.
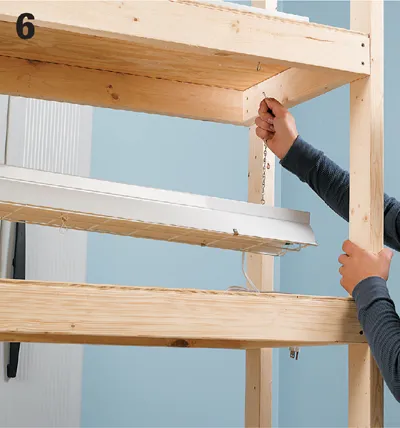
Hang the light fixtures, using chain and S-hooks. Cut the chain into 18" lengths, using wire cutters, and attach each to one end of each fixture, using S...
Table of contents
Cover
Title Page
Contents
Introduction
Greenhouses
Garden Projects
Credits
Resources
Index
Copyright Page
Frequently asked questions
Yes, you can cancel anytime from the Subscription tab in your account settings on the Perlego website. Your subscription will stay active until the end of your current billing period. Learn how to cancel your subscription
No, books cannot be downloaded as external files, such as PDFs, for use outside of Perlego. However, you can download books within the Perlego app for offline reading on mobile or tablet. Learn how to download books offline
Perlego offers two plans: Essential and Complete
Essential is ideal for learners and professionals who enjoy exploring a wide range of subjects. Access the Essential Library with 800,000+ trusted titles and best-sellers across business, personal growth, and the humanities. Includes unlimited reading time and Standard Read Aloud voice.
Complete: Perfect for advanced learners and researchers needing full, unrestricted access. Unlock 1.5M+ books across hundreds of subjects, including academic and specialized titles. The Complete Plan also includes advanced features like Premium Read Aloud and Research Assistant.
Both plans are available with monthly, semester, or annual billing cycles.
We are an online textbook subscription service, where you can get access to an entire online library for less than the price of a single book per month. With over 1.5 million books across 990+ topics, we’ve got you covered! Learn about our mission
Look out for the read-aloud symbol on your next book to see if you can listen to it. The read-aloud tool reads text aloud for you, highlighting the text as it is being read. You can pause it, speed it up and slow it down. Learn more about Read Aloud
Yes! You can use the Perlego app on both iOS and Android devices to read anytime, anywhere — even offline. Perfect for commutes or when you’re on the go. Please note we cannot support devices running on iOS 13 and Android 7 or earlier. Learn more about using the app
Yes, you can access Black & Decker The Complete Guide to Greenhouses & Garden Projects by Philip Schmidt in PDF and/or ePUB format, as well as other popular books in Biological Sciences & Urban Planning & Landscaping. We have over 1.5 million books available in our catalogue for you to explore.