eBook - ePub
Available until 22 Apr |Learn more
How to Draw from Photographs
Learn how to make your drawings "picture perfect"
This book is available to read until 22nd April, 2026
- 64 pages
- English
- ePUB (mobile friendly)
- Available on iOS & Android
eBook - ePub
Available until 22 Apr |Learn more
About this book
Photographs are valuable reference tools that most artists use. Complex subjects are generally easier to draw from photos—plus other factors, such as weather, movement, and lighting, can make drawing from life nearly impossible. Children and animals, for example, rarely sit still when you want them to, making it much easier to draw them from photographs. However, many beginning artists aren't confident in their picture-taking skills, or they don't know how to translate their photos into drawings. That's where this innovative book comes in! In no time, beginning artists will be drawing animals, people, landscapes, and still lifes that look real enough to reach out and touch!
Tools to learn more effectively

Saving Books

Keyword Search

Annotating Text

Listen to it instead
Information
Understanding the Subject’s Context
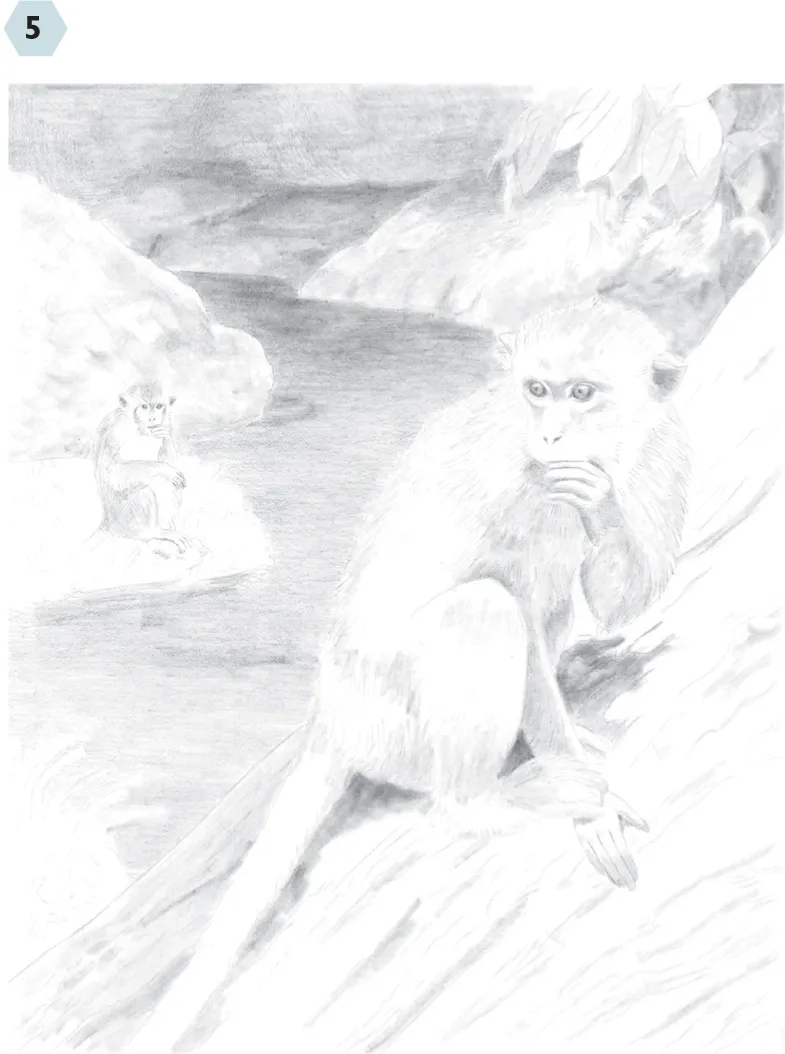
Creating a realistic drawing is about more than proportion and perspective. You could have a perfectly rendered polar bear with exact anatomy and detail—but if you place it on a beach, the viewer isn’t going to find a lot of believability in your portrait! That’s why it’s important to understand the context of your subject, whether it’s an object, a person, or an animal, like the Crab-Eating Macque that’s the focus of this lesson.


Doing Your Homework Zoos are a great place to observe animals, because the keepers typically create environments that reflect natural habitats. I took a lot of photos of the rocks and water surrounding this monkey at the zoo. But I also researched the monkey, finding out about its native habitat in Southeast Asia and confirming the relevance of the water and rocks. I also learned that it’s a very social animal, so I decided to include a second monkey.
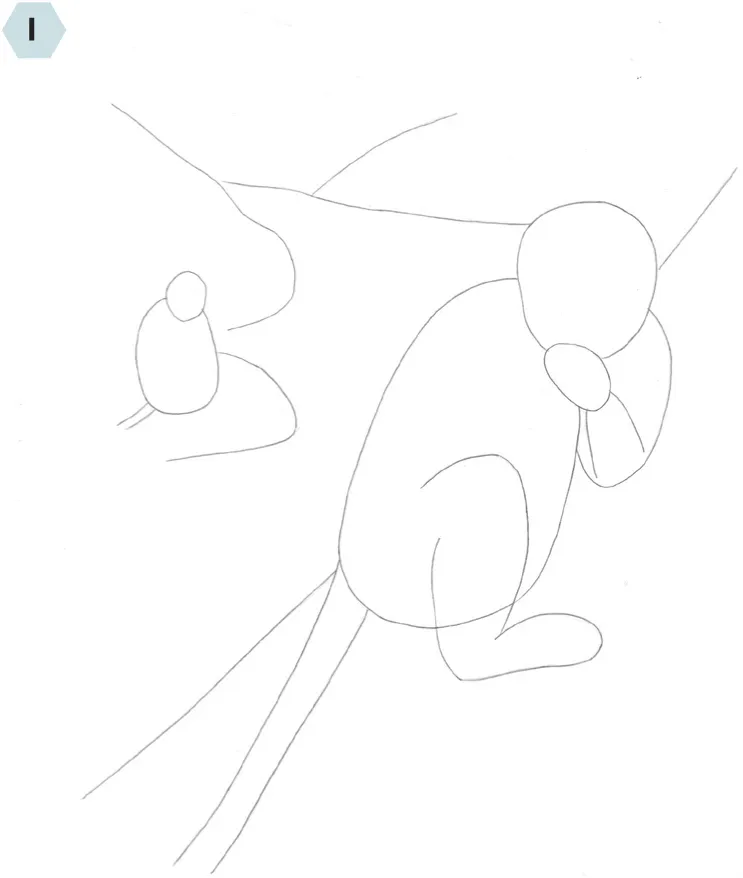
Step One I start the main monkey: two oval shapes for the head and body, a simple outline of the arms and legs—with an oval to represent the hand—and the tail. I also indicate the tree, background rocks, and water with a few simple lines. For the background monkey, I draw two ovals in proportion to both each other and the main monkey.
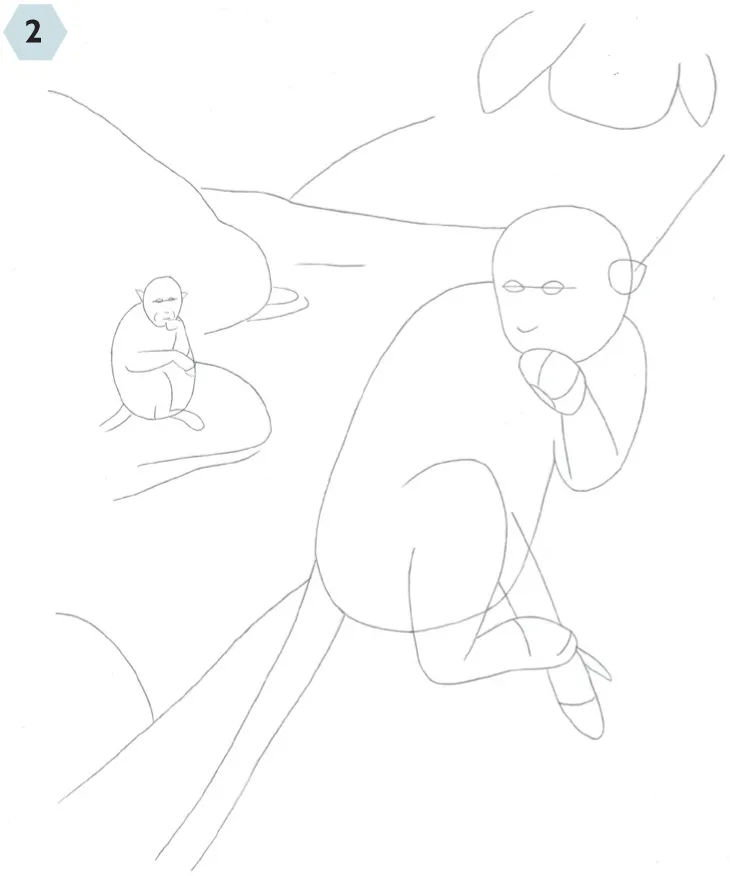
Step Two Now, I add a little more detail to the outline. I make a line on each monkey to establish the position and angle of the eyes, which I draw in as small almond shapes. I add the ears and indicate the position of the nose. I also block in the other arm of the main monkey. Then, I add curved lines to indicate where the hands and feet bend.

Step Three I lay a heavyweight tracing paper over my initial sketch and begin to redraw the monkeys, refining the shapes of the bodies as I go. I create a more natural outline by interrupting the figures with a few short lines of hair texture. Then I work in a little detailing, focusing first on the eyes, nose, and ears, and then on the fingers and toes. With long strokes, I indicate a little texture on the tree, and I also add leaves, lines for the water, and rock outlines in the background.
In some photos, it can be a challenge to see the direction or the pattern of hair growth well enough to depict it in your drawing. But not to worry, you can look for other photos of the same species as a reference. Using that resource, you can create a diagram of the hair growth to work from.
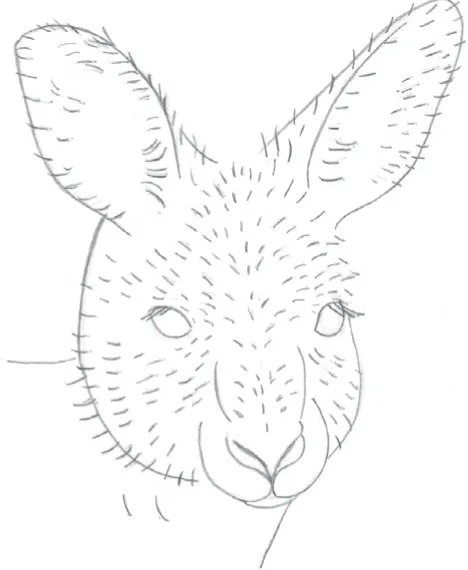
In this example, I drew the outline of the head before carefully studying the pattern of the hair, which I depicted with short lines showing the direction of growth for the individual hairs.
Details matter when you’re depicting animals. Unfortunately, photos don’t always do justice to smaller features, like hands and feet. When I’m visiting the zoo, I always take many detail shots of the animals so I’ll have reference material on hand when I need it.
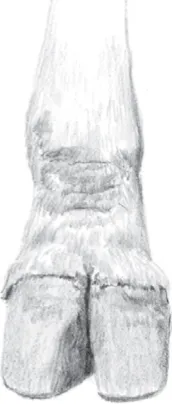
Animals with hooves, demonstrated by this giraffe, often will use their feet to protect themselves.
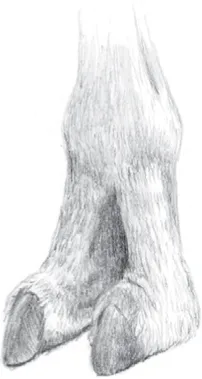
Animals don’t all have the same number of toes—this llama has two, plus a large pad for gripping purposes.
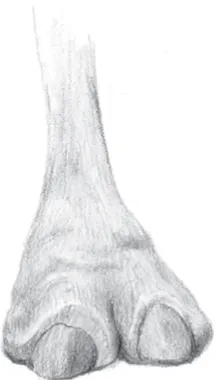
The camel likewise has toes instead of a hoof, with a very large pad to help the animal walk across sand.

Step Four Before continuing, I transfer my drawing to Bristol paper. Next, I lay in a base tone using a large stump and stroking in the direction of the hair growth on the monkeys. With the stump’s tip, I tone the eyes and ears. I switch to the stump’s side for the tree. Then, I make irregular strokes, both circular and straight, to tone the rocks. Finally, I use horizontal strokes for the water, which gets a deeper tone along with the rocks and tree.
Step Five For tone on the monkeys, I use the side of a 2B, making short strokes and following the direction of growth where applicable. To define the facial features, I use the point of the pencil. Then I add darker texture to the tree with back and forth strokes that are at the same angle as the tree; irregular lines indicate the bark. Next I use the side of a 4B to shade the water with horizontal strokes. And I add texture and tone to the rocks by applying irregular strokes with the side of a 4B.

Step Six Because the background is so dark, I’m going to concentrate on bringing it closer to its final value rather than developing the whole drawing at once. Applying heavy pressure and making circular strokes with the side of an 8B, I build up the tone of the rocks. For the crevices, I use heavier pressure to create a very dark value. I use the 6B and horizontal strokes to build up the water; where the water meets the rocks, I further deepen the tone. And for the rock behind the monkey, I lift out additional texture.

Step Seven Now I build up the hair texture, switching between the side and point of the 2B while creating short strokes that follow the direction of growth. I use a kneaded eraser to pick out white hairs. Next, I shade the faces using delicate strokes applied with the side of the 2B. I add detail to the eyes using both the HB and 2B pencils. Then I further refine the ears, hands, and feet. With the side of the 4B, I add texture to the tree, stroking in the direction of the bark. I also use the point of the 2B to add grass to the small island.
Table of contents
- Cover
- Title Page
- Contents
- Introduction
- Tools and Materials
- Camera Equipment
- Taking the Photo
- Fixing Distortion
- Understanding Lighting
- Approaching the Drawing
- Composition Basics
- Drawing Techniques
- Developing Style
- Staging a Composition
- Contrasting Values for Effect
- Showcasing Light Subjects
- Using a Grid as a Guide
- Working from Nature
- Creating a Softer Feel
- Tricking the Eye
- Understanding the Subject’s Context
- Applying Linear Perspective
- Achieving Depth
- Selecting the Best Format
- Bringing It All Together
- A Note of Encouragement
- Copyright Page
Frequently asked questions
Yes, you can cancel anytime from the Subscription tab in your account settings on the Perlego website. Your subscription will stay active until the end of your current billing period. Learn how to cancel your subscription
No, books cannot be downloaded as external files, such as PDFs, for use outside of Perlego. However, you can download books within the Perlego app for offline reading on mobile or tablet. Learn how to download books offline
Perlego offers two plans: Essential and Complete
- Essential is ideal for learners and professionals who enjoy exploring a wide range of subjects. Access the Essential Library with 800,000+ trusted titles and best-sellers across business, personal growth, and the humanities. Includes unlimited reading time and Standard Read Aloud voice.
- Complete: Perfect for advanced learners and researchers needing full, unrestricted access. Unlock 1.4M+ books across hundreds of subjects, including academic and specialized titles. The Complete Plan also includes advanced features like Premium Read Aloud and Research Assistant.
We are an online textbook subscription service, where you can get access to an entire online library for less than the price of a single book per month. With over 1 million books across 990+ topics, we’ve got you covered! Learn about our mission
Look out for the read-aloud symbol on your next book to see if you can listen to it. The read-aloud tool reads text aloud for you, highlighting the text as it is being read. You can pause it, speed it up and slow it down. Learn more about Read Aloud
Yes! You can use the Perlego app on both iOS and Android devices to read anytime, anywhere — even offline. Perfect for commutes or when you’re on the go.
Please note we cannot support devices running on iOS 13 and Android 7 or earlier. Learn more about using the app
Please note we cannot support devices running on iOS 13 and Android 7 or earlier. Learn more about using the app
Yes, you can access How to Draw from Photographs by Diane Cardaci in PDF and/or ePUB format, as well as other popular books in Art & Art Techniques. We have over one million books available in our catalogue for you to explore.