eBook - ePub
Scroll Saw Wooden Bowls, Revised & Expanded Edition
30 Useful & Surprisingly Easy-to-Make Projects
This is a test
- 250 pages
- English
- ePUB (mobile friendly)
- Available on iOS & Android
eBook - ePub
Scroll Saw Wooden Bowls, Revised & Expanded Edition
30 Useful & Surprisingly Easy-to-Make Projects
Book details
Book preview
Table of contents
Citations
About This Book
While wood bowls are commonly made on a lathe, this newly updated guided resource offers 30 projects for crafting a variety of beautiful bowls with the more accessible scroll saw. The projects are organized in a progressive learning format: beginning crafters can start with the most basic stacked bowl and gradually work their way toward more elaborate laminated wood bowls, multiple-angle bowls, thin wood bowls and more.
Frequently asked questions
At the moment all of our mobile-responsive ePub books are available to download via the app. Most of our PDFs are also available to download and we're working on making the final remaining ones downloadable now. Learn more here.
Both plans give you full access to the library and all of Perlego’s features. The only differences are the price and subscription period: With the annual plan you’ll save around 30% compared to 12 months on the monthly plan.
We are an online textbook subscription service, where you can get access to an entire online library for less than the price of a single book per month. With over 1 million books across 1000+ topics, we’ve got you covered! Learn more here.
Look out for the read-aloud symbol on your next book to see if you can listen to it. The read-aloud tool reads text aloud for you, highlighting the text as it is being read. You can pause it, speed it up and slow it down. Learn more here.
Yes, you can access Scroll Saw Wooden Bowls, Revised & Expanded Edition by Carole Rothman in PDF and/or ePUB format, as well as other popular books in Technologie et ingénierie & Métiers techniques et manufacturiers. We have over one million books available in our catalogue for you to explore.
Information
CHAPTER 1

Cutting the bowls in this book requires tilting your scroll saw table. The angle is determined by width of the rings and the thickness of the stock used.
Bowl Basics
Scrolled bowls are created from concentric rings cut at an angle, then stacked, glued, and sanded to the desired shape. Making a functional and attractive three- dimensional object from a flat piece of wood is quite amazing, not to mention economical. It’s also a perfect way to use up wood you have on hand. This chapter introduces the steps involved in making a scrolled bowl. Although the focus is on bowl basics—the materials, tools, and techniques you’ll need to get started—I’ve included information that will be useful for bowl makers of any skill level who are seeking to improve the quality and variety of their work.

Attention to grain and color helps ensure an attractive bowl.
Choose wood carefully
Examine boards before you buy them. Wood that is cupped, twisted, or otherwise defective is usually no less expensive than perfect pieces with attractive grain.
Choosing the Wood
The first step in making a bowl is choosing the wood. The stock used for scrolled bowls typically varies in thickness from ½” (13mm) to 1” (25mm), depending on wood type and project design. Most of the projects in this book are cut from ¾” (19mm) stock, a thickness generally available wherever hardwood is sold. This thickness accommodates a variety of profiles and angles and is generally easy to cut. Thicker wood is more challenging, requiring a slower feed rate to keep the blade from deflecting and distorting the cut.
It’s hard to resist the temptation to push the wood through the blade, especially if the cut is a long one, but the payoff for feeding the wood slowly is an accurately cut ring that will be far easier to work with. As you gain experience, you’ll learn how to manage thick and dense wood through proper technique and careful blade selection.
Selecting the primary wood
Many types of wood are suitable for scrolled bowls, either by themselves or combined with contrasting woods. I call these “primary woods” to differentiate them from wood best used for decorative accents. Here are some primary woods that are readily available and moderately priced.
Aspen
Although more difficult to find than in past years, it is relatively inexpensive, easy to cut and shape, and, when sanded well and shellacked, looks like ivory or porcelain. It is best used alone, since its softness makes it difficult to sand evenly when combined with harder wood. It is also vulnerable to discoloration from sanding dust and bleeding when combined with strongly colored woods.
Poplar
Inexpensive and easy to cut, popular is attractive when clear and light colored. Avoid pieces with large brownish-green patches, unless deliberately chosen for a special effect.
Cedar
This popular wood comes in many varieties and is easy to cut and sand. However, some types can cause respiratory problems and rashes, and others are prone to brittleness, so be sure you’re familiar with the characteristics of the variety you’re considering.
Mahogany
There are many types of mahogany, varying greatly in cost and beauty. All varieties are easy to cut and sand. Boards with dramatic grain, or with chatoyance (a shimmering quality), are most effective when used by themselves, with simple designs that showcase their beauty.
Maple
Either hard or soft maple is a good choice for a light-colored bowl, or for combining with a darker wood. Since color cast varies, choose your piece carefully to get the effect you want.
Cherry
A longstanding favorite of bowl makers and other woodworkers, cherry is vulnerable to burning when cut. To minimize or prevent this problem, cover the wood with clear or blue tape to lubricate the blade.
Walnut
Slightly more expensive than other common hardwoods, this attractive wood is easy to cut and sand. It also contrasts well with lighter-colored woods, such as cherry and maple.
Oak
Both white and red varieties work as stand-alone woods, or in combination with other hardwoods. Its distinctive grain pattern can produce unusual and dramatic effects when cut at an angle.
Selecting wood for combinations
Whether gluing in strips to create swags or vertical stripes, or layering wood horizontally, there are three factors to keep in mind.
Color contrast
Color contrast can be subtle, as with poplar and cedar, or dramatic, as with walnut and maple. Be aware that even boards from the same species can differ slightly in color. Walnut, for example, can vary from warm brown with a reddish cast to a cooler, brown-gray hue. These differences will become apparent as you try out different wood combinations, and can make one board a more appropriate choice than another. Since the finished color may be difficult to predict, you can preview the final results with an application of mineral spirits.
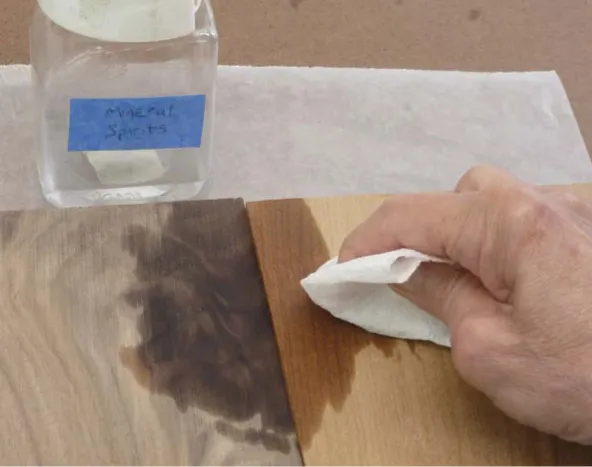
An application of mineral spirits will approximate what the wood will look like when the finish is applied.
Found Wood
Many of the bowls in this book were cut from “found” wood. I’ve rescued large boards of varnish-covered mahogany and teak from an old storage shed, and repurposed hard maple from my sons’ baby dresser. I’ve even done my share of dumpster diving. However, my best discovery was a local cabinet shop whose craftsmen tossed bowl-sized cutoffs of beautiful hardwoods into bins to be used for firewood. They were pleased to find a better use for their cutoffs, and the chance to “talk shop” with experienced professionals was an unexpected bonus. Be creative with your sources. You’ll benefit, and so will the environment.
Hardness
When possible, choose woods that are similar in hardness, like cherry and maple. They will be easier to sand smooth when glued together. Woods that are somewhat softer, like walnut and mahogany, can be combined successfully with slightly harder ones if care is taken to sand them evenly. Avoid great discrepancies in hardness—the beauty of the color combination will most likely be undermined by the uneven finished surface.
Sanding dust migration and color bleeding
The dust from strongly colored accent wood like padauk and redheart can migrate into the pores of adjacent pieces during sanding and discolor the wood. For this reason, it’s generally not wise to pair light-colored, porous wood with strongly colored exotics. However, if your design demands that you do so, vacuuming the workpiece frequently as you sand can often remove the offending dust. Strongly colored wood can also bleed into adjacent areas if the finish is applied too generously. Minimize this likelihood by using light coats of finish. Fortunately, the discolored areas can usually be corrected with an application of the appropriate solvent, and the finish repaired.
Don't be afraid to try new woods and combinations. If you don’t want to commit to a full-size project, make a small prototype to see how the wood cuts and sands. I’ve made my share of “designer sawdust” but have also had some wonderful discoveries—you’ll never know how things will work out unless you try.
Cutting the Rings
All the projects in this book are made from concen...
Table of contents
- Cover
- Title
- Copyright
- Contents
- Introduction: About This Edition
- Chapter 1: Bowl Basics
- Chapter 2: Basic Stacked Bowls
- Chapter 3: Laminated Wood Bowls
- Chapter 4: Multiple-Angle Bowls
- Chapter 5: Thin Wood Bowls
- Chapter 6: Thinking Outside the Bowl
- Appendix: Creating Patterns
- About the author