
- 67 pages
- English
- ePUB (mobile friendly)
- Available on iOS & Android
About This Book
If you've ever wanted to retain more of your royalties or try publishing e-books but didn't know where to start, this book is for you!Recently e-books have exploded onto the publishing scene, making it easier than ever for writers to break into the market. But many people who read e-books aren't familiar with how to create them. What formats should you offer? Where do you sell them? What do you use for a cover? And, most important, how do you go from a Word document to an EPUB, MOBI, or PDF file?Best-selling, multi-published author J.M. Snyder has written this no-nonsense, hands-on guide. She takes the mystery out of e-publishing while making the process of creating an e-book simple, cheap, and easy.Using Microsoft Word (or an equivalent word processing program) along with inexpensive or free software readily available online, you will learn how to create the nine most common e-book formats. You will be walked through cover art design, interior book layout, and e-book creation, as well as given many of the tips J.M. has learned along the way. Also included is a brief guide to online bookstores where you can sell your finished e-book.Let J.M. Snyder help you discover how easy it is to publish yourself!
Frequently asked questions
Information
Nine E-Book Formats
- LIT
- HTML
- EPUB
- PRC & MOBI
- LRF, PDB, & RB
Creating PDF E-Books
- Open your e-book document in Word (or the word processing software program of your choice).
- Click on FILE from the toolbar, then PRINT. DO NOT click on the Print icon on the Standard toolbar, because the program will try to print your file to the computer's default printer. If you have a physical printer installed on your system, chances are that's the default and your e-book will begin printing from the actual printer and not to PDF.
- In the pop-up that appears, select your PDF printer. If you're using CutePDF, you'll see that listed. If you're using Adobe, don't choose the Distiller option. You want "Adobe PDF."
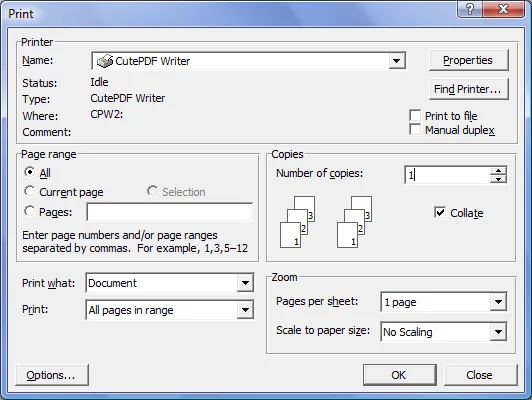
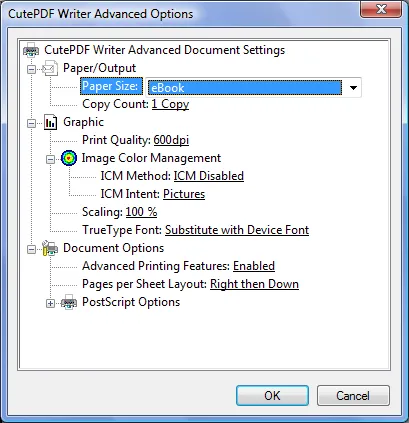
- Next, click the PROPERTIES button. Make sure you're printing in Color or your cover page won't display properly in the PDF file.
- Click the ADVANCED button. Here you will select the custom page size from the options listed. If you didn't add your paper size to your printer properties as I mentioned earlier, it won't appear in the list here. When that happens, even though you set your document properties to a specific page size, the PDF file will be saved in your default page size. If that happens, close your word processing program, add the paper size to your PDF printer properties, and try printing the PDF again.
- Click OK until all the boxes close. The PDF printer will spool the document, then another pop-up will come up, asking where you want to save the file.
- The cover and any images in the e-book will have a white border around them, because they're images on the page and not the image files themselves. If you open the PDF file and replace the image pages with actual image files (saved at the same size of your e-book pages--for a 6" x 9" e-book, use a 300 DPI image of 1800 x 2700, as mentioned previously). This will make the images full-sized, and they will "bleed" to the edge of the e-book. It will make the presentation of the e-book much nicer.
- To replace a page with an image file, open the PDF file and navigate to the page you want to replace. In Acrobat, click on DOCUMENTS from the toolbar, then REPLACE PAGES. You will be able to find the page on your system (be sure to change the file type you're trying to open from PDF to JPG). Click on your image, then click SELECT. Click OK to move through the pop-ups and the page will update to the image file instead.
- Next, go through the PDF file and add a bookmark at every chapter or section heading to allow readers to jump through the book easily. In Adobe Acrobat, just highlight the chapter title and hit CTRL+B.
- Finally, optimize the PDF file. In Adobe Acrobat, click on ADVANCED from the toolbar, then choose PDF OPTIMIZER. You will be prompted to save the file, then given options to help you compress the file and reduce the file size.
Creating LIT E-Books
- Download and install the Read in Microsoft Reader plug-in from Microsoft's website (a direct link to the web page is in the appendix).
- Open your e-book document in Word (this is the only program which supports the plug-in).
- Once the plug-in is installed, you should see a new button on the Standard toolbar that looks like a lower-case letter R with three green leaves sprouting out of it. This is the plug-in button. Click on it to begin the conversion process.
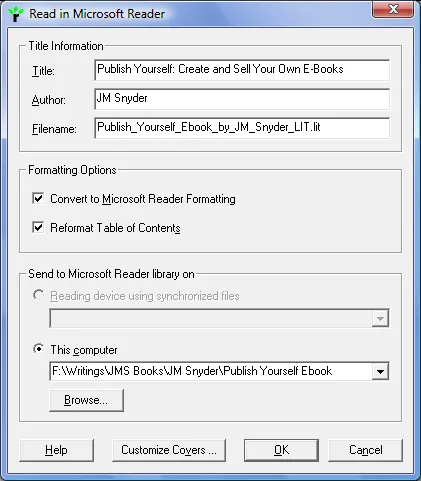
- If you don't see the button, you can still access the program from the toolbar. Click on FILE, then select READ. A pop-up window will open to begin the e-book conversion.
- On the pop-up, you will see the Title and Author Name for the book. This draws directly from the information you entered in the document's PROPERTIES tab. If this is incorrect, you can edit it here but I recommend changing it in the Properties, as well.
- The file name will appear as the current name of the document with an LIT extension. Make any changes you wish to the file name here. I always add _LIT at the end of the file name, as I mentioned previously.
- You don't have to make any changes to the options in the middle of the pop-up. The default options will create your e-book without a problem.
- At the bottom of the window is the path where you want the e-book to be saved. Click on Browse to navigate to the folder where you want to save the file.
- PLEASE NOTE: For some reason, the program always inserts carets before and after the drive initial. If you want to save the file in the default location already listed, you will have to remove these carets or you will get an error message.
- Finally, click on CUSTOMIZE COVERS button at the bottom of the window. A new pop-up will appear, giving you options for the cover art. Click the Browse button to navigate to the folder where your e-book's cover art is saved and select one of the JPGs you created of your cover art. I always use the largest one, but this can make the file size very large. Anything over 1000 x 1500 pixels should work.
- Click OK twice and the plug-in will run. Word will close the file and reopen it before the conversion is complete. This is normal.
- When the file is saved in LIT format, a pop-up will appear giving you the option of opening it in MS Reader to view the final file.
Creating HTML E-Books
Table of contents
- Section I: Introduction
- Basic Assumptions
- My Self-Publishing Journey
- What are E-Books?
- Crash Course on E-Readers and E-Book Formats
- DRM Encrypted and Locked Files ...Should You Bother?
- Section II: Getting Started
- Editing Your Work
- Creating Cover Art
- Promotional Blurb and Excerpt
- ISBNs...Do You Need One?
- What Should You Charge?
- Software Needed to Create E-Books
- Section III: Your E-Book Content
- Laying Out Your E-Book File
- Resizing Your E-Book Pages
- Document Properties and Styles
- Front Matter
- Back Matter
- Formatting Your E-Book Content
- Final Formatting Tips
- Section IV: Creating Your E-Books
- Nine E-Book Formats
- Creating PDF E-Books
- Creating LIT E-Books
- Creating HTML E-Books
- Creating EPUB E-Books
- Creating PRC and MOBI E-Books
- Creating LRF, PDB, and RB E-Books
- Checking Your E-Book Files
- Section V: Publishing Your E-Books
- Selling Your E-Books
- Amazon Kindle
- Barnes & Noble Nook
- Smashwords
- Other E-Bookstores
- Section VI: In Summary
- Appendix: Links to Websites Mentioned in This Book