![]()
1
Getting Started in Architecture
Craftsmanship arises from manual skill, training and experience – personal commitment as well as judgement.
—Juhani Pallasmaa
All the work of the hand is rooted in thinking.
—Martin Heidegger
As a starting point, this chapter will introduce you to the basic equipment you will use in your study of architectural design. We begin with an introduction to the tools you will use when drawing, and provide some tips on using your drafting equipment.
While there are many specialist drawing implements, the ones we cover here will allow you to complete accurate architectural drawings. We also introduce you to the tools and equipment used in a building laboratory. Again, there are specialist tools in the laboratory for cutting and model-making, such as the laser cutter and the C&C router, and the tools we deal with here will see you through your first two years of study. Finally, we look at common tools and techniques for making architectural models.
While this chapter gives you practical tips and advice, there is no substitute for experience. As you get used to drawing and model-making, you will hone your own methods and techniques, and, we hope, take pleasure in drawing and model-making – the foundations of architectural design.
![]()
1.1
Basic
Equipment
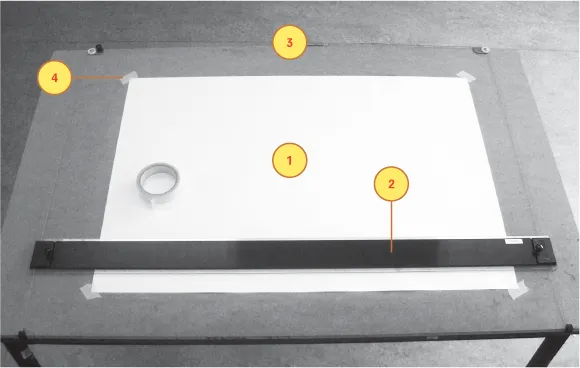
1.1.1 Drawing Board & Parallel Motion
Fig. 1
1. Backing sheet
2. Parallel motion
3. Drawing board
4. Drafting tape
Screw the parallel motion to the drawing board – use the fixings at the top and bottom of the board to ensure the wire is held taut and secured in place.
Drawing boards come in various sizes and materials. The most common metric sizes are:
A0: working area of 1270 × 920mm
A1: working area of 920 × 650mm
A2: working area of 650 × 470mm
Standard US dimensions are:
E 34 × 44”
D 22 × 34”
C 17 × 22”
Common materials include timber, MDF, plastic and melamine (which is a smooth plastic finish to a wooden base).
Parallel motions are preferable to T-squares because they allow greater accuracy and stability in drawing. ‘Mayline’ is a common brand name for parallel motions. Use the ‘Mayline’ to draw horizontal parallel lines.
Pre-assembled boards and parallel motions are available, which are easy to transport and come with an adjustable prop.
When fixing paper to the drawing board ensure the page is in line with (and parallel to) the parallel motion. The parallel motion should move smoothly in a ‘parallel motion’ along the board – it shouldn’t wobble!
Use a brick or block of wood to prop up the board – it’s easier to work when the board is at an incline.
Use graph paper covered with acetate as a backing sheet to guarantee a clean surface.
The graph paper allows you to easily align your paper. You can use the graph lines to set out text and lines when using transparent paper.
Secure each corner of the paper with drafting tape.
1.1.2 Adjustable Set...