Hands-On Geometry
eBook - ePub

Hands-On Geometry

Constructions With a Straightedge and Compass (Grades 4-6)

Christopher M. Freeman

Share book
  1. 84 pages
  2. English
  3. ePUB (mobile friendly)
  4. Available on iOS & Android
eBook - ePub

Hands-On Geometry

Constructions With a Straightedge and Compass (Grades 4-6)

Christopher M. Freeman

Book details
Book preview
Table of contents
Citations

About This Book

Put compasses into your students' hands and behold the results! Hands-On Geometry teaches students to draw accurate constructions of equilateral triangles, squares, and regular hexagons, octagons, and dodecagons; to construct kites and use their diagonals to construct altitudes, angle bisectors, perpendicular bisectors, and the inscribed and circumscribed circles of any triangle; to construct perpendicular lines and rectangles, parallel lines, and parallelograms; and to construct a regular pentagon and a golden rectangle.Students will enjoy fulfilling high standards of precision with these hands-on activities. Hands-On Geometry provides the background students need to become exceptionally well prepared for a formal geometry class. The book provides an easy way to differentiate instruction: Because the lessons are self-explanatory, students can proceed at their own pace, and the finished constructions can be assessed at a glance.Grades 4-6

Frequently asked questions

How do I cancel my subscription?
Simply head over to the account section in settings and click on ā€œCancel Subscriptionā€ - itā€™s as simple as that. After you cancel, your membership will stay active for the remainder of the time youā€™ve paid for. Learn more here.
Can/how do I download books?
At the moment all of our mobile-responsive ePub books are available to download via the app. Most of our PDFs are also available to download and we're working on making the final remaining ones downloadable now. Learn more here.
What is the difference between the pricing plans?
Both plans give you full access to the library and all of Perlegoā€™s features. The only differences are the price and subscription period: With the annual plan youā€™ll save around 30% compared to 12 months on the monthly plan.
What is Perlego?
We are an online textbook subscription service, where you can get access to an entire online library for less than the price of a single book per month. With over 1 million books across 1000+ topics, weā€™ve got you covered! Learn more here.
Do you support text-to-speech?
Look out for the read-aloud symbol on your next book to see if you can listen to it. The read-aloud tool reads text aloud for you, highlighting the text as it is being read. You can pause it, speed it up and slow it down. Learn more here.
Is Hands-On Geometry an online PDF/ePUB?
Yes, you can access Hands-On Geometry by Christopher M. Freeman in PDF and/or ePUB format, as well as other popular books in Education & Education General. We have over one million books available in our catalogue for you to explore.

Information

Publisher
Routledge
Year
2021
ISBN
9781000493306
Edition
1

Chapter 1:
Lines and Arcs

DOI: 10.4324/9781003235477-1
Name____________________________________ Date__________________

Introduction: The Straightedge and Compass Tools

For more than 2,000 years, mathematicians have used two basic tools to construct geometric figures: a compass to draw circles, and a straightedge to draw lines. With these simple tools, you will learn to construct triangles, hexagons, squares, kites, perpendicular lines, parallel lines, and lots of other figures.
A compass has a sharp point at one end to hold it steady at the center of the circle, and it has a pencil point at the other end to draw the circle. The distance between the sharp point and the pencil point is called the radius. You will use a compass to draw circles and arcs. To draw a straight line, you will pull a pencil tip along a straightedge. A straightedge is different from a ruler, because a straightedge has no marks on it. If you use a ruler, you should ignore the inch or centimeter markings. To measure length, you will use the radius of the compass.
Name_______________________________________ Date._______________________

Lesson 1.1
Construct a Circle by Center and Point
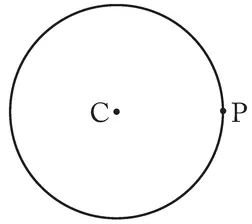
A point is a location. We often represent a point with a dot (.), but any dot is really too big because the point is at the center of the dot. We name points with capital letters, like points C and P below.
One way to construct a circle starts with one point that will be its center and another point that will be on the circle. Follow the directions below to construct the circle with center C and passing through P. Your construction will look like the picture to the right.
  1. Put the sharp point of the compass onto C and hold it there.
  2. Adjust the compass radius so that the pencil point rests gently on the point P.
  3. Hold the compass at its top, not by the pencil
  4. Lean the compass slightly in the direction you want to draw
  5. Start drawing the circle through P; if the curve doesn't go exactly through the center of point P, adjust the radius and start again.
  6. Lightly draw the circle with your compass.


Name________________________________________ Date_____________________________

Lesson 1.2
Construct a Line and an Equilateral Triangle

A basic postulate of geometry is that two points determine a line. In practice, drawing this line is not as trivial as it may sound. If you work carefully, your construction will look like the picture below. Follow the directions below to construct a line.
  1. Place your straightedge just under the two points P and Q below. Hold it steady.
  2. As you pull your pencil along the straightedge, make sure that the pencil tip goes through the center of each point. If not, change the angle of your pencil, or adjust your straightedge. Be precise! Make sure your pencil is sharp.
  3. Draw an arrowhead at each end of your line.


The arrowheads indicate that lines go on forever in both directions. We name a line using any two points on it with a line symbol above them, such as
.The piece of a line between two endpoints (like P and Q above) is called a line segment, or segment for short. We name a segment using its two endpoints with a bar on top, such as
Segments don't go on forever, they end at their endpoints.
Now you will construct an equilateral triangle, in which all three sides are segments of equal length. Your construction will look like the picture to the right.
  1. Use your straightedge to construct the line segment
  2. Construct a circle with center A and passing through B,
  3. Construct another circle with center B and passing through A.
  4. Locate a point where the two circles intersect and label it C. (You don't need to draw a dot because the location where two circles cross is a point.)
  5. Use your straightedge to construct segments
    and
    . You now have equilateral ā–³ ABC!
Name_______________________________________ Date___________________________

Lesson 1.3
Draw an Arc and Copy a Segment
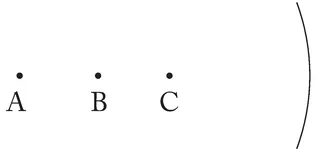
Just as a segment is a piece of a line, an arc is a piece of a circle.
Which point, A, B, or C, is the center of the arc shown below? ______________
To check your answer, put the sharp point of your compass on A, adjust your radius, and try to draw the arc. Then put the sharp point on B and try to draw the arc. Then repeat using point C. (Was your answer correct?)
To copy a segment means to make another segment with the same length. Don't use a ruler to measure lengthā€”use the radius of your compass! When you follow the directions below, you will construct a copy of segment
, called
. Your construction will look like this picture:
Use segment
and line m, below.
  1. Anywhere on the line m, mark a tiny dot and label it P.
  2. Put the sharp point of your compass on E, and adjust the radius so you can draw a short arc through F.
  3. Don't change the radius, but move the sharp point to P and draw a short ...

Table of contents