![]()
Book 1
Excel Basics
Contents at a Glance
- Chapter 1: The Excel 2019 User Experience
- Excel 2019’s Sleek Look and Feel
- Excel’s Start Screen
- Excel’s Ribbon User Interface
- Getting Help
- Launching and Quitting Excel
- Chapter 2: Customizing Excel 2019
- Tailoring the Quick Access Toolbar to Your Tastes
- Exercising Your Options
- Using Office Add-ins
- Using Excel’s Own Add-ins
![]()
Chapter 1
The Excel 2019 User Experience
IN THIS CHAPTER
Getting to know Excel 2019’s Start screen and program window Selecting commands from the Ribbon Using Excel 2019 on a touchscreen device Getting around the worksheet and workbook Using Excel 2019’s Tell Me feature when you need help Launching and quitting Excel Excel 2019 relies primarily on the onscreen element called the Ribbon, which is the means by which you select the vast majority of Excel commands. In addition, Excel 2019 sports a single toolbar (the Quick Access toolbar), some context-sensitive buttons and command bars in the form of the Quick Analysis tool and mini-bar, along with a number of task panes (such as Clipboard, Research, Thesaurus, and Selection to name a few).
Among the features supported when selecting certain style and formatting commands is the Live Preview, which shows you how your actual worksheet data will appear in a particular font, table formatting, and so on before you actually apply it. Excel also supports an honest-to-goodness Page Layout view that displays rulers and margins along with headers and footers for every worksheet. Page Layout view has a zoom slider at the bottom of the screen that enables you to zoom in and out on the spreadsheet data instantly. The Backstage view attached to the File tab on the Excel Ribbon enables you to get at-a-glance information about your spreadsheet files as well as save, share, preview, and print them. Last but not least, Excel 2019 is full of pop-up galleries that make spreadsheet formatting and charting a real breeze, especially with the program’s Live Preview.
Excel 2019’s Sleek Look and Feel
If you’re coming to Excel 2019 from Excel 2007 or Excel 2010, the first thing you notice about the Excel 2019 user interface is its comparatively flat (as though you’ve gone from 3-D to 2-D) and decidedly less colorful display. Gone entirely are the contoured command buttons and color-filled Ribbon and pull-down menu graphics along with any hint of the gradients and shading so prevalent in the earlier versions. The Excel 2019 screen is so stark that even its worksheet column and row borders lack any color, and the shading is reserved for only the columns and rows that are currently selected in the worksheet itself.
The look and feel for Excel 2019 (indeed, all the Office 2019 apps) is all part of the Windows 10 user experience. This latest version of the Windows operating system was developed primarily to work across a wide variety of devices from desktop and laptop to tablets and smartphones, devices with much smaller screen sizes and where touch often is the means of selecting and manipulating screen objects. With an eye toward making this touch experience as satisfying as possible on all these devices, Microsoft redesigned the interface of both its new operating system and Office 2019 application programs: It attempted to reduce the graphical complexity of many screen elements as well as make them as responsive as possible on touchscreen devices.
The result is a snappy Excel 2019, regardless of what kind of hardware you run it on. And the new, somewhat plainer and definitely flatter look, while adding to Excel 2019’s robustness on any device, takes nothing away from the program’s functionality.
The greatest thing about the look of Office 2019 is that each of its application programs features a different predominant color. Excel 2019 features a green color long associated with the program. Green appears throughout the program’s colored screen elements, including the Excel program and file icon, the Status bar, the outline of the cell pointer, the shading of highlighted and selected Ribbon tabs, and menu items. This is in stark contrast to the last few versions of Excel where the screen elements were all predominately blue, the color traditionally associated with Microsoft Word.
Excel’s Start Screen
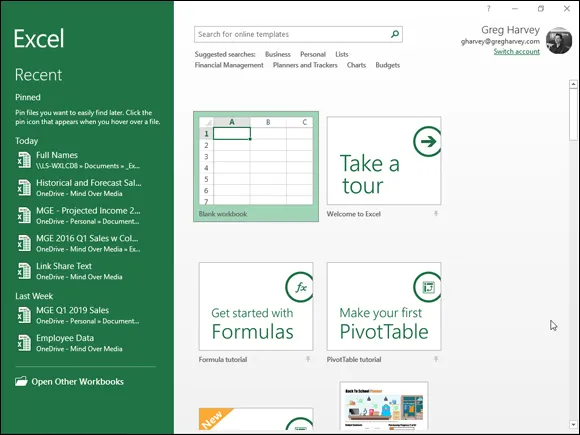
When you first launch Excel 2019, the program welcomes you with an Excel Start screen similar to the one shown in Figure 1-1. This screen is divided into two panes.
The left green navigation pane with the Home icon selected contains New and Open items at the top and Account, Feedback, and Options at the bottom.
The right pane displays a single row of thumbnails showing some of the different templates you can use to create a new workbook at the top with a list of some of the most recently opened workbooks shown below. To see more templates to use in creating a new workbook, you can click the Find More in New link on the right side of the Home screen or the New icon in the navigation pane on the left.
To open an existing Excel workbook not displayed in the Recent list, click the Find More in Open link on the right side of the Home screen or the Open icon in the navigation pane on the left.
The first template thumbnail displayed on the top row of the Home tab on the Start screen is called Blank Workbook, and you select this thumbnail to start a new spreadsheet of your own design. The second thumbnail is called Welcome to Excel, and you select this thumbnail to open a workbook with ten worksheets that enable you to take a tour and play around with several of the nifty new features in Excel 2019.
I encourage you to take the time to open the Welcome to Excel template and explore its worksheets. When you click the Create button after clicking this thumbnail, Excel opens a new Welcome to Excel1 workbook where you can experiment with using the Flash Fill feature to fill in a series of data entries; the Quick Analysis tool to preview the formatting, charts, totals, pivot tables, and sparklines you can add to a table of data; and the Recommended Charts command to create a new chart, all with a minimum of effort. After you’re done experimenting with these features, you can close the workbook by choosing File⇒ Close or pressing Ctrl+W and then clicking the Don’t Save button in the alert dialog box that asks you whether you want to save your changes.
If none of the Excel templates shown in the Home screen fit the bill, click the Find More in New link to select New in the Navigation pane and display the New screen displaying a whole host of standard templates that you can select to use as the basis for new worksheets. These templates include templates for creating calendars, tracking projects, and creating invoices. (See Book 2, Chapter 1 for more on creating new workbooks from ready-made and custom templates.)
Excel’s Ribbon User Interface
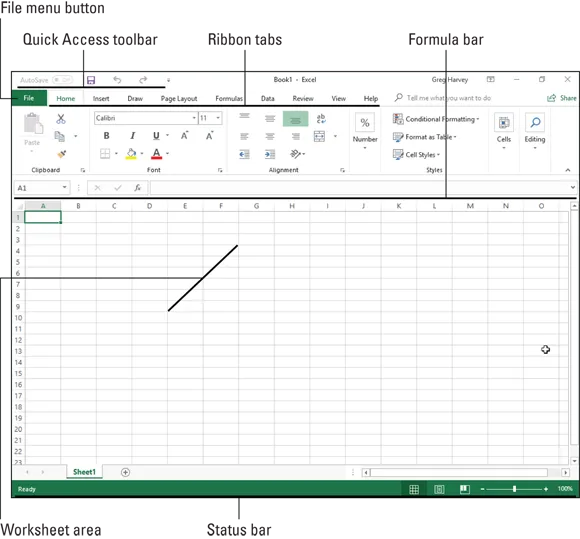
When you first open a new, blank workbook by clicking the New Workbook thumbnail in the Home screen, Excel 2019 opens up a single worksheet (with the generic name, Sheet1) in a new workbook file (with the generic filename, Book1) inside a program window such as the one shown in Figure 1-2.
The Excel program window containing this worksheet of the workbook is made up of the following components:
- File menu button: When clicked, Excel opens the Backstage view, which contains a bunch of file-related options including Info, New, Open, Save, Save As, Print, Share, Export, Publish, Close, and Account, as well as Options, which enables you to change Excel’s default settings.
- Quick Access toolbar: This toolbar consists of AutoSave, Save, Undo, and Redo. AutoSave is automatically engaged after you first manually save a workbook to your OneDrive or SharePoint website in the Cloud. You can click the Save, Undo, and Redo buttons to perform common tasks to save your workbook for the first time and save editing changes when AutoSave is not engaged and undo and redo editing changes. You can also click the Customize Quick Access Toolbar button to the immediate right of the Redo button to open a drop-down m...