![]()
Chapter 1
Connecting to the Interface
To access the power of Autodesk® Inventor® 2014, you have to start with the interface. To some extent, Inventor is an interface between your ideas and your computer.
The ability to navigate and leverage the nuances of a program interface can mean the difference between struggling and excelling with the application. In this chapter, you will explore the components of dialog boxes, Ribbons, tabs, and viewing tools that will help you create your designs. You will also learn how to modify the interface to increase your comfort with Inventor.
- Exploring the graphical user interface
- Setting application options
- Using visualization tools
- Working with project files
Exploring the Graphical User Interface
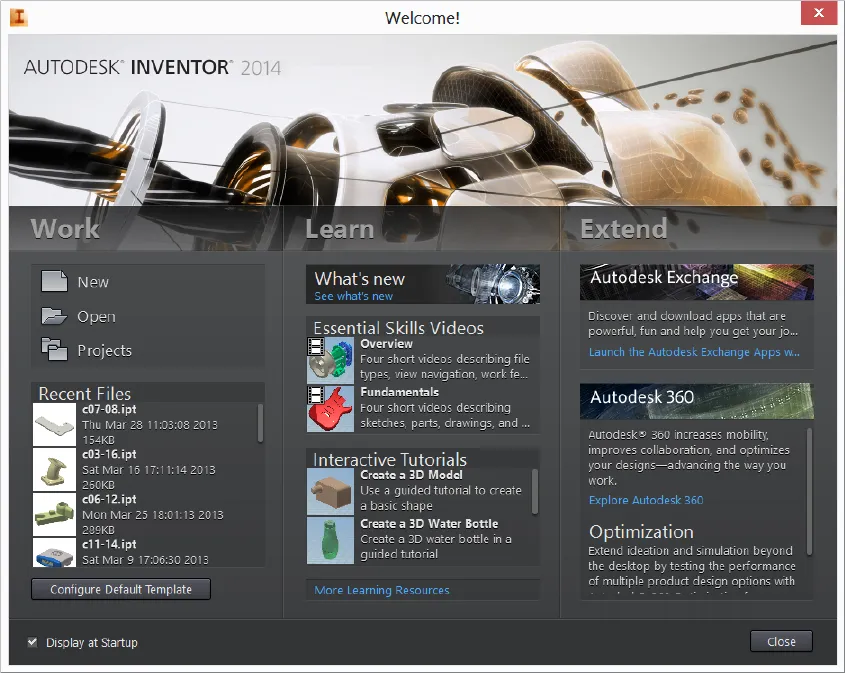
Autodesk Inventor 2014 opens with a Welcome screen (Figure 1.1), which presents the new user with the tools needed to create a new file, open an existing one, and access the many Essential Skills Videos and tutorials built into the product. You can even change the units of the default templates to spare you from selecting Metric or English templates all the time.
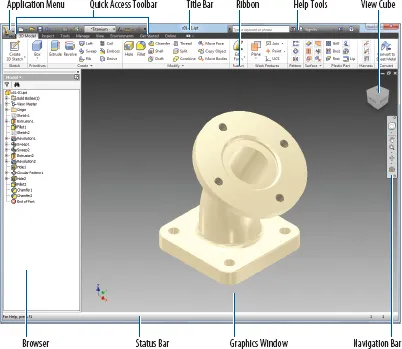
When you first see the interface, you will probably think it is rather bare. With no file open, you just have the absolute basics there. Even when a file is loaded, your design remains the focus of the interface. In Figure 1.2, you can see the primary elements of the interface that we will refer to in this chapter.
Users of other current Autodesk or Microsoft applications will recognize the Ribbon-style interface and the Application icon in the upper left. The adoption of the Ribbon interface in Inventor goes beyond most other applications by actively offering you tools when they’re most needed. But let’s not get ahead of ourselves; let’s start by getting more details on these features.
Across the top of the Inventor window is the title bar. It lets you know you’re using Autodesk Inventor, or it displays the name of the active file when you’re editing one.
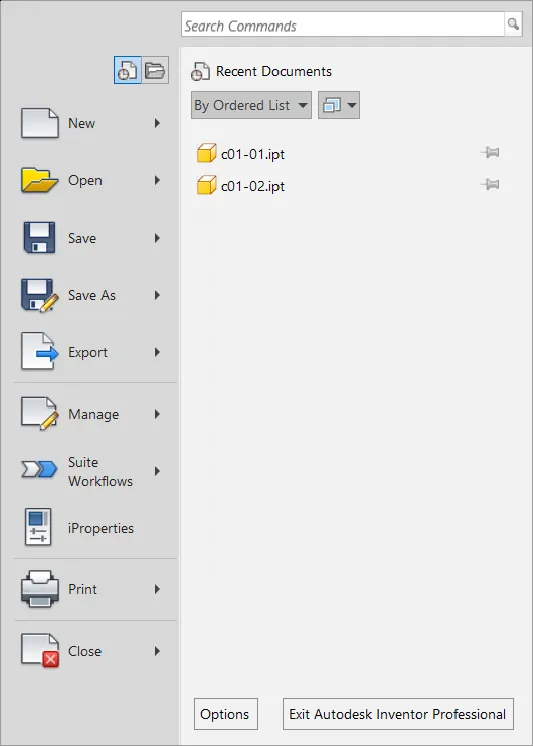
In the upper-left corner is an icon with a large I on it. Clicking it opens the Application menu (Figure 1.3), which displays tools for creating and manipulating files (on the left) and a list of recently opened files (on the right). If you want to be able to return to a file frequently, you can select the pushpin icon to the right of the filename and keep it on the list of recently accessed files.
You can also toggle the list between recent documents and the documents that are currently open and change the list from filenames to icons showing the files.
At the top (on the right side) is a Search Commands window for finding tools that are available in the file you are editing. As you begin typing a tool name or more conceptual term, a list of options based on the entry will be generated. You can then start the tool from that list. The location of the tool in the Ribbon is also displayed for future reference.
Just below that you will find icons that sort how previously opened files are listed and a drop-down menu for the size of the icon displayed.
At the bottom of the menu are buttons to exit Inventor and to access the application options, which you will explore later in this chapter.
The Quick Access toolbar is embedded in the title bar next to the Application icon and contains common tools for accessing new file templates, undoing and redoing edits, and printing. The toolbar is dynamic, which means different tools will appear depending on the active file. For example, one of those part-time tools is a drop-down menu that allows you to change the color of the active part.
You can customize this toolbar by adding commonly used tools to the toolbar. To do so, select the desired tool from the Ribbon, right-click, and select Add To Quick Access Toolbar from the context menu.
Important!
At this time, it is critical that you go to www.sybex.com/go/inventor2014essentials, download the Inventor 2014 Essentials Data.zip file, and extract it to the root of your C drive. This will create a new folder, C:\Inventor 2014 Essentials. The files needed to complete the exercises for this book are in this folder.
Opening a File
Knowing this much of the interface will allow you to access the Open dialog box and see how the rest of the interface works. In this exercise, you will open a file in Inventor:
1. Start Autodesk Inventor if it is not already up and running.
2. Expand the Application menu, and select Open from the options on the left.
When the Open dialog box appears, notice the tools at the top. These tools allow you to navigate to other folders as you would in Windows Explorer, change the way files are displayed (including the option of thumbnail images), and add new folders.
3. In the Open dialog box, use the Up One Level button to navigate to the
C:\Inventor 2014 Essentials\Parts\Chapter 01, folder, as shown in
Figure 1.4.
4. Double-click the
c01-01.ipt file listed, or click it once and then click Open.
You can also access the Open tool via the Quick Access toolbar.
5. To see the complete model, move your cursor near the ViewCube® in the upper right of the Graphics window. When the icon that looks like a house appears, click it.
Clicking the Home view icon restores a view position that was saved with the model. Your screen should now resemble Figure 1.2.
Selecting an Inventor file from the file list generates a...