Contents at a Glance
Chapter 1: Running Windows from Start to Finish
A Few Quick Steps to Make the Desktop Your Own
Mousing with Your Mouse
Starting with the Start Button
Touching on the Taskbar
Working with Files and Folders
Getting Around
Arranging Libraries
Creating Shortcuts
Sleep: Perchance to Dream
Chapter 2: Controlling Users
Logging On
Choosing Account Types
Controlling User Account Control
Adding Users
Enabling the Guest Account
Changing Accounts
Switching Users
Chapter 3: Maintaining Your System
Coping with Start-Up Problems
Working with Backups
Maintaining Drives
Using System Restore and Restore Points
Scheduling the Task Scheduler
Zipping and Compressing
Using the Windows 7 Resource Monitor and Reliability Monitor
Controlling the Control Panel
Chapter 4: Getting the Basic Stuff Done
Burning CDs and DVDs
Improving Your Experience Index
Getting Word Processing — Free
Taming the Character Map
Calculating — Free
Painting
Sticking Sticky Notes
Using Sneaky Key Commands
Chapter 5: Troubleshooting and Getting Help
Troubleshooting in the Action Center
Tracking Your System’s Stability
Tackling Windows Help and Support
How to Really Get Help
Snapping and Recording Your Problems
Connecting to Remote Assistance
Getting Help on the Web
Chapter 1: Running Windows from Start to Finish
In This Chapter
Moving around the desktop
Working with windows (windows with a wittle w)
Stepping through the wondrous Taskbar
Organizing files and folders
Showing filename extensions
Using libraries to extend your reach
To sleep, perchance to dream
This chapter explains how to find your way around the Windows windows. If you’re an old hand at Windows, you know most of this stuff — such as mousing and interacting with dialog boxes — but I bet some of it will come as a surprise, particularly if you’ve never taken advantage of Windows 7 libraries or if the idea of using a background slide show appeals to you. You know who you are.
Most of all, you need to understand that you don’t have to accept all the default settings. Windows 7 was designed to sell more copies of Windows 7. A lot of that folderol just gets in the way. What’s best for Microsoft isn’t necessarily best for you, and a few quick clicks can help make your PC more usable, and more . . . yours.
If you’re looking for information on customizing the Windows 7 Start menu and the taskbar, skip ahead to Book III, Chapter 2.
A Few Quick Steps to Make the Desktop Your Own
As soon as you log on to the computer (that’s what it’s called when you click your name), you’re greeted with an enormous expanse of near-nothingness, cleverly painted with a pretty picture. Your computer manufacturer might have chosen the picture for you, or you might see the default Microsoft screen.
Your Windows destiny, such as it is, unfolds on the computer’s screen. The screen that Windows shows you every time you start your computer is the desktop, although it doesn’t bear much resemblance to a real desktop. Try putting a pencil on it.
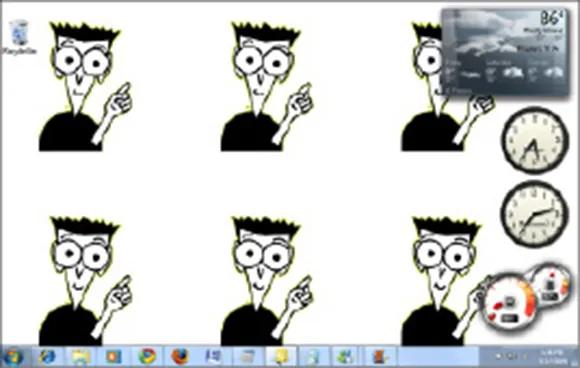
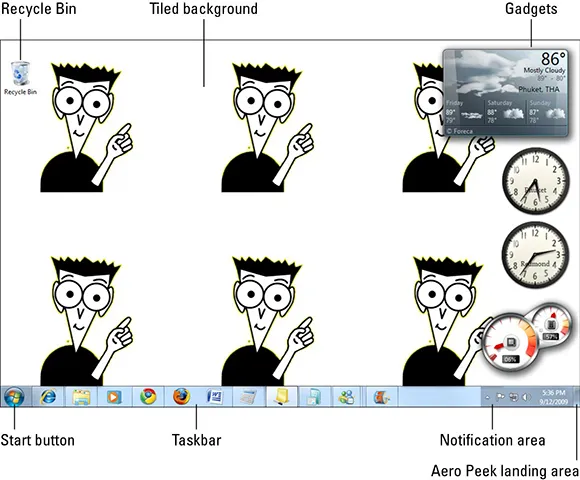
I talk about changing and organizing your desktop in Book III, Chapter 1, but every new Windows 7 user will want to make a few quick changes. In the end, your desktop should look something like Figure 1-1 — although you probably want a cool picture slide show on the desktop rather than a photo of my namesake.
Figure 1-1: My Own Dummies desktop.
The Windows desktop looks simple enough, but don’t fool yourself: Underneath that calm exterior sits the most sophisticated computer program ever created. Hundreds of millions of dollars went into creating the illusion of simplicity — something to remember the next time you feel like kicking your computer and screaming at the 7 gods.
Changing the background
Start taking your destiny into your own hands by changing the wallpaper (er, the desktop background). If you bought a new computer with Windows 7 installed, your background text probably says Dell or Vaio or Billy Joe Bob’s Computer Emporium / Dial 555-3765 for a good time. Bah. Change your wallpaper by following these steps (note that Windows 7 Starter Edition owners can’t change the wallpaper):
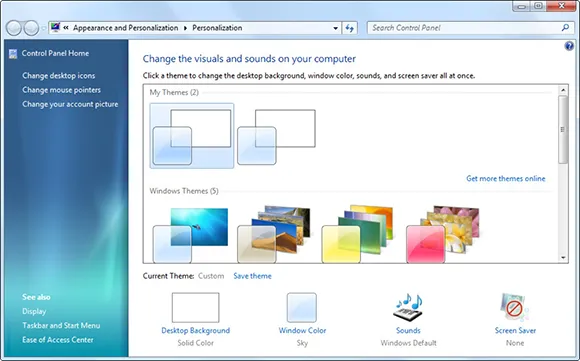
1. Right-click an empty part of the desktop and choose Personalize.
Windows hops to the Control Panel’s Personalization pane, shown in Figure 1-2.
Figure 1-2: Choose your desktop background (even a slide show) here.
2. If you see a theme you like (use the scroll bar on the right to make sure you see all of them, including the high contrast options), click one of the Windows themes.
Each of the Windows themes consists of a slide show of the pictures you see, shuffled every 30 minutes. Although themes can specify different sounds and screen savers, the built-in Windows themes don’t modify the sounds and they don’t include screen savers.
If you want to see the details about each of the themes — in particular, if you
really want to know where those gorgeous photos were shot — choose the theme and then click the Desktop Background link in the lower left corner. Hover the mouse over the picture to see its lineage.
3. If you don’t see a theme that tickles your fancy, or if you want to roll your own backgrounds, in the lower left corner click the Desktop Background link.
Windows responds with the Desktop Background window, shown in Figure 1-3, where you choose the pictures that you want to appear in a slide show by hovering the mouse over the picture and then selecting the box that appears.
Figure 1-3: Choose the pictures that you want to appear in a slide show.
4...