![]()
Chapter 1: Editing Basics
By understanding the foundations of postprocessing, you will find that your editing not only improves but so will the speed at which you can process your images. In this chapter, we cover some of the basics of image editing as well as general terminology that you might encounter in this book or when discussing postprocessing with others.
Fundamental Editing Techniques
Far too often, we are approached by photographers who feel completely overwhelmed by the idea of editing their photos. These photographers range from folks with many years of experience shooting film to folks whose first camera was digital. When we talk with these photographers, we find that their biggest problem is knowing what to do — and why they should do it. Although the theory and reasons why you should edit in certain ways, along with all the different approaches, could fill volumes, there are a few basics that once you learn them help the process tremendously.
Evaluating an image before editing
The first thing you should do before making any edits is evaluate your image. Evaluating doesn’t mean just to determine if the image is too dark or too bright or needs to be rotated or cropped, but to really identify what is wrong with the image and what you would like to do to it. There are different ways of keeping track of the things you want to do to your image, and although over time you will get good at identifying and then resolving the edits you identified, we recommend that you start off with a pad of paper at your desk and take notes as you edit your images.
Some photographers actually have a plan at the time of shooting. They visualize the final image even before the shutter opens. This takes lots of practice, because you will need to know what the image will look like once it has been captured. You then need plenty of knowledge of what you like as well as what tools are available and what those tools are capable of doing. This is a great goal, as it makes you a better shooter, and the act of evaluating your image once you have transferred to your computer is a good first step to being able to visualize your images.
Before starting to evaluate your picture, make sure your image has potential. You can spend a lot of time editing a picture just to find out that, no matter what you do, you cannot make it a great image. By being able to quickly determine if a picture has potential or not, you will prevent wasting time editing an image that you will never use.
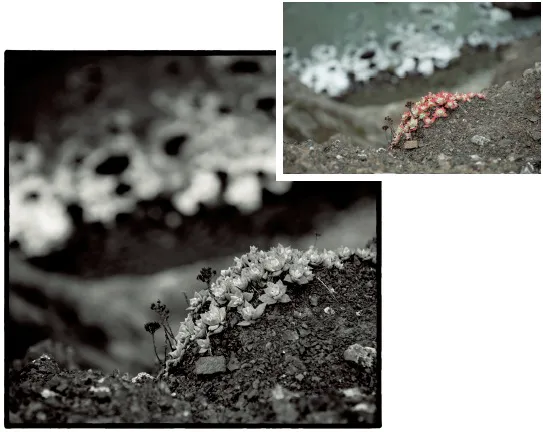
Basically, an image with potential will have a clear subject and at least one of the three following elements (the more elements the better): an interesting subject, interesting light, and good composition. Put another way, you can do something with a moderately interesting subject with mediocre composition but amazing light. Obviously, an interesting subject with awesome light and superb composition makes the best image, but you would be surprised what you can do when you have only one of the three elements to work with. Figure 1-1 shows an example.
Now that you have an image with potential, look at your picture as a whole and note where your eyes go first. Is that where you want the viewer’s eyes to go to? Sometimes it is helpful to sit back from your picture a bit, or even allow your eyes to defocus if you are having a hard time figuring out the focal point. We often squint to see where our eyes go first.
Figure 1-1. When evaluating your images, you can quickly identify images with potential. As an example, this image as shot in the camera (the inset) isn’t very interesting, but with some editing it becomes memorable.
The first place you want your viewer’s eyes to go should be the image’s main subject. If your eyes don’t go to the main subject, note where your focal point is and try to determine why. (We cover some of the possible reasons later in this chapter.)
You should next note the overall color and tonality of the image. Is the image too bright or too dark? Are the colors too bright or too subtle? Is the image too green or too warm?
What about the objects that are based on the four typical memory colors: sky blue, plant green, skin color, and neutrals? These colors are called memory colors because people see them so often and have an amazing ability to perceive the trueness of the colors. These are the most important colors in your image and if these colors are off, your viewers will immediately notice. Keep in mind though, it is perfectly fine for these colors to not be exactly as they are in nature. If these colors are different, just make sure they are significantly different and there seems to be a reason for a difference.
Next, look around the borders of your image. Are there things that could be considered distractions begging for the viewer’s attention? Is there a curb cutting into the lower-left corner? Is there a telephone wire clipping the top-right corner? These are things that can be easily cropped and in most cases will need to be cloned if the cropping and composition are just right.
After closely scrutinizing the edges, look through the rest of the image for other elements that might become a distraction. Is there someone in the background looking right into the lens? Perhaps there’s some noise, hot pixels, or dust on the sensor or lens? Note these to be fixed as well.
Finally, think about how you want the image to look. Is there an image or painting you are striving to emulate? Is there an emotion you want to impart? Knowing what you want to enhance before you start editing will help you make informed decisions as you begin to edit your image. For example, if you know that you want the image to end up with very warm, friendly tones, it doesn’t make much sense to cool the image down even if it starts off a bit too warm.
Planning your edits based on the human visual system
In addition to developing your editing plans, it is a good idea to keep in mind a few things about the human visual system. Because we all make images for other people to enjoy, knowing how people look at images is very helpful when you plan your edits. Without simplifying things too much, think about the perception of a scene as a series of elements that will draw the viewer’s eye. Those are, in order:
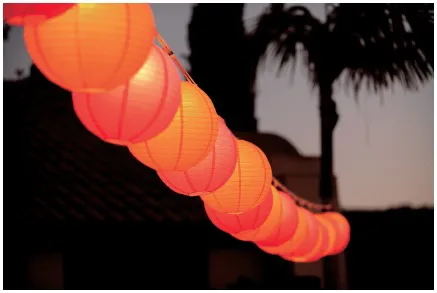
- Faces and text. The first and strongest attractor to our eyes is the human face. This includes both actual faces and objects that look like faces, as Figure 1-2 shows. After hum...