Book III
Illustrator CS5
Contents at a Glance
Chapter 1: What’s New in Illustrator CS5
Chapter 2: Discovering Illustrator CS5
Chapter 3: Using the Selection Tools
Chapter 4: Creating Basic Shapes
Chapter 5: Using the Pen Tool and Placing Images
Chapter 6: Using Type in Illustrator
Chapter 7: Organizing Your Illustrations
Chapter 8: Using Layers
Chapter 9: Livening Up Illustrations with Color
Chapter 10: Using the Transform and Distortions Tools
Chapter 11: Working with Transparency and Special Effects Tools
Chapter 12: Using Filters and Effects
Chapter 13: Using Your Illustrator Images
Chapter 1: What’s New in Illustrator CS5
In This Chapter
Working with multiple artboards
Creating unique brush strokes with the Bristle Brush tool
Building shapes with the Shape Builder tool
Using the perspective grid
Illustrator only gets better and better, and you can discover the latest and greatest new features in this chapter. Many of these features are discussed in detail in the rest of the chapters in this minibook.
Managing Multiple Artboards with the New Artboard Panel
If you’ve ever dreamed of producing multiple-page documents in Illustrator, your dream has come true: CS4 introduced multiple artboards. Before then, you added pages by using a rather convoluted method of making a large artboard and then tiling its pages. But now you can create multiple artboards (as many as 100!) as soon as you open the New Document dialog box.
What makes the artboard feature enhanced in CS5? For one thing, artboards now have a dedicated panel. Use this panel to easily locate and select an artboard. Using the Artboard panel, you can also reorder, delete, and even copy artboards.
Creating a document with multiple artboards
To create a document with multiple artboards, follow these steps:
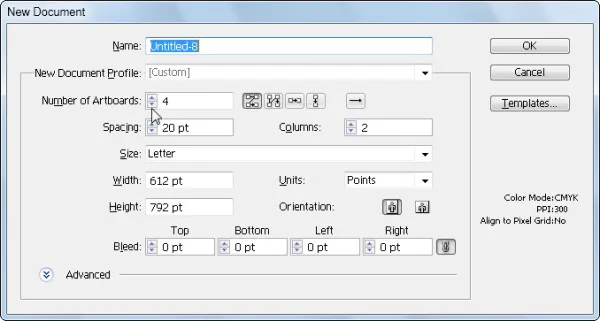
1. Launch Adobe Illustrator CS5 and choose File⇒New.
The New Document dialog box appears, as shown in Figure 1-1.
2. Specify the number of artboards to start with by entering a number in the Number of Artboards text box.
In our example, we added four artboards.
Figure 1-1: Add multiple artboards right from the start.
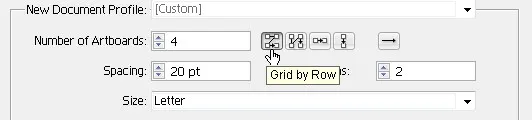
3. To specify how to arrange the artboard, click a grid or row arrangement icon to the right of the Number of Artboards text box, as shown in Figure 1-2.
Figure 1-2: Choose how you want the artboards arranged.
Using these grid boxes, you can
• Specify how many rows and columns to use.
• Change the direction of the layout from left to right or right to left.
4. Enter an amount in the Spacing text box to determine the distance between artboards.
Enter 0 (zero) if you want the artboards to butt against each other, or a higher value if you want some space between them.
5. Click OK to create your new document.
The example, showing four artboards, looks like the ones you see in Figure 1-3.
Exploring enhanced artboard features
After you create multiple artboards, choose Window⇒Artboards to see a panel with artboards listed individually, as shown in Figure 1-4.
Here are some swell things you can do to artboards from the Artboard panel:
Figure 1-3:
A document created...