Mastering AutoCAD Civil 3D 2013
eBook - ePub

Mastering AutoCAD Civil 3D 2013

  1. English
  2. ePUB (mobile friendly)
  3. Available on iOS & Android
eBook - ePub

Mastering AutoCAD Civil 3D 2013

Book details
Book preview
Table of contents
Citations

About This Book

A complete tutorial and reference for AutoCAD Civil 3D 2013

Autodesk's Civil 3D is the leading civil engineering software, and this reliable training guide has been thoroughly revised and updated to offer a fresh perspective on this powerful engineering package. Filled with illustrative examples, new datasets, and new tutorials, this book shows how elements of the dynamic engineering program work together and discusses the best methods for creating, editing, displaying, and labeling all of a civil engineering project's elements.

The book's straightforward explanations, real-world examples, and practical tutorials focus squarely on teaching vital Civil 3D tips, tricks, and techniques. The authors' extensive real-world experience and Civil 3D expertise allows them to focus on how the software is used in real-world professional environments and present topics and techniques that are not documented elsewhere.

  • Offers an overview of key concepts and the software's interface
  • Discusses the best methods for creating, editing, displaying, and labeling all of a civil engineering project's elements
  • Features in-depth, detailed coverage of surveying, points, alignments, surfaces, profiles, corridors, grading, LandXML and LDT Project Transfer, cross sections, pipe networks, visualization, sheets, and project management, as well as Vault and data shortcuts
  • Offers help for the Civil 3D Certified Associate and Certified Professional exams

This book is the only complete, detailed reference and tutorial for Autodesk's extremely popular and robust civil engineering software.

Frequently asked questions

Simply head over to the account section in settings and click on ā€œCancel Subscriptionā€ - itā€™s as simple as that. After you cancel, your membership will stay active for the remainder of the time youā€™ve paid for. Learn more here.
At the moment all of our mobile-responsive ePub books are available to download via the app. Most of our PDFs are also available to download and we're working on making the final remaining ones downloadable now. Learn more here.
Both plans give you full access to the library and all of Perlegoā€™s features. The only differences are the price and subscription period: With the annual plan youā€™ll save around 30% compared to 12 months on the monthly plan.
We are an online textbook subscription service, where you can get access to an entire online library for less than the price of a single book per month. With over 1 million books across 1000+ topics, weā€™ve got you covered! Learn more here.
Look out for the read-aloud symbol on your next book to see if you can listen to it. The read-aloud tool reads text aloud for you, highlighting the text as it is being read. You can pause it, speed it up and slow it down. Learn more here.
Yes, you can access Mastering AutoCAD Civil 3D 2013 by Louisa Holland, Kati Mercier in PDF and/or ePUB format, as well as other popular books in Computer Science & CAD-CAM. We have over one million books available in our catalogue for you to explore.

Information

Publisher
Sybex
Year
2012
ISBN
9781118330715
Edition
1
Chapter 1
The Basics
Before we get into the ā€œMasteringā€ of the AutoCADĀ® Civil 3DĀ® program, it is important to understand the basics. There are numerous dialogs, Ribbons, menus, and icons to pore over. They might seem daunting at first glance, but as you use them, you will gain familiarity with their location and use. In this chapter, you will explore the interface and learn terminology that will be used throughout this book.
In addition, we will introduce the Lines and Curves commands, which offer a plethora of options for drawing lines and curves accurately.
In this chapter, you will learn to:
  • Find any Civil 3D object with just a few clicks
  • Modify the drawing scale and default object layers
  • Navigate the Ribbon's contextual tabs
  • Create a curve tangent to the end of a line
  • Label lines and curves

The Interface

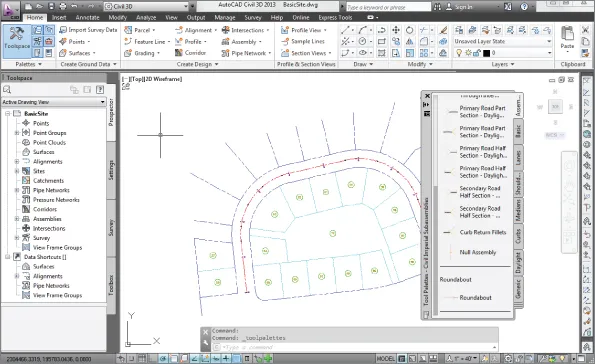
If you have used Civil 3D 2010 or newer, the interface for Civil 3D 2013 is basically the same. If you are new to Civil 3D or are coming from Civil 3D 2009 or prior, this part of the chapter is for you. Civil 3D uses a Ribbon-based interface, which is where you will access many of the tools. The Ribbon consists of tabs and panels that organize tools into logical groups. When working in Civil 3D 2013, you will spend the majority of your time on the Home tab, shown in Figure 1.1.
Figure 1.1 The Ribbon runs horizontally across the top of your screen and is where you will access many tools.
1.1
The interface may change slightly, depending on what task you are performing. When you click on a Civil 3D object, you will see a context-specific contextual tab appear in the Ribbon. Figure 1.2 shows the Civil 3D palette sets, along with the AutoCAD tool palettes and Ribbon displayed in a typical environment.
Figure 1.2 Overview of the Civil 3D environment. Toolspace is docked to the left, and tool palettes float over the drawing window. The Ribbon is at the top of the workspace.
1.2
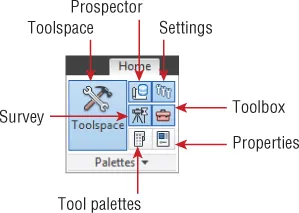
Panels are subgroups within each tab that further organize your tools. For example, the Palettes panel on the Home tab (shown in Figure 1.3) is where you can toggle on or off the elements you are about to learn.
Figure 1.3 Palettes panel of the Home tab
1.3

Toolspace

UnFigure
Toolspace is a set of palettes that is specific to Civil 3D. You will want to have the palette visible any time you are working in Civil 3D. If you do not see it, click the Toolspace button on the Home tab and select Palettes.
Toolspace can have as many as four tabs to manage user data, as follows:
  • Prospector
  • Settings
  • Survey
  • Toolbox
The tabs can be turned on or off by toggling the display on the Palettes panel.
Each tab has a unique role to play in working with Civil 3D. Prospector and Settings will be your most frequently visited tabs. Survey and Toolbox are used for special tasks that you will examine in the following section.

Prospector

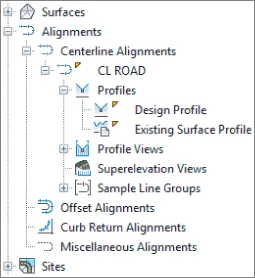
Prospector shows your drawing-specific information about what currently exists in your project. Civil 3D objects are listed in workflow order, starting at the top of the listing. Each main grouping under the drawing name is referred to as a collection. If you expand a collection by clicking on the plus sign next to the name, you will see the contents of that group. Some of these groups are empty until objects are created.
Because all Civil 3D data is dynamically linked together, you will see object dependencies as well. You can learn details about an individual object by expanding the tree and selecting an object (Figure 1.4).
Figure 1.4 A look at the Alignment branch of the Prospector tab. Profiles are linked to alignments; therefore, they appear under alignments.
1.4
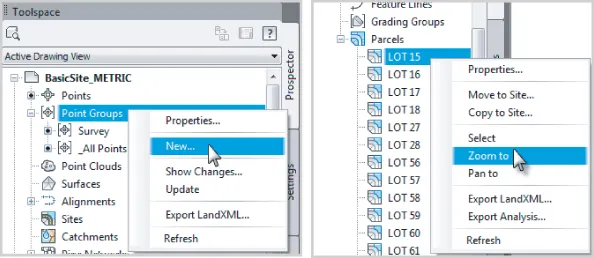
Right-clicking the collection name allows you to select various commands that apply to all the members of that collection. For example, right-clicking the Point Groups collection brings up the menu shown in Figure 1.5.
Figure 1.5 Context-sensitive menus in Prospector
1.5
In addition, right-clicking the individual object in the list view offers many commands unique to Civil 3D: Zoom To Object and Pan To Object are typically included. By using these commands, you can find any parcel, point, cross section, or other Civil 3D object in your drawing almost instantly.
For example, if you are interested in locating LOT 27 using the Zoom To command, locate the Sites collection on the Prospector tab of Toolspace. Expand the Proposed Site and highlight Parcels. At the bottom of Prospector, you will see all the lots listed. To locate LOT 27 graphically, right-click it and select Zoom To.
Near the top of the Toolspace you will see a pull-down giving you the option of Active Drawing View or Master View.
Active Drawing view will show you:
  • The current drawing
  • Data shortcuts
Master view will show you:
  • Open drawings
  • Data shortcuts
  • Drawing templates
Master view will list every drawing you have open, as well as its contents and templates. If you use Master view, the name of the drawing you are working with appears at the top of the list in bold. To make a drawing current, right-click its name in Prospect...

Table of contents

  1. Cover
  2. Title Page
  3. Copyright
  4. Publisher's Note
  5. Acknowledgments
  6. About the Authors
  7. Introduction
  8. Chapter 1: The Basics
  9. Chapter 2: Survey
  10. Chapter 3: Points
  11. Chapter 4: Surfaces
  12. Chapter 5: Parcels
  13. Chapter 6: Alignments
  14. Chapter 7: Profiles and Profile Views
  15. Chapter 8: Assemblies and Subassemblies
  16. Chapter 9: Custom Subassemblies
  17. Chapter 10: Basic Corridors
  18. Chapter 11: Advanced Corridors, Intersections, and Roundabouts
  19. Chapter 12: Superelevation
  20. Chapter 13: Cross Sections and Mass Haul
  21. Chapter 14: Pipe Networks
  22. Chapter 15: Storm and Sanitary Analysis
  23. Chapter 16: Grading
  24. Chapter 17: Plan Production
  25. Chapter 18: Advanced Workflows
  26. Chapter 19: Quantity Takeoff
  27. Chapter 20: Label Styles
  28. Chapter 21: Object Styles
  29. Appendix A: The Bottom Line
  30. Appendix B: Autodesk Civil 3D 2013 Certification
  31. Index