![]()
Part 1: The Basics
Chapter 1: Exploring the AutoCAD Interface
Chapter 2: Creating Your First Drawing
Chapter 3: Setting Up and Using AutoCAD’s Drafting Tools
Chapter 4: Organizing Objects with Blocks and Groups
Chapter 5: Keeping Track of Layers and Blocks
![]()
Chapter 1
Exploring the AutoCAD Interface
Before you can start to use AutoCAD for Mac, you’ll need to become familiar with the basics. If you’re completely new to AutoCAD, you’ll want to read this first chapter carefully. It introduces you to many of AutoCAD’s basic operations, such as opening and closing files, getting a close-up look at part of a drawing, and changing a drawing. If you’re familiar with the latest Windows version of AutoCAD, you should review this chapter anyway to get acquainted with the Macintosh version. The AutoCAD Mac interface is quite different from the Windows version, so this chapter will help you find the tools you are familiar with.
Autodesk releases new versions of AutoCAD every year. Part of this strategy is to introduce improvements that focus on a particular category of features. This latest version, AutoCAD for Mac, includes several new features that are related to curves in both 2D drafting and 3D modeling. There are also a number of enhancements that allow you to easily select similar objects in a drawing. The ability to make objects appear transparent has also been improved.
Autodesk has discovered that the number of 3D users is on the upswing, so with this version, you’ll see some new 3D features that will give you more freedom to create 3D shapes. These features include some new ways to create surface forms and the editing tools that enable you to easily manipulate 3D solids and surfaces.
You’ll get a chance to explore these new features and many more as you work through this book. Before you begin the exercise later in this chapter, make sure that you have loaded the sample files from this book’s companion website, www.sybex.com/go/masteringautocadmac. See the introduction for details.
In this chapter, you’ll learn to do the following:
- Use the AutoCAD application
- Get a closer look with the Zoom command
- Save a file as you work
- Make changes and open multiple files
Taking a Guided Tour
In this section, you’ll get a chance to familiarize yourself with the AutoCAD application and how you communicate with AutoCAD. As you do the exercises in this chapter, you’ll also get a feel for how to work with this book. Don’t worry about understanding or remembering everything you see in this chapter. You’ll get plenty of opportunities to probe the finer details of the program as you work through the later chapters. To help you remember the material, you’ll find a brief set of questions at the end of each chapter. For now, just enjoy your first excursion into AutoCAD.
Launching AutoCAD
If you have already installed AutoCAD (see Appendix B on the book's website) and are ready to jump in and take a look, click the AutoCAD icon in the Dock. AutoCAD opens and displays a blank default document named Drawing1.dwg.
If you’re using the trial version, you’ll see the Product License Activation window after you click the AutoCAD icon. This window shows you the number of days you have left in the trial version. It also enables you to activate the product if you purchase a license. Click the Try button to continue to the blank default document.
Now let’s look at the AutoCAD application in detail. Don’t worry if it seems like a lot of information. You don’t have to memorize it, but by looking at all the parts, you’ll be aware of what is available in a general way.
The AutoCAD Application
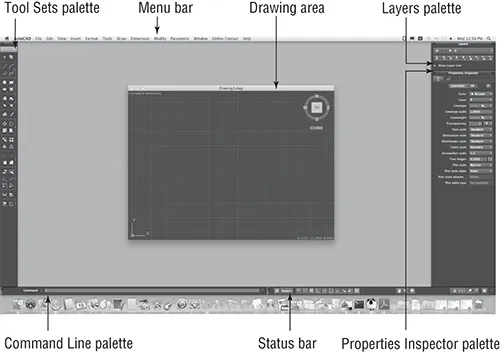
The AutoCAD program window is divided into seven parts:
- Menu bar
- Layers palette
- Properties Inspector palette
- Tool Sets palette
- Drawing area
- Command Line palette
- Status bar
Figure 1-1 shows a typical layout of the AutoCAD application. You can organize the AutoCAD palettes into any arrangement you want, but while you’re learning AutoCAD you may want to leave the default arrangement in place.
The Menu Bar
Like a typical Mac application, AutoCAD displays a menu bar where you can select a command to perform a task. As you work through this book, you’ll be directed to choose commands from the menu bar where appropriate. Often commands in the menu bar are repeated as tools in the Tool Sets palette, so I’ll direct you to select a tool from the Tool Sets palette or a command from the menu bar and you can decide which method you prefer. You’ll learn about the Tool Sets palette a bit later.
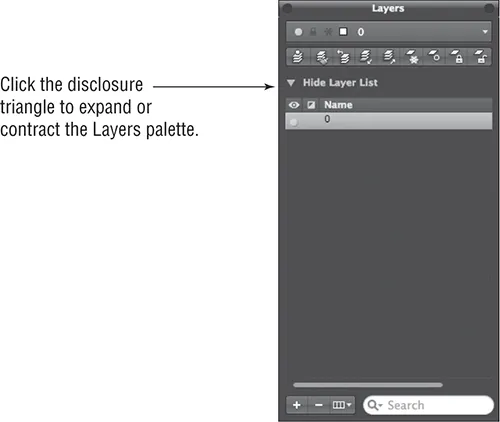
The Layers Palette
The Layers palette (Figure 1-2) displays the layer information in the current drawing. Layers help you organize your drawing. If you’ve used Photoshop or other drawing programs that employ layers, you’re probably familiar with the basic concept of layers. You can separate parts of a drawing into layers and then control the display of those parts by adjusting layer properties. You’ll learn more about layers in Chapter 5, “Keeping Track of Layers and Blocks.”
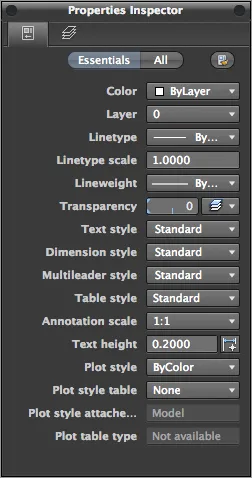
The Properties Inspector Palette
The Properties Inspector palette (Figure 1-3) displays information about the layers and objects in your drawing. When you select a layer name from the Layers palette, the layer’s properties are displayed in the Properties Inspector palette. When you draw lines, circles, and other objects, you can use the Properties Inspector palette to display the properties of those objects. You’ll learn more about object properties in Chapter 2, “Creating Your First Drawing.”
The Tool Sets Palette
The Tool Sets palette (Figure 1-4) contains tools you’ll use to create and edit your drawings. The tools in the palette give you a clue to their purpose, and you can hover the cursor over a tool to see a tooltip showing a descriptive name of the tool. The Tool Sets palette gives you a quick, one-click method for issuing commands. You’ll also find that many of the tools in the Tool Sets palette duplicate commands in the menu bar.
The Tool Sets palette is organized into groups of tools that serve similar functions. Figure 1-4 shows the tool groups; some can be expanded into panels, which are described later in this section.
Though not obvious, the Tool Sets palette offers three tool sets, or workflow panels: Drafting, Annotation, and Modeling (see Figure 1-4). The one you see now is the Drafting workflow. You ca...