- 408 pages
- English
- ePUB (mobile friendly)
- Available on iOS & Android
eBook - ePub
About this book
Utilizing as few words as possible, but presenting a tremendous variety and volume of illustrations, this all-in-one guide details the fundamentals of drawing in its various phases and fields. In the opening pages, the author points out the first step on the road to creative achievement: artists must learn how to see people and things in terms of pictures, then master the techniques needed to express themselves on paper.
Geared to newcomers and yet still beneficial for more experienced artists, Moranz’s illuminating advice covers everything from nude and draped figures to the art of portraits and sketching animals. He covers the effective use of various mediums, including pencil, charcoal, pen, and wash. Plus, he offers helpful tips on developing a sixth sense about perspective, the basics of composition, reflecting light and shadow, and more. There's even a chapter on taking drawing one step further — from a pleasurable hobby to a successful commercial venture.
Geared to newcomers and yet still beneficial for more experienced artists, Moranz’s illuminating advice covers everything from nude and draped figures to the art of portraits and sketching animals. He covers the effective use of various mediums, including pencil, charcoal, pen, and wash. Plus, he offers helpful tips on developing a sixth sense about perspective, the basics of composition, reflecting light and shadow, and more. There's even a chapter on taking drawing one step further — from a pleasurable hobby to a successful commercial venture.
Tools to learn more effectively

Saving Books

Keyword Search

Annotating Text

Listen to it instead
Information
PART ONE
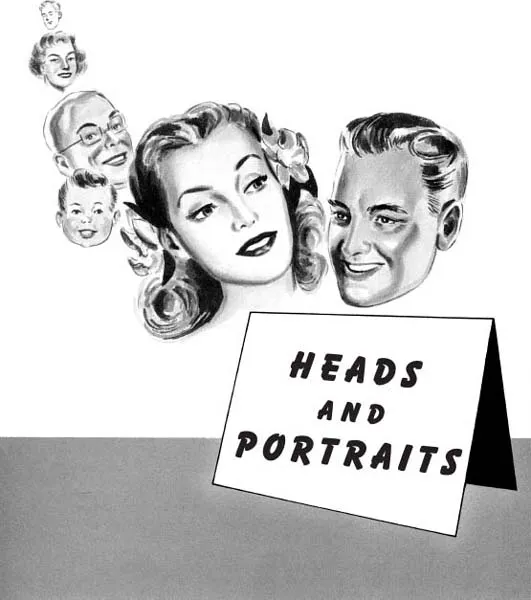
HEADS AND PORTRAITS
HEADS
HEAD and facial characteristics are of prime importance to the artist. Of the five senses, four center in the head. Your thoughts, your every act and feeling affect your facial expression. To become proficient in drawing the head and face, however, is not inordinately difficult. Almost everyone has, at some time, drawn an oval, placed the eyes, nose and mouth inside, added the ears and the hair line—and then wondered what had been left out!
In order to draw the head you must be able to capture the expression, you must be able to give sharp definition to each of the features of the face, but primarily you must know where these features fit into the face! We shall have a look at the eyes, the nose, the mouth and the ears separately, but let’s not get ahead of the story.
We know that through our facial expressions we show our inner feelings. The face is in a continual process of changing expressions, but nearly every individual has some particular facial expression by which he can be identified. There are very few principles to guide the artist in putting expression into the faces he draws. We can, however, divide the head into three terminal expression zones: first, the area of the mouth and jaw; second, the nose and cheeks; third, the eyes and brow.
The artist can best study expression by examining his own face and observing the faces of his friends. Stand before a mirror and express various emotions. Notice when smiling how the mouth opens and the lips curve up at the corners. The face is broadened as the cheeks move up and form a deeper pouch beneath the eyes. The eyes are generally narrowed. A frown, on the contrary, will bring the eyebrows closer together and wrinkle the brow. The mouth is usually more compressed and the lips will appear thinner. The outline of the nostrils is more sharply defined.
Whenever the face expresses emotion some change occurs in each of the expression zones. Handling expressions delicately will lend subtlety to your drawing. Overemphasis on any particular part of the face may destroy the effect. Any change in one expression zone will have a direct bearing on another.
From infancy to old age the face develops lines of character. Note particularly the wrinkles about the eyes, furrows of the brow and the lines extending from the nostrils downward. Developing these lines of character adds individuality to a face.
Drawing the hair is often a stumbling block. A common mistake is to spend too much time and put too much detail into the drawing of the hair. It should be drawn in its simplest masses. By adding a few lines following the direction in which the hair grows, you will establish the whole effect.
There are no two faces exactly alike. Approach every face you draw as a new adventure, but remember that all faces have this in common: no face can be right without proper construction. The two sides of the face must balance, and proper relationship must be maintained between the features and the shape of the head on which they are placed. Watch particularly the space between the eyes, the placement of the ears and nose, the location of the mouth and the hairline framing the face.
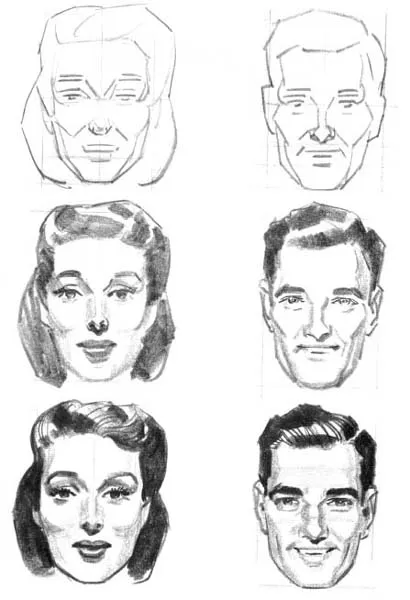
There are several methods or devices which you will need to use while you are training your eye and hand. These methods are no more than props on which you can lean while you are learning to draw, but you have every right and every reason to use these props or devices. One of these devices will help you greatly in handling the primary problem of proportion. So let’s begin our study of heads by quickly and simply tackling this problem. The block method is the most universal approach to proportion.
THE BLOCK METHOD
When viewed from the front or back, the average adult human head measures approximately six inches wide and eight inches from the chin to the top of the head. A block, six inches wide and eight inches high, will give you the framework. Within this framework guide lines will be drawn to give you the correct proportions of the face. The four illustrations on the following page will show you how to proceed.
In the first figure, four guide lines have been drawn. Down the center is a vertical line. Three horizontal lines are drawn across the block. The first is about midway between the top and the bottom of the block. The second horizontal line divides the lower part of the block in half. The third horizontal line is drawn three-fourths the distance down from the center horizontal line or one-eighth of the total block from top to bottom.
Now what is the purpose of these guide lines? The vertical line will keep the balance between the two sides of the face you are going to draw. The center horizontal line is the eye line on which you construct the eye. On the second horizontal line you mark the base of the nose. And on the third horizontal line you have the location of the mouth.
Remember, these are merely guide lines. You will need to, and be able to, change them to meet particular facial characteristics. But for this explanation you should follow them closely.
Now you are ready to start working on the face. In the second figure you will see how this is done. With straight lines draw the boundaries of the forehead, top and sides. Rough in the upper border of the eye sockets on the center horizontal line, making sure that they are balanced on either side of the center vertical line. At the intersection of the second horizontal line and the vertical line draw a small triangle to denote the base of the nose. And at the intersection of the third horizontal and the vertical line, draw a small line to indicate the location of the mouth. Rough in the ears on the sides of the head between the center horizontal line and the horizontal line just below it.
You are now ready to fill in the features at the locations marked. The third figure shows how this is done. With heavy strokes fill in the features that you want to appear in the final drawing. At this point you will have reached the fourth figure. Erase the guide lines and see what you have been able to do under the block method. Even on your first attempt, if you have followed the instructions step by step, you should have a head and face which show sound construction and proportion.
The artist, like the architect, has a definite construction problem. Let the block represent the scaffolding while you are learning to draw. It will provide a good framework as well as an accurate means of measurement. With practice your hand will follow your eye and you will be able to take the preliminary steps automatically, without the use of props.

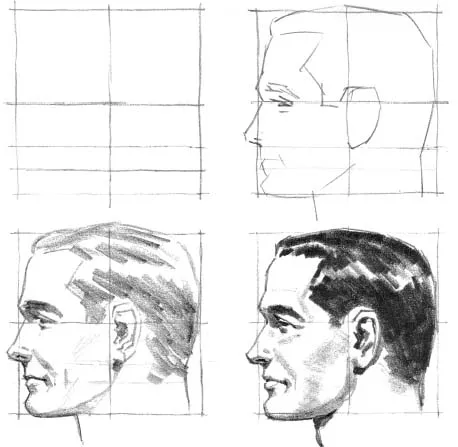
THE PROFILE
Up to this point we have considered the head and face from a front view only. This is very convenient as a beginning in drawing, but it is only the beginning. Let...
Table of contents
- Contents
- Preface
- Silent Instructor
- Part One — Heads AND Portraits
- Part Two — Hands AND Feet
- Part Three — Figure Drawing
- Part Four — The Draped Figure
- Part Five — Perspective
- Part Six — Composition
- Part Seven — Advertising Layout
- Part Eight — Creating Illustrations
- Part Nine — Animals
- Part Ten — Cashing IN
- Index
Frequently asked questions
Yes, you can cancel anytime from the Subscription tab in your account settings on the Perlego website. Your subscription will stay active until the end of your current billing period. Learn how to cancel your subscription
No, books cannot be downloaded as external files, such as PDFs, for use outside of Perlego. However, you can download books within the Perlego app for offline reading on mobile or tablet. Learn how to download books offline
Perlego offers two plans: Essential and Complete
- Essential is ideal for learners and professionals who enjoy exploring a wide range of subjects. Access the Essential Library with 800,000+ trusted titles and best-sellers across business, personal growth, and the humanities. Includes unlimited reading time and Standard Read Aloud voice.
- Complete: Perfect for advanced learners and researchers needing full, unrestricted access. Unlock 1.4M+ books across hundreds of subjects, including academic and specialized titles. The Complete Plan also includes advanced features like Premium Read Aloud and Research Assistant.
We are an online textbook subscription service, where you can get access to an entire online library for less than the price of a single book per month. With over 1 million books across 990+ topics, we’ve got you covered! Learn about our mission
Look out for the read-aloud symbol on your next book to see if you can listen to it. The read-aloud tool reads text aloud for you, highlighting the text as it is being read. You can pause it, speed it up and slow it down. Learn more about Read Aloud
Yes! You can use the Perlego app on both iOS and Android devices to read anytime, anywhere — even offline. Perfect for commutes or when you’re on the go.
Please note we cannot support devices running on iOS 13 and Android 7 or earlier. Learn more about using the app
Please note we cannot support devices running on iOS 13 and Android 7 or earlier. Learn more about using the app
Yes, you can access Drawing and Illustration by John Moranz in PDF and/or ePUB format, as well as other popular books in Art & Art Techniques. We have over one million books available in our catalogue for you to explore.