- 144 pages
- English
- ePUB (mobile friendly)
- Available on iOS & Android
eBook - ePub
Authentic Victorian Dressmaking Techniques
About this book
At the turn of the century, ladies of privilege could easily afford their own dressmakers, and even middle-class housewives occasionally employed competent seamstresses. But many women did their own sewing, often relying on Dressmaking, Up to Date, a how-to book published by the Butterick Publishing Company. First published in 1905 and widely considered the first modern American sewing book, this extremely rare volume is published here complete and unabridged.
This Butterick manual provides clear and concise instructions for altering patterns, hand-sewing stitches, and creating shirt-blouses, skirts, wedding and evening gowns, coats, jackets, maternity wear, undergarments, bathrobes, children's clothing, and many other articles of apparel. Today's costume historians and sewing enthusiasts will find fascinating instruction in such long-lost arts as boning a bodice perfectly, creating skirt sweepers and bust enhancers, concealing hooks and eyes, and other vintage dressmaking techniques.
An indispensable archive of information on late-Victorian and turn-of-the-century clothing, this volume will be of immense interest to anyone fascinated by the fashion and costume of the period. It will also be of value to needleworkers wanting to create accurate reproductions of Victorian-era costume, or to anyone interested in applying time-honored sewing techniques to a modern wardrobe.
Tools to learn more effectively

Saving Books

Keyword Search

Annotating Text

Listen to it instead
Information
SKIRTS
THE styles of skirts are diverse and varied, and as it is necessary to know just how to proceed when finishing any particular mode, we have selected a number which require different finishing, so that when these are understood it will hardly be possible for the worker to encounter any difficulties in other styles that may be put forth, which she cannot master. However, due consideration should be given the label on each pattern.
The lengths of skirts vary according to circumstances. The instep skirt and short round skirt are solely for walking purposes. The round skirt, which touches the floor, runs the gamut of the dancing skirt, the walking skirt and the house skirt; it is available for all conditions. The medium sweep and the long sweep skirts are usually admired for the more ceremonious occasions, the carriage, the theatre, the festival, etc.
Comparatively few of the skirts at present are lined, or, if a lining is used, it is in the form of a foundation petticoat and is often made entirely separate from the outer skirt, having its own waistband and placket closing. In neutral colors or black, one lining skirt may be worn with different outside skirts, though, unless the material of the gown is transparent, the lining skirt is often omitted entirely, one of the colored petticoats of silk or its imitations, now so generally worn, taking its place. The flat-lined skirt, as it is called when skirt and lining are made in one, is scarcely ever seen; its return has been rumored, but it seems hardly likely to find much favor, as a skirt of this sort is always heavy. It is true that so much cloth and so much lining have probably the same actual weight whether made together or separately, but the unlined skirt worn over the foundation petticoat is apparently much lighter and certainly more graceful, and, when made of cloth, even the foundation skirt may be dispensed with. Taffeta is usually employed for the foundation skirt, but where the cost is a consideration, percaline, nearsilk or any like substitute may be used instead of silk.

No. 1.—Plaiting Stitched on Foundation Skirt
If percaline or any double-width material is used and a skirt with wide gores is to be cut, fold the lining crosswise, allowing the cut ends to meet, and cut the largest piece first, placing the broadest end of the pattern at the cut end and the straight side to the selvage of the lining. The narrower gores may be inverted and cut from the remaining width. When cutting circular or other skirts which are to be bias at the centre front, the directions on the label should be followed implicitly. With the tracing-wheel trace through the pattern, keeping an even, true line for the seam. If necessary the front or any single gore may be cut last by folding the remaining lining lengthwise, being careful to measure before the previous gores have been cut. that the length will be sufficient.
The foundation skirt is usually finished with an accordion-plaited flounce, which may be any prescribed depth. If made with a plaiting, the length of the upper skirt must be calculated before cutting, since the deeper the plaiting the shorter the upper portion, besides, allowance must be made for the seam which joins these together, and the hem on the plaiting. This hem is one-quarter of an inch deep and stitched by machine. It is joined to the skirt in an ordinary seam, turned up on the skirt and covered with a ribbon binding, as shown at No. 1, or a narrow facing of silk may be sewed in the seam at the same time and all turned up and stitched to the upper portion.
Sometimes this plaiting is hemmed top and bottom and the upper portion is permitted to extend under the flounce several inches. The latter edge is pinked or finished with a tiny hem and the flounce is placed at the line indicating the length on the upper portion, and stitched to this skirt one-quarter of an inch below the upper hemmed edge, forming a heading.
After cutting, the lining is stitched and pressed and the seams overcast or bound, after which the plaiting is added. This foundation skirt may now be basted on the belt, and is ready to be tried on, but is not finished until the drop skirt is added.
The belt is made of silk and should be cut on the warp or selvage. It is usually two inches and a quarter longer than the size of the waist, the width varying from very narrow for a stout figure to two inches and a half unfinished, for a slim figure. Crease three-eighths of an inch off each side and the same at both ends, double the belt over forming half the width and baste near the fold edge; now mark off one inch and a half which will be left beyond the size of the waist for the lap; this must be basted plain to the belt.
Find the centre of the skirt, also the centre of the belt after the inch and a half has been deducted for the lap, and pin together by placing the right side of the belt to the lining of the skirt; pin on half-way round, fold the belt at the centre crease and mark with chalk or pins where the seams or darts of the other side of the skirt are to be placed. In this manner corresponding seams applied at these marks will be fitted to their proper positions on each side and the skirt will be accurately adjusted on the belt. Baste off the three-eighths of an inch seam with strong cotton.
If there is any doubt that the skirt may not fit correctly it is a better plan not to baste the belt to the skirt in the beginning, but to pin it securely around the waist and pin the skirt to the belt after the hips are fitted and the placket carefully adjusted. In this way the correct lines for the seams may be positively ascertained. When fitting, the length is adjusted by raising or lowering the plaiting on the upper skirt portion where necessary.
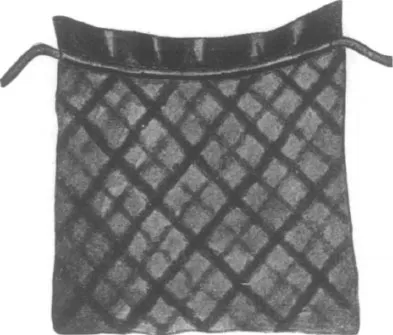
No. 2.—Cord on Top of Skirt
If a plaiting is not desired on the bottom of the skirt, the lining is cut full length and the bottom interlined with crinoline or haircloth from five to ten inches deep and this is faced to its full depth with the lining, as explained in the chapter “Wedding and Evening Gowns.” The interlining, however, may be omitted if a number of small ruffles are to finish this skirt.
After the skirt has been prepared, the correct length is measured off. Sometimes a skirt will be too long at the sides and back and it seems impossible to obtain the correct effect by turning up at the bottom; in this case raise the skirt above the belt at the sides and back, adjusting around the hips. When a skirt is to be short (for golfing or other wear) a good plan for obtaining an even length all around is to measure on a card the desired length from the floor. Having the figure on a pedestal or table, rest the card on the floor and with tailors’ chalk mark all around the skirt at the top of the card. This is perhaps the simplest and best method for short skirts.
Trains are any desired length, but for these a special pattern should be bought, as through any attempt at experiment in lengthening the back, the gown is likely to be ruined by the imperfect shaping.
Pin the corresponding seams together at the top and bottom of the skirt and with either chalk or pins mark for the length through the opposite side. Baste a true line around the bottom, turn up on this tracing and try on the skirt. Any little variation or modification may be made at the top around the belt, and, if necessary, alterations may be made at the bottom.
If the lining has been carefully fitted, there will be very little trouble later, and the skirt may be readily completed. Never finish a skirt around the bottom before the belt is basted on, because no matter how carefully measured it is likely to hang unevenly; the skirt may be short in places, and, if completed with velveteen or braid, there is no possible way of lengthening.
The material skirt is cut from the pattern and may be the same or an entirely different shape from the foundation skirt. After the seams are joined and pressed this skirt is fitted to the foundation skirt and sewed in the same belt unless the petticoat is desired separate. The lower edge is usually finished with a hem about one inch and a half deep, which must be allowed in cutting, as only a seam finish is generally allowed on patterns. The hem may be stitched in rows on the machine or blind-stitched, or tucks or other decorations may be added.
In a great many skirts where few gores are provided it is necessary to hold the material a little full on the belt, so that the shaping of the gores may not be distorted to fit over the hips which may be a trifle larger, or a waist a little smaller than the average. In perfectly plain skirts of wool this fulness may be pressed so that it is not at all discernible. In stiff silks the effect cannot be entirely obliterated, but it may be somewhat relieved by judicious pressing.
If necessary, the skirt may be tried on for the last time, to be certain that it is thoroughly correct, in which case the belt is ready for finishing.
FINISHING THE BELT
One edge of the belt has been sewed to the skirt; turn the remaining edge over the top of the skirt covering “the seam and stitch down by hand or machine. Overhand the ends that have been turned in.
When sewing the hooks and eyes on, place a hook one-eighth of an inch back from the right-hand edge at the bottom of the belt; sew an eye with the point touching the seam that joins the fly to the skirt. Put another eye directly on the end of this side of the belt and a hook on the opposite side to correspond. Hook the skirt before marking for this latter.
Hangers four inches long are made of silk or cotton tape and sewed flat to the belt; one end fastened at the hook, drawing the tape its full length toward the front and sewing securely on the other end. Measure on the opposite side of the belt for the corresponding tape.
Work a herringbone or fancy stitch on the belt to indicate the centre of the skirt. This little mark is very useful inasmuch as it permits one to properly adjust the skirt on the figure, so that the centre of the front gore will always be directly below the centre of the front of the waist.
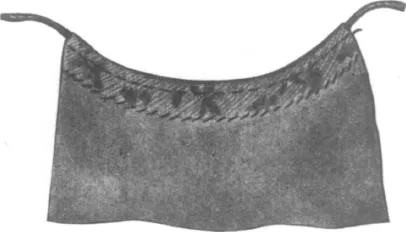
No. 3.—Finished Effect of Cord
Skirts for stout figures are frequently finished with a cording, and this is accomplished in the following manner: After the skirt has been properly fitted, a bias strip of strong silk is cut one inch and a quarter wide. This must be a perfect bias, and an old-fashioned cording made by using a medium-sized cable cord. In basting, be very careful not to stretch either the top of the skirt or the cording. If the skirt is stretched, it will not cling properly to the figure, but stand out at the top in a very ungraceful manner. If the cording is stretched, it will not fit when turned over. Baste the skirt and cording together by placing the side having the narrow seam of silk against the right side of the skirt with the cording toward the bottom—No. 2—and having the line of running stitches three-eighths of an inch below the top of the skirt. Baste this carefully, after which sew it to the skirt by hand, using back-stitches directly on top of the previous row of stitches. Turn the skirt over on the line of stitching, so that the cording just forms the heading. None of the stitches should show here, and if the work is properly executed the cord will be snugly encased and the top of the skirt roll slightly. With the right side of the skirt toward the worker, baste along the top just below the cording. Turn on the wrong side, turn in the edge of the silk one-quarter of an inch and hem carefully to the lining. Stretch the bias silk slightly where necessary at the curves, and be careful not to take the stitches through to the outside. The finished effect is shown at No. 3.
Sew three or five hooks in an upright position on the back of the belt two inches apart to correspond with eyes or rings on the waist. This prevents any displacement or pulling away at the back and assures a feeling of security which is a relief to the wearer's mind. If the waist is to be worn outside the skirt, worked rings are placed on the belt and hooks on the waist. The method of finishing the skirt of a wedding or evening gown is described in the chapter “Wedding and Evening Gowns” an...
Table of contents
- Cover Page
- Title Page
- Copyright Page
- Introduction
- Contents
- Frontispiece—The Sewing Circle
- Hand-Sewing Stitches
- Important Points and Aids in Dressmaking
- The Correct Method of Altering Patterns
- Shirt-Blouses
- Draped Waists
- Skirts
- Novel, Artistic Seams
- Wedding and Evening Gowns
- The Tailor-Made Gown
- Coats and Jackets
- Practical and Ornamental Stitches
- Bias Bands and Folds—Turning Corners
- An Empire Tea-Gown
- Desirable Garments for Maternity Wear
- Making and Finishing Underwear
- The Bath-Robe
- Children's Clothes
- Boys’ Suits
Frequently asked questions
Yes, you can cancel anytime from the Subscription tab in your account settings on the Perlego website. Your subscription will stay active until the end of your current billing period. Learn how to cancel your subscription
No, books cannot be downloaded as external files, such as PDFs, for use outside of Perlego. However, you can download books within the Perlego app for offline reading on mobile or tablet. Learn how to download books offline
Perlego offers two plans: Essential and Complete
- Essential is ideal for learners and professionals who enjoy exploring a wide range of subjects. Access the Essential Library with 800,000+ trusted titles and best-sellers across business, personal growth, and the humanities. Includes unlimited reading time and Standard Read Aloud voice.
- Complete: Perfect for advanced learners and researchers needing full, unrestricted access. Unlock 1.4M+ books across hundreds of subjects, including academic and specialized titles. The Complete Plan also includes advanced features like Premium Read Aloud and Research Assistant.
We are an online textbook subscription service, where you can get access to an entire online library for less than the price of a single book per month. With over 1 million books across 990+ topics, we’ve got you covered! Learn about our mission
Look out for the read-aloud symbol on your next book to see if you can listen to it. The read-aloud tool reads text aloud for you, highlighting the text as it is being read. You can pause it, speed it up and slow it down. Learn more about Read Aloud
Yes! You can use the Perlego app on both iOS and Android devices to read anytime, anywhere — even offline. Perfect for commutes or when you’re on the go.
Please note we cannot support devices running on iOS 13 and Android 7 or earlier. Learn more about using the app
Please note we cannot support devices running on iOS 13 and Android 7 or earlier. Learn more about using the app
Yes, you can access Authentic Victorian Dressmaking Techniques by Kristina Harris in PDF and/or ePUB format, as well as other popular books in Design & Fashion Design. We have over one million books available in our catalogue for you to explore.