Learning Objectives
By the end of this chapter, you will be able to:
- Establish the code-build-test process
- Describe the various stages of compilation
- Decipher complicated C++ type systems
- Configure projects with unit tests
- Convert source code to object code
- Write readable code and debug it
In this chapter, we will learn to establish the code-build-test model that will be used throughout the book, write beautiful code, and perform unit tests.
Introduction
C++ is one of the oldest and most popular languages that you can use to write efficient code. It is both "close to the metal," like C, and has advanced object-oriented features, like Java. Being an efficient low-level language makes C++ the language of choice for domains in which efficiency is paramount, such as games, simulations, and embedded systems. At the same time, being an object-oriented language with advanced features such as generics, references, and countless others makes it suitable for large projects that are developed and maintained by multiple people.
Almost any programming experience involves organizing your code base and using libraries written by others. C++ is no different. Unless your program is simple, you will distribute your code into multiple files that you need to organize, and you will use various libraries that fulfill tasks, usually in a much more efficient and robust way than your code would. C++ projects that do not use any third-party libraries are edge cases that do not represent the majority of projects, which use many libraries. These projects and their libraries are expected to work in different hardware architectures and operating systems. Therefore, it is important to spend time on project setup and understand the tools used to manage dependencies if you are going to develop anything meaningful with C++.
Most modern and popular high-level languages have standard tools to maintain projects, build them, and handle their library dependencies. Many of these have repositories that host libraries and tools that automatically download and use libraries from those repositories. For example, Python has pip, which takes care of downloading and using appropriate versions of libraries that the programmer wants to use. Similarly, JavaScript has npm, Java has maven, Dart has pub, and C# has NuGet. In most of these languages, you list the name of the library and the version that you would like to use, and the tool automatically downloads and uses the compatible version of the library. These languages benefit from the fact that the programs are built and run in a controlled environment in which a certain level of hardware and software requirements are satisfied. C++, on the other hand, is expected to work in a variety of contexts with different architectures, including very primitive hardware. Hence, C++ programmers are less pampered when it comes to building programs and performing dependency management.
Managing C++ Projects
In the world of C++, we have several tools that help in managing project sources and their dependencies. For example, pkg-config, Autotools, make, and CMake are the most notable ones in the community. Compared to the tools of the other high-level languages, these are much more complicated to use. CMake has arisen among these as the de facto standard for managing C++ projects and their dependencies. It is more opinionated compared to make, and it is accepted as the direct project format for most IDEs (Integrated Development Environments).
While CMake helps with managing projects and their dependencies, the experience is still far from higher-level languages in which you list the libraries and their versions that you want to use and everything else is taken care of for you. With CMake, you still are responsible for installing libraries properly in your development environment, and you are expected to use compatible versions for each library. In popular Linux distributions with extensive package managers, you can easily install binary versions of most popular libraries. However, sometimes, you may have to compile and install the libraries yourself. This is a part of the whole C++ developer experience, which you will gather by learning more about the development platform of your choice. Here, we will focus more on how to properly set up our CMake projects, including understanding and resolving issues related to libraries.
The Code-Build-Test-Run Loop
In order to base our discussion on a solid foundation, we will immediately start with a practical example. We will start with a C++ code base template that you can use as a starting point for your own projects. We will see how we can build and compile it using CMake on the command line. We will also set up the Eclipse IDE for C/C++ developers and import our CMake project. The use of an IDE will provide us with facilities that ease the creation of source code and enable us to debug our programs line by line to view what exactly happens during the execution of our program and correct our mistakes in an informed fashion rather than trial and error and superstition.
Building a CMake Project
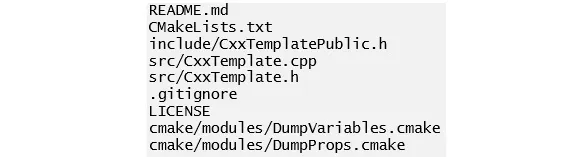
The de facto standard for C++ projects is to use CMake to organize and build the project. Here, we will use a basic template project as a starting point. The following is the folder structure of a sample template:
Figure 1.1: Folder structure of a sample template
In the preceding figure, the .gitignore file lists the file patterns that should not be added to the git version control system. Such ignored files include the outputs of the build process, which are created locally and should not be shared among computers.
The files in the include and src folders are the actual C++ source files, and the CMakeLists.txt file is the CMake script file that glues the project together by handling the source compilation rules, library dependencies, and other project settings. CMake rules are high-level platform-independent rules. CMake uses them to...