- 224 pages
- English
- ePUB (mobile friendly)
- Available on iOS & Android
eBook - ePub
Trusted by 375,005 students
Access to over 1.5 million titles for a fair monthly price.
Study more efficiently using our study tools.
Information
Topic
ArtSubtopic
Culinary Arts

I feel like I came to pizza by being observant. By being a genuine fan. By seeing, tasting, and feeling. It was a culmination of life (or pizza) experiences. That’s how I arrived at Pizzeria Beddia. All the pizzas that inspired me brought me right here: the Arizona olive oil that Chris Bianco finishes his pies with, Dom DeMarco’s use of both fresh and aged mozzarellas, and the simplicity of Anthony Mangieri’s Neapolitan pies.
Early in my pizza quest I was obsessed with the traditional, wood-fired pizzas of Naples. Using 00 flour, baking at 1,000°F (something like 540°C), making sauce with only San Marzano tomatoes from the volcanic soil of Mount Vesuvius—I felt this was the pure way forward. There are guidelines and rules to making these pizzas, and I wanted to follow them. But I slowly realized that all of my pizza heroes didn’t really follow any strict codes. They created their own paths.
Before long, wood-fired pizzerias were en vogue and started popping up everywhere. Most of it is crap. To be honest, pizza is a quick food with great profit margins, but unfortunately people don’t take the time to do it well. They’re just interested in making a buck. Luckily, it took me a while to get my shit together and open the pizza shop. I spent a lot of time doing research and decided that I needed to do my own thing and separate myself from the competition. I had an inspired pizza on a trip with my brother to Chicago. It was at a tiny, now-closed pizzeria called Great Lake. They made a beautiful pizza in a slightly modified deck oven. I decided after that trip to stick with traditional American pizza—what some people would call New York–style. Lower baking temperature produces a crispier, more substantial crust than the wood-fired Neapolitan style, which tends to be softer and chewier.
Pizzeria Beddia is about quality. It makes your job easier as a cook when you start with great products. There is a lot of quality food close to the pizza shop and throughout the rest of the country. You no longer have to go to Europe for superior foodstuffs. We use organic flour from Utah, sweet New Jersey tomatoes, whole-milk mozzarella from Jersey, grassy California extra-virgin olive oil, and an aged raw cow’s-milk cheese from nearby in Pennsylvania. I rely on all these ingredients to make great pizza. It is the humble marriage of a few cheeses, a solid tomato sauce, and a well-fermented crust.
When I was first opening Pizzeria Beddia, I knew I wanted to have an extremely simple menu. I’ve never liked big, complicated menus at places; nobody wants to be forced to make all those choices just to eat. I love the idea of “Here’s what I have—get what you want.” I’m not a pizza supremist.
That’s why I’ve decided to organize this book the same way. The first two parts provide everything you need to know about making the staples at home—my #1 simple red pizza and seasonal white pizzas. Toppings can then be added to any or all of the pizzas you make, with some other ways to use dough (sandwiches, bread, etc.).
This book has recipes, but it’s not a straight cookbook. Most cookbooks are stupid. I have a collection but they’re mainly books I’ve been given (or borrowed—if you recognize one in the previous pages, you’ll have to come get it yourself).
Fact is, I’ve spent my career figuring out the best way to make pizza and it’s all in here, but you’ll also have to put up with all my bullshit if you want it. The drawings, the bad jokes, the random notes and thoughts—if you want good pizza, you’ll deal. I promise you it’s worth it, just like the wait at my shop.
EQUIPMENT

Food processor: For blending cream sauces and making pesto.
Pizza stone: Get the largest pizza stone that will fit into your oven—one that will allow you to make a 16-inch (40.5-cm) pizza, ideally.
Stainless steel mixing bowls: Get multiple sizes. I use these to mix my dough and for various mise en place needs.
Digital scale: Essential for weighing flour, yeast, and other ingredients to make consistent dough. I weigh in metric. It’s how I learned, and it’s more precise than standard kitchen measurements.
Pizza cutter: It’s better than a knife!
Cheese grater: You need it for hard cheeses. A good, sturdy metal box grater will work.
Garlic press: This is a very non-Italian thing to use, but I think it’s great for distributing garlic into sauces and sausage. It’s just easy.
Pizza peel: This is the paddle you’ll use to take your pizzas in and out of the oven. They come in both metal and wood; both types are fine. Just get one you feel comfortable using.
Dough cutter: Essential for portioning your dough. Google “dough cutter.” You’ll find a good one.
Dough scraper: A pliable plastic tool, mainly used to move your dough from a bowl to the counter.
DOUGH
Makes two 1-pound (454-gram) balls
(each makes a proper 16-inch / 40.5-cm pie)
(each makes a proper 16-inch / 40.5-cm pie)
Important note while making dough: Turn your phone off and don’t speak; it’s a great time to listen, it’s a great time for new ideas, it’s not busy, you are present, and you are somewhere else. Making dough should be a calming, meditative process and a great time to think of new ideas about pizza, or about life in general.
1½ cups (355 g) cool water
2 teaspoons sugar
About ½ teaspoon active dry yeast
1 tablespoon extra-virgin olive oil
3½ cups (500 g) all-purpose or bread flour
1 tablespoon + ½ teaspoon fine sea salt
Pizza is bread. It’s really simple and a little complicated at the same time. Dough takes planning to develop good flavor, and if you do it right you’ll thank me later. You can make dough with a sourdough starter, but I’ve found that a nice, slow fermentation is more consistent and the results are always perfect. Sourdough can be unpredictable.
Find yourself a nice all-purpose or bread flour. I use organic flour, but regular King Arthur will do fine. Traditionally, four ingredients are used in making dough (flour, water, salt, and yeast), but we’re adding sugar to help with fermentation and a little oil to relax and fatten the dough.
It took me a couple of years to come up with this process, which produces a dough with excellent flavor, a crispy exterior, and a chewy interior. These measurements are in metric, as traditional Italian recipes always are. This is how I initially learned how to do it. They are more exact, which is vital in baking.
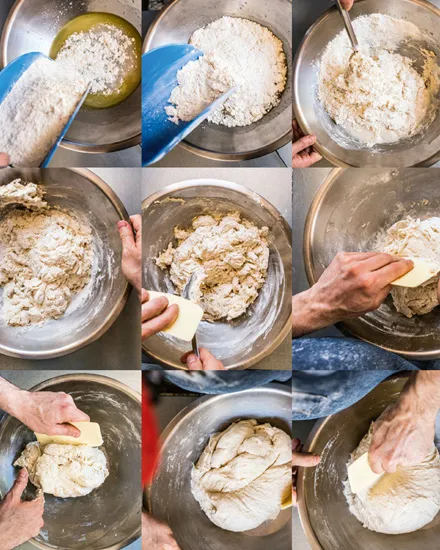
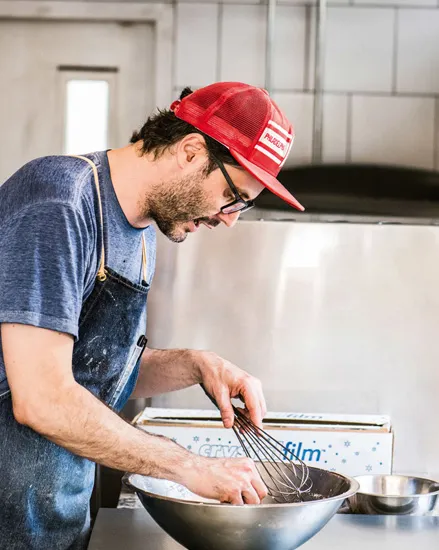
Start out by whisking the water with the sugar and yeast in a large stainless-steel bowl. Next, mix in the olive oil. Then we’ll mix in the flour. A large, strong spoon is good, or you can use your hands. If you have a stand mixer with a dough hook attachment, use that and mix for about five minutes on a slow speed, until everything is just incorporated. After everything is mixed and there aren’t any dry parts, scrape any remaining dough down the sides and cover the bowl with plastic wrap or a damp kitchen towel. Let it rest for 30 minutes. This will give the gluten structure and strength. The dough will become elastic.
Next, knead the salt into the dough until the dough is smooth and the salt is fully incorporated, using wet hands (this makes handling it easier) or a dough scraper. Gently fold the dough over onto itself. You do not want to mix in the salt early on because it will hinder the yeast development. Once the salt is incorporated, cover the bowl with plastic wrap and put it in the fridge for 24 hours—the colder temperature will result in slower, longer fermentation, which in turn results in better flavor.
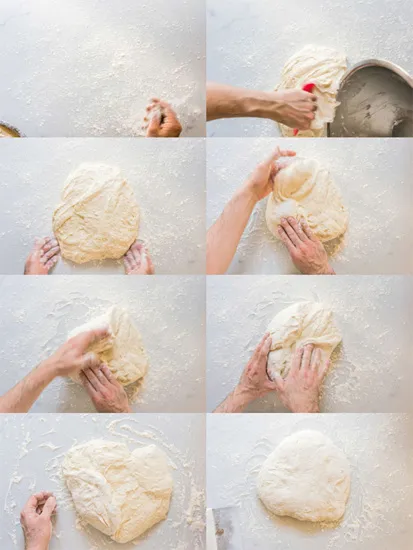
After the dough has chilled for 24 hours, take it out of the fridge and scrape it out onto a well-floured, clean counter. From here, you want to shape the entire thing into one big ball. With well-floured hands, grab either end of the dough mass and pull them up to meet in the middle. Rotate the dough mass one quarter turn and repeat. You’re basically incorporating the dough into itself to form one smooth, round, floured ball. Flip the whole thing over, then, using a knife or bench scraper, cut the dough in half. You can weigh it to keep it even or eyeball it. I weigh everything to keep it kosher.
With well-floured hands, take one half of the dough and fold it over on itself, essentially repeating the same shaping technique with each half (see the pictures on this page and this page), until you have a round, extremely smooth-surfaced ball. Consistency here is important, and it takes some practice to get it right, so don’t get discouraged if it takes a few tries. If the dough gets too sticky or tacky while you’re working it, dust it with more flour. After you have a smooth dough ball, set it on a floured surface and let it sit, covered with a kitchen towel, until it doubles in size. The climate, including temperature and humidity, plays a huge role in how fast this process happens. It should take approximately three to four hours. Just remember the goal is for it to double in size—that’s when you know the dough is ready. It should feel smooth at this point, and it should rise back slowly when you press into it with your finger.
If you’re not ready to make pizza right away, you can put the dough back in the fridge in a sealed container for another slow rise, but don’t keep it in there for more than 24 hours, or it will begin to sour and become hard to work with.


SAUCE
Makes 3½ cups (840 ml)
1 (28-ounce / 800-g) can crushed tomatoes or whole peeled tomatoes, crushed by hand or passed through a food mill
2 cloves garlic...
Table of contents
- Cover
- Title Page
- Contents
- Foreword
- Introduction
- Part One: Basic Pizza
- Part Two: White Pizza
- Part Three: Toppings
- Part Four: Composed Pizza
- Part Five: Hoagies, Sandwiches, Etc.
- About the Author
- Acknowledgement
- Index
- Copyright Page
Frequently asked questions
Yes, you can cancel anytime from the Subscription tab in your account settings on the Perlego website. Your subscription will stay active until the end of your current billing period. Learn how to cancel your subscription
No, books cannot be downloaded as external files, such as PDFs, for use outside of Perlego. However, you can download books within the Perlego app for offline reading on mobile or tablet. Learn how to download books offline
Perlego offers two plans: Essential and Complete
- Essential is ideal for learners and professionals who enjoy exploring a wide range of subjects. Access the Essential Library with 800,000+ trusted titles and best-sellers across business, personal growth, and the humanities. Includes unlimited reading time and Standard Read Aloud voice.
- Complete: Perfect for advanced learners and researchers needing full, unrestricted access. Unlock 1.5M+ books across hundreds of subjects, including academic and specialized titles. The Complete Plan also includes advanced features like Premium Read Aloud and Research Assistant.
We are an online textbook subscription service, where you can get access to an entire online library for less than the price of a single book per month. With over 1.5 million books across 990+ topics, we’ve got you covered! Learn about our mission
Look out for the read-aloud symbol on your next book to see if you can listen to it. The read-aloud tool reads text aloud for you, highlighting the text as it is being read. You can pause it, speed it up and slow it down. Learn more about Read Aloud
Yes! You can use the Perlego app on both iOS and Android devices to read anytime, anywhere — even offline. Perfect for commutes or when you’re on the go.
Please note we cannot support devices running on iOS 13 and Android 7 or earlier. Learn more about using the app
Please note we cannot support devices running on iOS 13 and Android 7 or earlier. Learn more about using the app
Yes, you can access Pizza Camp by in PDF and/or ePUB format, as well as other popular books in Art & Culinary Arts. We have over 1.5 million books available in our catalogue for you to explore.