![]()
A
RULES
Rule 1: Use the Right Wood
Rule 2: Build Yourself a Pit
Rule 3: Learn to Fire the Pit
Rule 4: Maintain Consistent Heat in the Pit
Rule 5: Choose Your Fire Wisely
A
RULES
RULE 1:
USE THE RIGHT WOOD
Now, when I say, “Use the right wood,” I’m referring to the process of choosing the type of wood you’ll use to smoke your meat, which is the very first step of cooking real pit-smoked barbecue. When I was a kid and it was time to get cooking, our first job was to pick the woods my dad liked, and the woods he liked were, number one, local, meaning whatever grew in south Georgia, and, number two, fresh and green. Jack liked to use a blend of hickory and oak for this style of cooking, and it had to be green, by which I mean young and flexible. Green wood is important because its moisture ensures that when you burn it down for coals, the coals are big and pop off easily. Think of it this way: With today’s type of barbecue technology, we all use seasoned wood, because when it cooks down it makes ash (and we find the smoky flavor from that ash desirable); but when we cook old school, we want the wood to burn down and make coals that will have to burn again, and for that process to work well you need to start with green wood.
More about that wood: The best advice I can give you is the advice my dad followed, which is to use what grows close around you. I get asked a lot about the best woods to use for barbecue, and I have my own distinct opinion on that based on my own experience: You already know I’m down in south Georgia, and that my dad taught me how to use a combination of young hickory and oak from the time I was a little boy. Then I got into competitive barbecue, and because I am in the Peach State, I have access to peach wood (I’ll sell you some and ship it to you if want—www.jacksoldsouth.com). So I’m also a big fan of peach wood because as I’ve progressed as a pitmaster I’ve learned how to blend woods. I like peach wood blended in with what started me out, hickory and oak. When I’m asked about which wood to use, I ask people where they live and what they have around them. If you have access to young green fruit woods, take advantage of them: Apple wood, pear wood, apricot wood, grapevine wood, or cherry wood—any and all of these are great choices for barbecue and should be available locally in your groceries and wherever you can buy a smoker. That’s what the first pitmasters did: If they lived in Missouri, they didn’t have the option of having peach wood shipped to them like you and I do today. They had to cook with the wood that was around them. So my answer to which wood to use is this: There are a lot of different woods that are great for barbecuing, and what you should use just depends on where you’re located and what kind of wood or trees you have in your area.
The very first step of cooking real pit-smoked barbecue is choosing
THE RIGHT WOOD.
And by that I mean local. Use wood that grows around where you live.
A
RULE 2:
BUILD YOURSELF A PIT
materials and tools
Large heavy-duty shovel
Rake or hoe
Hand tamp
Pick
Tape measure
48 cinder blocks (standard 8 × 8 × 16-inch / 20.5 × 20.5 × 40.5-cm size)
Level
Four 2 × 4-inch (5 × 10-cm) stakes
Masonry sand
Carpenter’s square
1 sheet of 48 × 80-inch (122 × 203-cm) expanded metal
2 sheets of 4 × 4-foot (1.2 × 1.2-m) 16-gauge steel
1 sheet of 2 × 4-foot (0.6 × 1.2-m) 16-gauge steel
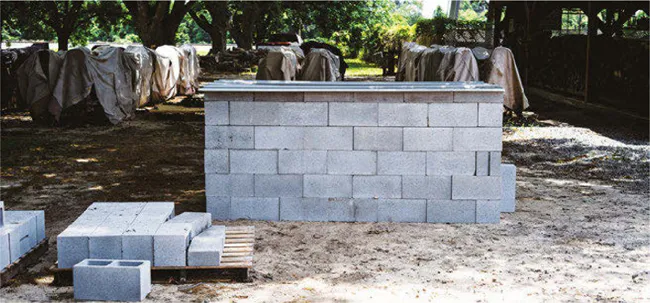
Building a backyard barbecue pit is about half a day’s worth of good hard labor, but it’s as straightforward as it gets and doesn’t require a high degree of skill. All the materials are available at a good local hardware store or home improvement center, and you can get it all for less than $400.
PICK A SITE
You need a good spot for your pit and its 48 × 80-inch (122 × 203-cm) foundation. You need level ground that is a safe distance (about 20 feet / 6 m) from your house and from any wooden structures like decks or gazebos, and as clear of dry vegetation as possible.
LAY THE GROUNDWORK
Once you’ve settled on a spot, take your time to use the shovel, rake, and tamp as necessary to level the ground thoroughly. You will need to remove grass, weeds, and rocks from the site. Dig out any high spots in the area; picks and shovels work fine for this.
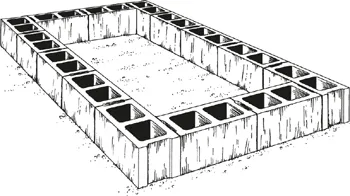
1) Take 14 cinder blocks and assemble them into a rectangle that is 48 × 80 inches (122 × 203 cm); it will be five cinder blocks long and two cinder blocks wide, as shown.
2) Place the 2 × 4-inch (5 × 10-cm) stakes at the four inside corners. Then remove the cinder blocks.
Excavate topsoil from the interior area of the pit (the area inside the stakes) and refill it with the masonry sand—you’ll end up removing 4 to 6 inches (10 to 15 cm) of topsoil and replacing it with 4 to 6 inches (10 to 15 cm) of masonry sand.
* Note: That’s the basic method, and it will have the grease from what’s cooking in the pit run down laterally into the topsoil, which is fine. If you want to do something a little more elegant, you can dig down a full foot (30.5 cm) and grade the excavated area so that any cooking grease will run down to a central point that is 12 inches (30.5 cm) deep—then just refill the hole with sand or line it with fire brick. Again, this is not necessary, but it is a nice feature.
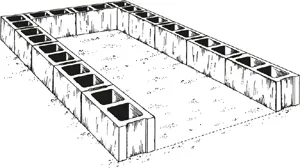
3) Reassemble the first 5 × 2 rectangle of cinder blocks. Decide which of the shorter, two-block ends you want to be the front of the pit and remove those two blocks. This gap will be used to load fresh coals in during the cook, so make sure it’s facing an area that provides enough space for you to do something like maneuver a hog gurney and swing a shovel.
LAY THE PIT
4) Stack a second layer of blocks atop the first. Make sure all the blocks line up with those under them and use the carpenter’s square to ensure that the two blocks at each corner are flush, then lay the sheet of expanded metal on top of that.
5) Stack two more layers of cinder blocks on top of the expanded metal grill and place the two 4 × 4-foot (1.2 × 1.2-m) steel sheets over the top as a roof. There is going to be a bit of overlap between the sheets as well as over the edges of the pit—that’s good. The overlap will allow you to grip the sheet and slide it off when checking on a cook and maintaining the cooking temp in the pit.
6) Finally, set the 2 × 4-foot (0.6 × 1.2-m) steel sheet against...