![]()
CHAPTER 1
Introduction
This chapter introduces the fundamentals for setting up your smartphone for filming. It includes online videos to orient you to the types of stories you can produce with a mobile phone.
Online Videos
- A big electronics show in Berlin
Quick Start Guide
- Manual control
- Filmic Pro
- Camera usage
- Shot sizes
Exercise
Figure 1.1 This online multimedia report that shows several video story forms that can be produced by a single person covering an event.
Online Videos
Watch the videos for this chapter at www.SmartFilmBook.com.
In this opening chapter I want to give you a sense of the many types of video storytelling you can make with a smartphone. Please view the multimedia report that I made from a large consumer electronics show that takes place every year in Berlin.
To see it, log into the online classroom using the link above to witness all of the social video content that was produced by one reporter carrying one iPhone.
Online Example 1.1
A Big Electronics Show in Berlin
Many of these micro stories were produced and posted to social media channels in almost real time. I compiled them all into this multimedia package to explain how I approached the scene.
In the package you will see many of the story forms that I teach in the book chapters.
This report includes examples of walkthroughs, interviews, and fast facts videos, and introduces some of the cinematic filming and editing techniques that you will learn.
This book is designed to teach you fundamentals for visual storytelling so that whatever camera you have with you, you will know how to use it find, capture, edit, and share your stories.
Along the way you will learn about the apps and gear that can provide professional results.
There are so many fascinating dimensions to learning the art of filmmaking, and it is my pleasure to get you started right away.
You can choose any chapter topic that interests you and begin to build a foundation of filmmaking knowledge that will stay with you, no matter what gear you use to make it.
Let me first introduce to you the filming fundamentals that you can use right away.
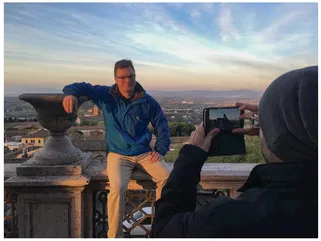
Figure 1.2 Journalists learn to film with smartphones at a film walk led by the author at the International Journalism Festival in Perugia, Italy.
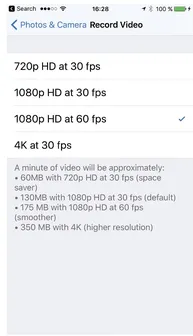
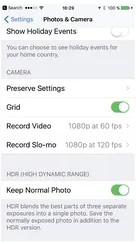
Figure 1.3 On iOS devices, you manage the default camera settings with the Settings app. In the Photos & Camera pane you can set the resolution and frame rate for the video camera.
Quick Start Guide
This technical checklist will begin to transform your smartphone into a pro video camera:
- Enter airplane mode
- Disable notifications
- Disable portrait lock
- Check the battery power
- Clear memory storage
- Test your mic and audio levels
- Observe the lighting (quality and direction)
Why Airplane Mode?
Every smartphone has a cell phone radio inside and it needs to be disabled because it can cause audio interference. Cell phones make frequent contact with nearby cell towers and these signals are sometimes recorded when filming. Be aware that this audio interference can also happen when you are livestreaming video. Mobile journalists usually carry portable WIFI connections with them when livestreaming to prevent this from happening.
On-screen notifications are not only a visual distraction when filming, they may actually halt your camera app in the middle of recording a scene.
Settings for Video
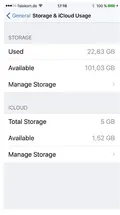
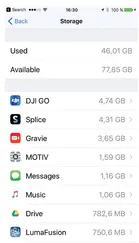
Figure 1.4 Maximize your device’s memory before starting any important film project. Back up your photos and videos to an external drive before deleting them from your device.
Figure 1.5 Apps can take a lot of memory, too. Watch out for those video editing apps that make copies of the video clips.
Figure 1.6 Activate the framing grid.
These are the default settings I use to capture high-quality video with my iPhone.
1080p is high-quality HD video and 60 frames per second helps capture smoother video. I also want to capture slow-motion video clips at the highest quality.
Slow-motion is a capture mode that that records more frames per second. For example, 120 frames per second video can be played back at a standard 30 frames per second in a video editor, and all the motion will appear four times slower and very fluid and smooth.
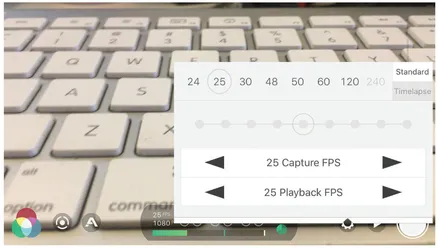
30 Frames per Second and 25 Frames per Second
30 frames per second is the default frame rate for all smartphones. It is based on the TV standard for North America. In Europe and almost everywhere else 25 frames per second is the TV standard. This frequency mismatch can cause light-flickering issues to be visible in video filmed under artificial light.
Figure 1.7 To correct for light flicker, you can use a pro video camera app like Filmic Pro to capture footage at 25 frames per second.
Manual Control
The smartphone you have in your pocket is an amazing video production machine.
The key to capturing pro footage is to escape out of the fully auto mode and learn how to film in fully manual mode.
Here are some tips to help you unlock that power.
With the built-in video camera app, you can get a degree of manual control by locking focus and exposure. The way this works on many phones is by disabling the AF (autofocus) and AE (auto exposure) controls.
Figure 1.8 With the iPhone camera app, just tap and hold on the screen until the AE/AF LOCK bar appears on screen.
The focus is now locked, but you can still adjust the exposure by sliding the icon of the sun up and down to make the exposure lighter or darker.
If the focus is not correct, just tap once to reset the camera to auto mode, and tap and hold on the area you want to focus on.
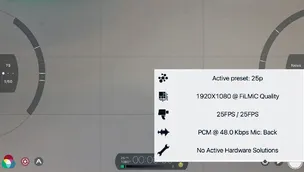
To gain more reliable and independent control over focus and exposure I like to use a pro camera app like Filmic Pro.
Figure 1.9 Fully manual camera control is available with the Filmic Pro app for iOS and Android.
Apps like Filmic Pro transform your smartphone into a professional video camera.
This pro video camera app provides you with ma...