![]()
We will now jump straight into MATLAB instructions that are immediately relevant to scripting an experiment. I will assume that you have successfully installed and tested Psychtoolbox (although admittedly this can be a little complicated!) Full instructions are on the download pages of the Psychtoolbox website (http://psychtoolbox.org/download/). To check whether Psychtoolbox is installed, you can type ver in the MATLAB command window and see whether it is listed). Basic instructions about installation often change as software is updated, so it is important to become familiar with how to find such information when necessary. In fact, there are very few problems you will encounter that Google cannot solve either with a link to a forum or a help page. An advantage of MATLAB is that the online help pages, documentation and communities are very good. It is highly likely that other people have previously solved your problem, and their solutions can be found online.
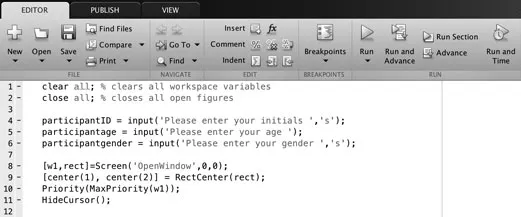
Explore the MATLAB program a little and find where to click to open up a new blank script page. Take a moment to stare at it. As with starting an essay at school, it is rather scary to be presented with a blank canvas, with the knowledge that it must eventually contain hundreds or thousands of words. Fortunately, the question ‘Where do I start?’ is easily answered in the case of programming an experiment. This is because they almost always start in the same way with a basic template. This normally involves initialising the programming software, which in our case will be Psychtoolbox. Figure 1.1 shows a basic start to a MATLAB/Psychtoolbox script.
Figure 1.1 A starting template (reprinted with permission from The MathWorks, Inc.)
Let’s start with a clear all command. This will remove all variables from the MATLAB workspace to prevent the possibility that they interfere with our current program (they also remove some other MATLAB processes that may be active in the background, which is why you may see an orange warning message in the script; ignore this for now because we will come back to it). The function close all will then close any MATLAB figures or images that are currently on-screen. This next piece of advice should go without saying: please make absolutely sure that you don’t need any of the workspace variables or figures before you clear them. If you do, be sure to save them first, because you may never see them again. There is a ‘save workspace’ button for saving all of your current variables (or use the MATLAB function save which you can learn about by typing help save or doc save in the command window; we will also return to saving in Step 6). When you have a figure open, you can use File > Save as to save it to your computer before closing.
Note that after each of the first two commands, there is a comment included. Comments are entered into a MATLAB script by using a ‘%’ symbol anywhere outside the command itself. Anything after this symbol is treated as a user comment rather than functional MATLAB language (it is usually also coloured green). You can therefore type whatever you like. Just make sure it is clear, informative and sufficiently detailed. The two comments I use in the code above are the only example comments that I will be providing. The rest is up to you. Your own commenting will be a significant part of the learning process throughout this book, so make sure you are doing it in addition to copying out the commands in the examples.
After clearing irrelevant information from MATLAB, we can move on to getting some simple demographic inputs from the participant. First, we can assign them an ID based on their initials to keep data anonymous by avoiding links to full names. The input function in MATLAB will present its first string argument (if you don’t yet know what a MATLAB ‘string’ is, refer back to Step 0 before moving on or look it up online) on-screen to the participant (i.e. ‘Please enter your initials’). If you want the participant’s input to also be treated as a string, for example their name or initials, then you can provide a second argument to the function after a comma: ‘s’. Without this, the data that the participant enters must be in numeric form. After the participant enters their information and presses return, the data will be stored with the variable name defined as the output for the input function (i.e. participantID). The script above then uses two further input functions to record participant age and gender. Age is the only input that should not be in string form because it should be entered as a number, so the ‘s’ argument is not used in the function.
Starting with Psychtoolbox
After we have an input function for each piece of demographic information we want to record, we can move on to our first function to come from Psychtoolbox rather than MATLAB. If you have properly installed Psychtoolbox by following the instructions on the Psychtoolbox website, MATLAB should have direct access to all of its functions, so all you need to do is use the function name in the same way you would use any standard MATLAB function. Screen is a function that you will regularly use with Psychtoolbox, as it is used when we want to perform some operation that affects information presented on the screen. It is a function with many possible arguments or inputs, the first of which always defines what the function will actually do. We will use it here for the first time to open the Psychtoolbox window. The Screen(‘OpenWindow’) command initiates the Psychtoolbox screen, which provides the background for all your stimuli. The output variables surrounded by square brackets will return two important bits of information to your MATLAB workspace: the first is a numerical reference to the window itself (here labelled as variable w1) and the second is the screen coordinates for your computer in the form ‘rect’ (note: if you get a persistent error message for the Screen function, you may have an issue with your Psychtoolbox installation or compatibility with your operating system; refer back to the introduction for more details). The next function RectCenter takes the ‘rect’ screen coordinates output from the previous Screen function, and calculates the centre position of the screen, returning it in the variable ‘center’ – the first value in ‘center’ is the x-coordinate and the second value is the y-coordinate. You can use this center information later when you want to easily present stimuli relative to the centre of the screen.
Finally, the Priority function makes sure that the Psychtoolbox window is prioritised on your computer, so that it is less likely to be interrupted when running. Remember that we used the variable w1 to refer to the window, so this is the input to the Priority function. The last thing you want when a participant is doing your task is an irrelevant software message to pop up and disrupt performance. The HideCursor command additionally hides the mouse cursor so that it is not visible on the screen when the experiment is running. When the cursor is not needed for the experiment, it is best to make it invisible to prevent distraction.
When you’ve typed out the commands above once, you can then use them as a template to copy and paste into future scripts. You may, of course, want to adapt the commands at some point to something more suitably tailored for a different experiment or for your own programming approach. You can find help docs for any command I use here by typing it into Google along with the word ‘MATLAB’ or ‘Psychtoolbox’, depending on where the function comes from. As mentioned in Step 0, you can also type ‘help’ followed by a space and the name of the function in the MATLAB command window (e.g. help mean). This produces a simplified information doc in the command window.
At the very end of your script, you will typically close the Psychtoolbox window and remove its priority. You should also use the ‘ShowCursor’ function with no arguments just to make sure the cursor is visible once you exit the script. These can be done with the following commands in Figure 1.2. Note that these commands will be at the end of the script, which in this example happens to be around line 66–8. Usually you won’t know where the end of the script will be at this stage, so you can place these commands anywhere after the initiation commands in Figure 1.1, and then type all other commands between them.
Figure 1.2 A closing template (reprinted with permission from The MathWorks, Inc.)
So you now have a script with a very basic template for initialising and closing Psychtoolbox. Different people have different programming styles, so these commands, along with others in this book, can vary between people. It is important to look at any other experimental scripts you can find online, and compare the kinds of commands they are adding or replacing. You can usually find existing examples by typing ‘Psychtoolbox demo scripts’ in Google. This will allow you to be fully informed as you develop a style or approach that works best for you.
![]()
STEP 2 | Setting parameters and opening up variables to store experimental conditions and data |
Now it’s time to add some parameters and variables that will be specific to e...