![]()
CHAPTER 1
Gear
The best camera is the one you have with you.
Choosing a Camera
This is a well-known, and generally true, axiom of photography. You can’t take a picture with a camera you do not have with you. Getting a shot is better than getting no shot at all. Most of the time.
When it comes to HDR and ExDR, the axiom falls down a bit. Not all cameras are created equal and not all cameras are up to the task of capturing the type of shots necessary for extended dynamic range photography.
Whether it is via automated methods like Photomatix or manual blending, we are going to be combining different versions of the same scene. What do I mean by different versions? What I mean is different exposure values of the same scene. We are going to be combining images of the scene shot at different exposure settings to enable us to capture the desired brightness range, or dynamic range, for blending later on. The simplest way to do that is through bracketing exposures with a feature in the camera that automates the exposure adjustment between shots. This is called Automatic (or Automated) Exposure Bracketing (AEB).
Whether you use AEB or adjust exposure manually, your camera needs to have the ability to allow you, the user, to alter exposure. Not all cameras do. Most inexpensive point-and-shoot compacts do not. You want a camera that gives you control of the ISO setting, the shutter speed and the aperture setting of the lens. You are going to be looking for a camera, at a minimum, that is a more advanced compact camera. More advanced compact cameras with integrated lenses and interchangeable lens cameras are going to give the user the required flexibility.
Ideally you also want a camera that will shoot RAW images. Can you get away with just shooting JPEG? Yes, but your post-capture processing options are far more limited. Having the flexibility of RAW is important, particularly when we are going to be doing the advanced type of editing and blending that we will get into later in the book. The ability to shoot RAW also means you will be looking at, at a minimum, advanced compact cameras.
A good feature to have, although not a must, is a Burst mode of some form in the camera. Burst mode allows you to rapidly, or fairly rapidly, capture a series of images while the shutter release is held open. Some cameras allow you to capture a bracketed series with a single press of the shutter and not have to hold the release open for the entire burst. Now, as I said, this is a good feature but not a necessity. You can capture a bracketed sequence in individual shots. It will just take longer and you run a greater risk of camera or subject movement. The faster the burst rate of the camera, the less chance something in your scene will move on you. Movement is bad and can be a royal pain to deal with.
More advanced cameras have more features and there are a couple that are very important for HDR and image blending. Advanced cameras give the photographer more control over exposure through specific exposure “modes” such as Aperture Priority, Shutter Priority and full manual control. Cameras that permit AEB will typically have these exposure modes as well. When capturing images for HDR and blending, we want to keep our aperture constant. Aperture Priority or full manual will allow for that to happen. There will be a more extensive explanation on why we want to keep the aperture constant a bit further on in the book (see Chapter 3).
Which cameras specifically do I recommend? I am not going to recommend any specific cameras. All of the major manufacturers make some very good cameras and it is difficult to go wrong with any of them. Here are a few things to keep in mind though.
Sensor Size
In general, the larger the sensor in the camera the better the overall quality of the photos from the camera will be. Larger sensors will tend to exhibit lower noise in photos and have better dynamic range. Dynamic range is the range of brightness a sensor can capture before highlights are overexposed and shadows are blocked up blotches of blackness.
Less noise is desirable for cleaner, smoother images, and wider dynamic range will mean you can bracket less in the field.
That does not mean you should run out and buy a camera with a larger sensor. Sensors come in three basic sizes. So-called full-frame sensors are the same size as a frame of 35mm film. Cropped frame or APS-C sensors are about 2/3 the size of a frame of 35mm film. Some cropped frame sensors are 1.5x smaller than full-frame and some are 1.6x smaller. That difference is not going to matter much. The third main sensor size is the Micro 4/3 sensor. These are only half the size of a full-frame sensor. I would not suggest you consider a camera with a sensor smaller than the Micro 4/3 format. The tradeoffs of size and weight for overall image quality are just too big to consider.
Despite the benefits of a full-frame camera, these cameras are also more expensive. In some cases much more expensive than cameras with smaller sensors. Noise is less a factor because we are bracketing and taking advantage of using more light in all areas of the scene which, naturally, reduces the evidence of noise. The dynamic range advantage of full-frame sensors is, today, not as big as it was even three or four years ago either. Manufacturers have been able to improve the dynamic range gap between the APS-C sensors and full-frame sensors as they have improved sensor technology. Generally speaking, there is still a fairly large, relative, gap between these larger sensors and the Micro 4/3 versions.
The biggest benefit to a full-frame camera is in printing. Generally these cameras have more pixels and more pixels means you can make a larger print and retain quality as you go larger. A full-frame camera and an APS-C camera with 16MP sensors will be able to make the same size print, but because the smaller sensor is being spread over a larger area, any flaws will show up more from the smaller-sensored camera. What is happening, effectively, is that those smaller pixels are being “enlarged” more and any flaws that do exist will become more evident.
When looking for a camera, take into consideration the sensor size, certainly. But, more importantly, take into account your budget. Don’t spend more than you can afford just to get a larger sensor or a camera that is a bit higher in the product chain. The most important factor, though, is how the camera feels in your hand and how well the controls are laid out for your preference. If the camera does not feel good in your hand and you are not comfortable with how to adjust the various settings, you are not going to use it regardless of how good a camera it might be. Go to a reputable retailer and try various cameras. See how they feel in your hand and how easy it is to make changes to settings. Some cameras have more settings available via physical knobs and wheels while others require you to dig into the menus to make some changes. Which is preferable to you?
You can research the cameras you are looking at online. There are many credible review sites on the web that will help you in your research. Keep in mind, too, that I am talking in generalities. It is not possible to discuss and compare every camera against every other one on the market. But these general guidelines should help you in your research and with your buying decisions.
Mirrorless or SLR
In the last couple of years there has been a spate of new mirrorless camera models come on the market. Mirrorless cameras are so named because there is no mirror inside that flips up and down when an exposure is made. Traditional SLR cameras have a mirror that reflects light coming through the lens into a mirror box and then out through the optical viewfinder. Mirrorless cameras have no such mechanism and use Electronic Viewfinders (EVF) rather than optical.
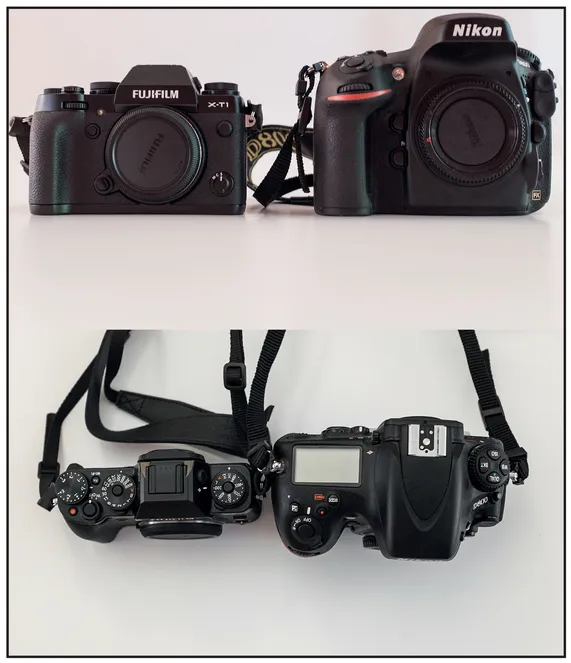
The benefits of the mirrorless setup are that the cameras can be much smaller and lighter than their mirrored equivalents. The shot of a D800 next to a Fuji X-T1 shows this difference (Figure 1.1). The D800 is a full-frame camera and the Fuji has an APS-C sensor but you can still see the difference. The Sony A7 line of cameras is also full-frame and are even a bit smaller than the Fuji.
If you are looking to save a bit of weight and get a very good camera to boot, mirrorless might be an option for you. Keep in mind the caveats noted earlier about features and bracketing.
For what it is worth, my view is that mirrorless is the future of digital interchangeable lens cameras. Nikon and Canon have resisted putting out serious mirrorless options but that is because they have a large legacy issue with their SLR-style cameras and lenses. Because of the way mirrorless cameras are designed, the same lenses that Nikon and Canon users have today would not likely work on a mirrorless body. It has to do with how the lenses are engineered optically for the distance from the back of the lens to the sensor. That distance is much shorter on a mirrorless camera. Canon already went through a big headache when it abandoned its manual focus FD mount in the mid-1980s and its users had to buy all new lenses for the autofocus EF system. Neither Canon nor Nikon would want to do that again so until they find a way to allow customers to keep and use their current lenses with no loss of function, they will not likely be coming out with serious mirrorless offerings. Both Canon (the EOS-M) and Nikon (the Nikon 1) have mirrorless cameras now but these are not considered serious systems. The Nikon system has small sensors and these cameras have not gained much traction in the market. Canon has, largely, abandoned the EOS-M system.
One of the nice things about many mirrorless systems is that there are lens adapters available to let you use other manufacturers’ lenses. I have an adapter that allows me to use my Nikon lenses on my Fuji X-T1. The downside is that, in most cases, you have manual focus only and can only use stop down metering (or a handheld meter) but it means less upfront expense if you are looking to switch from one system to another. The mirrorless cameras typically have good manual focus aids though, so focusing manually isn’t much of a problem.
Figure 1.1 Size comparison of full-frame DSLR and cropped frame mirrorless bodies.
If you are accustomed to an optical viewfinder, getting used to an EVF will take a bit of time, but it can be done.
Electronic Viewfinders suffer from a couple of problems. One is “lag.” That is, there can be a slight delay between when something moves or changes in your actual scene and when that change is reflected in the viewfinder. The lag time is getting better but it still exists. It is short enough that it will not, likely, impact your ability to compose properly but it can be off-putting if you are used to a camera with an optical viewfinder. Another issue with EVF systems is “washout.” In bright light, EVFs can be difficult to use because, like LCD screens on the back of the camera, brighter light causes a loss of contrast. You may be able to address this somewhat by turning up the brightness of the EVF, but it may be only a partial fix. The last issue with EVFs to think about is shooting at night. In darker light, EVF systems have to apply a “boost” to the signal in order to allow you to see what you are composing. Just as you will see more noise in a photo by increasing the ISO setting, the EVF will exhibit noise as well. This noise can interfere, or compete, with some of the manual focusing aids and make it more difficult to focus manually at night or in more subdued light.
Lenses
The lenses you choose are going to be the most important factor in your system. While the sensor is important to the quality of your pictures, the lens is more important. A good lens on a camera with a less than top notch sensor will still produce a better picture than a poor lens on a camera with a very good sensor.
As with cameras, you want to do your research. There are many good sites online that can help with this. Buy the best you can afford. Your lenses will outlast your camera body.
It used to be that single focal length, or prime, lenses were far superior to multifocal length, or zoom, lenses. For the most part this superiority has been minimized or eliminated. There are very good zoom lenses on the market now that can produce stellar photos. If you are shooting, typically, in situations where you do, or think you will, change lenses often, then zooms may be more to your liking. If you shoot in situations where you have a lens on the camera for a long period of time, then you may want to stick with prime lenses. What you will likely find over time is that you have a mix of zooms and primes in your kit. For example, I have three zooms and three primes for my Nikon system.
Prime lenses always have a fixed maximum aperture. You may see a lens noted as a 50mm f/1.4, for example. This means that the largest aperture is f/1.4. The f-number is a ratio of the opening of the lens iris, or aperture, to the focal length of the lens. In the case of this lens, the maximum iris opening would be 35.7mm (50mm divided by 1.4). The lens will still have a full range of smaller apertures available.
Some zoom lenses will have a fixed maximum aperture and some will have a variable maximum aperture. You might see, for example, a 70–200 f/2.8 lens and you also may see a 70–300 f/3.5–5.6. In the case of the variable maximum aperture, the maximum size of the iris opening does not change as the focal length of the lens is changed. With a fixed iris opening, the ratio of the opening to the focal length gets smaller as the focal length is increased. In the case of the first lens, the maximum iris opening will effectively get larger as the lens is zoomed to a longer focal length, allowing the ratio to stay constant. Zoom lenses with fixed maximum f-numbers are more difficult and expensive to build and, typically, will be better quality lenses than those with variable maximum f-numbers.
The smaller the f-number, the larger the maximum aperture is. The effect of the aperture on your photos will be discussed more in Chapter 2.
Many cameras come with a “kit” lens today. These kit lenses are not, typically, very good and will not let you produce the best photos possible in most cases. In order to keep these lenses inexpensive, lower-quality glass elements are used and there is less correction for various distortions like color fringing or barrel/pincushion distortion. The kit lenses will also tend to exhibit a greater fall-off in image quality from the center to the corners. All lenses are sharper in the center than at the edges. Higher quality lenses, with higher quality elements inside, will maintain center to edge quality better. Given that HDR accentuates everything, good and bad, maintaining as much quality in the image as possible is desirable. For those starting out, I would recommend a good, mid-range zoom lens. Something like a 24–70 or 28–105 with a fixed maximum aperture of f/2.8 or f/4. This type of lens will serve most people very well in many situations. It is a very versatile focal length range. There is not a necessity to buy new either. You can find some very good used lenses at significant savings. Just...