This third edition of Digital Restoration from Start to Finish walks you step-by-step through the entire process of restoring old photographs and repairing new ones using Adobe Photoshop, Photoshop Elements, GIMP and more. This best-selling guide is now updated with the latest software advancements, and new techniques including hand-tinting in lab, repairing water damaged photos, and tips for the spot healing brush and masked layers. No process detail is overlooked, from choosing the right hardware and software, getting the photographs into the computer, getting the finished photo out of the computer and preserving it for posterity.
LEARN HOW TO:
Scan faded and damaged prints or films
Improve snapshots with Shadow/Highlight adjustment
Correct uneven exposure
Fix color and skin tones quickly with Curves, plug-ins, and Hue/Saturation adjustment layers
Correct uneven exposure and do dodging and burning-in with adjustment layers
Hand-tint your photographs easily
Correct skin tones with airbrush layers
Clean up dust and scratches speedily and effectively
Repair small and large cracks with masks and filters
Eliminate tarnish and silvered-out spots from a photograph in just a few steps
Minimize unwanted print surface textures
Erase mildew spots
Eliminate dots from newspaper photographs
Increase sharpness and fine detail
Maximize print quality
Trusted by 375,005 students
Access to over 1.5 million titles for a fair monthly price.
When I sat down to plan this book, I quickly realized that the ideal photo restoration workflow was an elusive and possibly even mythological creature. Oh yes, in the broadest sense there’s a clear-cut pattern: scan the original photograph into your computer, use the image processing program of your choice to correct the defects, print the finished photograph, and archive the restored images digital file. The organization of this book reflects that flow.
The problem with that facile prescription is that it glosses over the real work that’s hidden in the three magic words correct the defects. The majority of this book is about satisfying that modest phrase.
Figuring out how to tackle a restoration job can be challenging, which is why I added a “Quick Diagnosis” guide before this chapter. Look for a photo on those pages that illustrates the restoration task you’re tackling. Next to that photo you’ll find pointers to the pages in the book where I take on that problem.
Hanging over this discussion is the larger and more serious question of just what it is you’re after. Photo restoration covers a lot of territory; goals are situational. For example, are you trying to be historically accurate, or are you aiming for the best art? The answer depends on the job.
So, before diving into photo restoration, think about your situation and contemplate the following questions:
•Who are you, and whose expectations matter?
•Who are you trying to make happy?
•Are you trying to re-create a historically accurate photograph?
•How important is the photograph, and how much scrutiny might it be subject to?
Of course, these factors are interrelated, but the answers to these questions provide a framework for organizing your thoughts.
Who Are You, and Whose Expectations Matter?
Are you doing a restoration to please yourself or to please a friend, relative, or client? Are you restoring the photograph as a hobby or favor, or are you doing it professionally?
The difference between a professional and a hobbyist in this case is not one of skill or talent. It’s that the professional must satisfy a client whose desires come first. Those needs control the kind of work you do.
Who Are You Trying to Make Happy?
Aunt Sarah and Uncle James will most likely be delighted with anything you do to make that family photo look better (Figure 1.1). Their pleasure is more important than perfection. On the other hand, a professional client who is paying you big bucks for a restoration will likely demand considerably more of your skills.
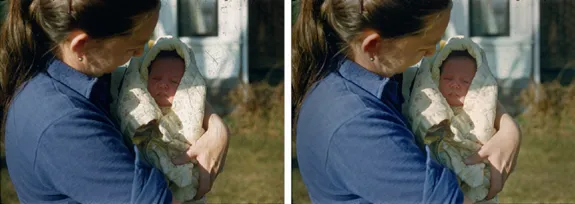
I’ve written this book from the point of view of the professional and the perfectionist. When I restore an old photo, I like feeling as though I’ve waved a magic wand that perfectly and invisibly undid the ravages of age. If I can take it one step further and make that photograph into something that’s even nicer than the original (Figure 1.2), it’s even better still. Making “the best of all possible prints” from the damaged photograph is what makes me happy.
If you master all the techniques I present in this book, I guarantee you’ll be able to do restorations that will please just about anyone. But you may not want nor need to go to the extremes I do. Don’t slavishly follow my goals. Figure out what will satisfy you in a restoration, and aim for that. I may take a restoration job from A to Z, but you might feel that stopping at K is entirely satisfactory.
My obsession shouldn’t drive you. It’s possible to spend unlimited amounts of time playing with a digital photograph, trying to make it absolutely pixel-perfect. If that’s what tickles your fancy (it does mine), that’s great. But if you’re doing professional restorations for clients, they’re not going to want to spend unlimited amounts of money, and you have to know when to call it quits. And if you’re doing restoration for your own enjoyment, never, ever forget that it’s about having fun. If you reach the point where following still one more recommendation of mine feels more like work than play, then don’t do it! You can achieve good restorations without it.
Figure 1.1 Digital restoration can easily restore a faded family snapshot like the one on the left. Most of the improved tone and color in the restoration on the right result simply from making a good scan, following the principles I present in Chapter 4. A little judicious cropping and burning in produces a photograph that’s even better than the original.
Figure 1.2 Digital tools can do more than repair damage. The original Kodachrome slide on the left isn’t faded at all, although it is badly scratched. Restoration not only removes the scratches, it improves detail in the shadows and highlights. The restoration on the right is a more attractive photograph overall.
Are You Trying to Re-create a Historically Accurate Photograph?
If so, it’s of paramount importance not to introduce any extraneous detail that wasn’t there, nor to remove any significant detail from the photograph. That can severely restrict the kind of gross repairs you can do, especially if entire pieces of the photograph are missing.
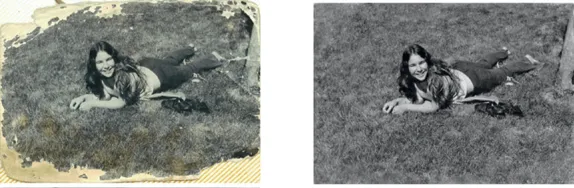
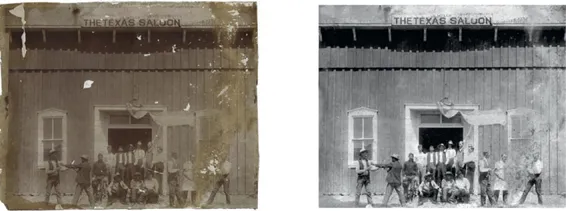
In Figure 1.3 no important information would be lost or altered by cropping the photograph or cloning in the lawn to fill in the missing areas. Figure 1.4 is another matter; there’s no way to repair the two figures on the right to accurately show what they’re doing or even who the rightmost man is. Artistically, we have a free hand in restoring this photograph; historically, most definitely not.
Figure 1.3 Specialized tools can fill in missing parts of photographs so perfectly that you can’t tell where the original leaves off and the reconstruction begins. It’s fine to take such liberties when historical accuracy is unimportant.
Figure 1.4 Retouch with caution if historical accuracy matters. Software such as Image Doctor can make quick work of the missing patches in the original upper photograph. But, as the bottom photograph shows, you can’t restore detail that doesn’t exist. How you “fix” the half-obliterated man on the right depends on whether you want an artistic restoration or a historically accurate one.
More subtly, does the photo need to be technically accurate? That will rarely be the case, but when I restored this astronomical plate (Figure 1.5) I had to decide whether I wanted a photograph that looked good or one that remained astronomically accurate. I went for “looking good” and invisibly repaired cracks and gaps, with bits of the star field brought in from intact parts of the plate. Consequently, the “restored” image contains a certain number of stars that don’t actually exist! Well, it’s my photograph, so it’s my call. Were I doing this repair for an astronomer or a scientific collection, I would not do that! You can read about the entire process I went through to restore this photograph in Chapter 11, Example 5 (full content on the web at http://photo-repair.com/DR3).
Figure 1.5 Scientific photographs can be digitally restored. In the online examples I describe, in full detail, how this astronomical plate was re-created from eight broken shards of glass.
If the restoration requires accuracy, you’ll need to know something about what photographs of that type are supposed to look like. James Reilly’s book, Care and Identification of 19th-century Photographic Prints (recommended in the introduction), is a fine reference up through the early part of the 20th century. I don’t know of any comparable book for modern color images, so be prepared to do some research on what the color photograph is supposed to look like if you’re asked to do an accurate restoration. The single best reference book on 20th-century color photographs and their preservation is Henry Wilhelm and Carol Brower’s The Permanence and Care of Color Photographs: Traditional and Digital Color Prints, Color Negatives, Slides, and Motion Pictures, available as a free download at http://wilhelm-research.com/book_toc.html.
Most of the time your goal will be artistic—to make the best restoration you can that looks good. This brings me to my next question for you.
How Important Is the Photograph, and How Much Scrutiny Might It Be Subject To?
The ordinary family photograph that Aunt Sarah and Uncle James proudly placed on their mantle is not going to be closely examined nor subject to critical analysis. You can take many liberties in your restoration as long as you remain true to the spirit of the photograph. Slight carelessness in technique will never be noticed.
On the other hand, photographs of historic events or famous personages, as in Figure 1.6, may receive closer examination by future viewers. (Read the full restoration process for this photograph in Chapter 11, Example 6.) Minor details matter to the historian; for example, a missing button or frayed collar may tell them something about the financial state of...
Table of contents
Cover
Half Title
Copyright Page
Title Page
Table of Contents
Preface
Introduction
Chapter 1: The Big Picture
Chapter 2: Hardware for Restoration
Chapter 3: Software for Restoration
Chapter 4: Chapter 4 Getting the Photo into the Computer
Chapter 5: Restoring Tone
Chapter 6: Restoring Color
Chapter 7: Making Masks
Chapter 8: Damage Control
Chapter 9: Tips, Tricks, and Enhancements
Chapter 10: Beautification
Chapter 11: Examples
Chapter 12: Printing
Chapter 13: Archiving and Permanence
Index
Frequently asked questions
Yes, you can cancel anytime from the Subscription tab in your account settings on the Perlego website. Your subscription will stay active until the end of your current billing period. Learn how to cancel your subscription
No, books cannot be downloaded as external files, such as PDFs, for use outside of Perlego. However, you can download books within the Perlego app for offline reading on mobile or tablet. Learn how to download books offline
Perlego offers two plans: Essential and Complete
Essential is ideal for learners and professionals who enjoy exploring a wide range of subjects. Access the Essential Library with 800,000+ trusted titles and best-sellers across business, personal growth, and the humanities. Includes unlimited reading time and Standard Read Aloud voice.
Complete: Perfect for advanced learners and researchers needing full, unrestricted access. Unlock 1.5M+ books across hundreds of subjects, including academic and specialized titles. The Complete Plan also includes advanced features like Premium Read Aloud and Research Assistant.
Both plans are available with monthly, semester, or annual billing cycles.
We are an online textbook subscription service, where you can get access to an entire online library for less than the price of a single book per month. With over 1.5 million books across 990+ topics, we’ve got you covered! Learn about our mission
Look out for the read-aloud symbol on your next book to see if you can listen to it. The read-aloud tool reads text aloud for you, highlighting the text as it is being read. You can pause it, speed it up and slow it down. Learn more about Read Aloud
Yes! You can use the Perlego app on both iOS and Android devices to read anytime, anywhere — even offline. Perfect for commutes or when you’re on the go. Please note we cannot support devices running on iOS 13 and Android 7 or earlier. Learn more about using the app
Yes, you can access Digital Restoration from Start to Finish by Ctein in PDF and/or ePUB format, as well as other popular books in Media & Performing Arts & Digital Media. We have over 1.5 million books available in our catalogue for you to explore.