![]()
one
PREFACE: HOW TO USE THIS BOOK
Millinery is a skill that every costume technician should take the time to master. Whether you are in professional theatre, community theatre, historical reenactment, teaching costume construction at the high school, undergraduate, or graduate level, or even just making a Halloween costume, hats are essential. Hats provide that finishing touch to a costume, defining character, personality, economic status, vocation, and mood. There is no better way to make a statement than with a hat! However, the unfortunate fact is that the practice of millinery declined rapidly during the latter half of the 20th century. While there has been a resurgence in this art form in recent years, millinery is still in many respects a lost art. In spite of the importance of hats it is rare to meet someone who possesses the skills to create these wearable works of art. My experience in the field of theatrical costuming has shown me the dramatic increase in the success of a costume when a hat can be designed and constructed to complement the clothing. While the art of millinery takes time and patience to master, I believe that it is well worth the effort.
Millinery is my greatest passion in the field of theatrical costuming and I am excited to share this skill with my readers. I have written this book to encourage and enable costume technicians of all levels to easily incorporate custom-made hats into their productions. Many of the hat books that are currently available are not a perfect fit for the typical situation in technical theatre. They are either too concise or they are so detailed that it is difficult to quickly access the information needed. However, Period Reproduction Buckram Hats: The Costumer’s Guide is written as an instructional guide which has been formatted so that the information necessary to make a custom hat is easily and quickly accessible.
In this book I have chosen to focus on flat pattern buckram hats. There are many techniques for making hats that use straw, felt, wire, non-traditional materials, and blocking techniques. However, flat patterned buckram is a good place to start when learning millinery. All of the hats in this book can be created using a sewing machine and a basic head block. Once you have practiced the techniques found in this book, other methods will become easier to master.
I have selected thirteen useful and diverse hat shapes that are frequently needed in a period show. These hats are organized in chronological order so that someone who is familiar with costume history can easily flip to the instructions for the hat they wish to create. Step-by-step instructions and process photos have been included for each hat. To assist the costumer in their research the instructions in this book are accompanied by a historical image and a brief background of each hat and its origins. In addition to instructions and historical research, each set of instructions includes an “ingredients” list of the amount of materials needed to create the hat, a list of required tools and equipment, difficulty level, estimated time to complete, and a quarter-scale pattern for an average 22″ head. The on-line component of this book includes printable full-scale patterns of each hat for head sizes 20″ to 24″. At the end of each set of instructions are guidelines for the common variations of that hat shape and ideas for altering the pattern to fit your design.
In addition to the individualized instructions for each hat, additional chapters are included to help expand and deepen the reader’s practical knowledge of making hats. These chapters cover: Taking Accurate Head Measurements, General Patterning Techniques, Hand Stitches, Covering and Trimming Techniques, Altering and Using Feathers, and Methods of Securing a Hat.
I hope that with the information in this book you will be energized and inspired to make custom hats for your productions by discovering the art of millinery!
![]()
two
TAKING ACCURATE HEAD MEASUREMENTS
The head measurement is the foundation of your hat pattern and as such it is of paramount importance that all of your head measurements are taken accurately. A beautifully constructed hat that does not fit is of little use. Unlike other forms of millinery and hat making, such as felt or straw, a buckram frame hat cannot be resized. That is why head measurements should be accurate to within ⅛ of an inch and must be taken at the proper angle to ensure a proper fit.
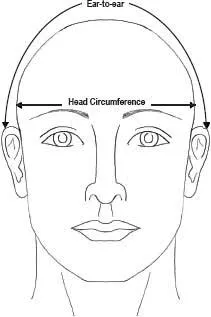
There are 4 basic head measurements that are used in both millinery and wig making. The first, and most commonly used, is the head circumference. This is the measurement of the distance around the head at its largest point. In order to take this measurement properly, the tape measure is placed above the eyebrows and encircles the head at an angle parallel to the floor. Do not take this measurement so tightly that it is uncomfortable for your actor, or so loosely that the tape measure hangs or shifts. It can be difficult to hold the tape measure at the proper tension without having your fingers get in the way. To solve this problem some companies have started manufacturing specialized head tape measures, which can make the process faster and more accurate. These tape measures have a slot through which the end of the tape measure can be placed when wrapping around the head. They can be easily purchased from medical suppliers who market them to pediatricians who chart children’s head sizes as part of their annual physical examinations.
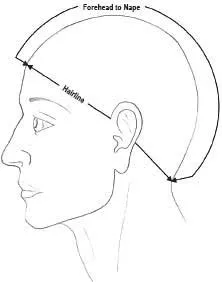
Other frequently used measurements are ear-to-ear across top, forehead to nape, and hairline. These measurements are not necessary for all hats but can be very useful and are good to have on file. To take the ear-to-ear across top measurement simply run the tape measure from the top of one ear across the top of the head to the top of the other ear, much like a head band. The forehead to nape measurement is taken from the hairline at the middle of the forehead to the dip at the base of the skull where it meets the neck (note: this is technically the nape of the skull and not the nape of the neck). To take the hairline measurement, run the tape measure around the hairline of your actor. For both the forehead to nape and the hairline measurements estimate the natural or original hairline of an older male actor and not the receded hair line if one exists.
Figure 2.1 Tape placements for head circumference and ear-to-ear measurements
Figure 2.2 Tape placements for forehead to nape and hairline measurements
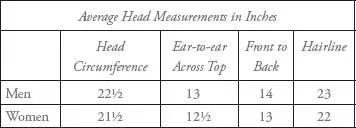
Heads come in all different shapes and sizes. Most men have a larger head circumference than most women. Another notable trend is that opera singers, especially basses, are more likely to have an exceptionally large head of 24 inches or more. The patterns in this book are drafted to fit the average 22-inch head. Table 2.1 demonstrates the average head measurements for men and for women.
Table 2.1 Average head measurements for men and women
There are many different ways of notating the size of a hat. Most often the size of a hat is referred to by either the head circumference measurement or a numerical hat size. These sizes are by no means standardized. Hat companies have their own blocks, the size of which often determines the exact measurement of that company’s hats in relation to a numerical size. UK and American hat sizes look very similar but are not interchangeable. American sizes are about one size smaller than the same numerical size in the UK. The numerical hat size is thought to be loosely derived from the diameter of the oval from which the pattern was drafted. Table 2.2 shows the head circumference measurement in inches as well as in centimeters, alongside the corresponding American and UK numerical hat sizes, as well as the average length and width of the oval from which that size hat pattern would be drafted.
A head-circle is the basis for most hat patterns. It represents the opening in the hat that sits around the wearer’s head and is the same size as the actor’s head circumference measurement. Because a head-circle is so commonly used in millinery it is useful to have your own head-circle templates. While a generic set of head-circles for head sizes 20″ to 25″ has been included in this book for the reader to use, instructions for drafting your own head-circles are also included.
To draft a head-circle begin by marking a center point on a piece of paper. Next, draft two lines, one running horizontally and the other vertically; be sure that these two lines intersect at a right-angle on the center point. From here use the average width and length measurements from the desired head size from Table 2.2 to plot corresponding points on the two lines. Then use a French curve to draw the shape of an oval that touches these points. Measure the circumference of the oval that you just drew and adjust it if necessary to correspond to the desired head circumference making sure that the oval is sufficiently symmetrical. If you wish to create a full set of head-circles first draft a head-circle for a size 22″ then grade the pattern offsetting your lines by ⅛″ each time. This will give you head-circles that are roughly plus or minus ½″ in circumference from the original. Once your head-circles are drafted take the time to clearly mark the cent...