![]()
After completing this chapter the student should be able to:
1. State the function of a partition wall.
2. Name the members in a timber stud partition.
3. State the factors governing the size and spacing of the members in a timber stud partition.
4. Name and sketch the joints used in the construction of timber stud partitions.
5. Sketch the common methods employed in forming openings for doors and windows in a timber stud partition.
6. Name common materials used as “skins” or “facings” on a stud partition.
7. Describe methods of sound insulation applicable to stud partitions.
8. Describe, and sketch details of two proprietary types of non-loadbearing partition.
INTRODUCTION
A partition can best be described as a wall, usually of fairly light construction, which is used to divide a building or large area into two or more compartments. Thus, partition walls generally extend from floor to ceiling and often contain one or more doorways and windows to provide access and daylight or ventilation.
In past years, partition walls were often substantially built, in brick or block, to help carry the weight of a floor or roof. Walls of this type are referred to as “loadbearing walls”. Modern trends in building construction, however, have led towards a situation whereby an ordinary domestic type of roof is carried more or less entirely by the external walls of the building. This means, in effect, that the first floor area of a typical modern dwelling can be split up into compartments or rooms by means of relatively lightweight non-loadbearing partitions which need only to be strong enough to be self-supporting, and solid enough to resist — within limits — the free passage of sound from one room to another.
STUD PARTITIONS
Known alternatively as common or quartered partitions, these are relatively simple structures comprising of a timber core or framework to which is fixed, usually on both sides, a skin of plasterboard or other suitable covering material.
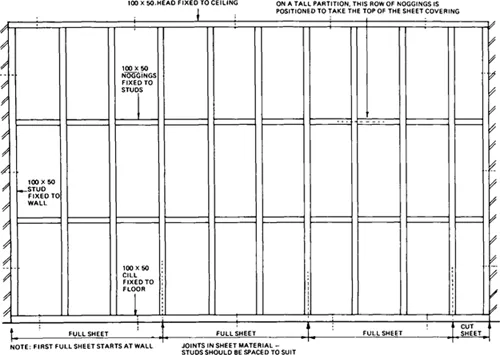
Figure 1.1 shows the general arrangement of the timberwork to a typical stud partition, and as can be seen, it consists of vertical members known as “studs” fixed at the top and bottom to horizontal timbers known as a “head”, and a “cill” or “sole piece” respectively. The vertical studs are stiffened by means of short horizontal pieces of timber fixed tightly between them at about midpoint. These short lengths between the studs are known as “noggings” or “nogging pieces” and serve much the same purpose as “her-ring-bone strutting” in a timber first floor (see Chapter 2).
Size and spacing of members
Sectional size of studs
This is dependent largely upon the floor to ceiling height of the partition and would normally be 100×50 for a partition up to about 3.000 m in height — perhaps 75×50 for one up to a maximum of 2.400 m. Head, cill and noggings are almost invariably of similar section to the studs, although in better class work the cill is sometimes heavier — 100×75 or 75×75 — depending upon the width of the studs and the weight to be carried. The vertical members on either side of the doorway are known as “door posts”. These also are often heavier in section than the studs, in order to better withstand the stresses set up by the weight — and possible slamming — of the door.
Fig. 1.1. Stud partition.
Spacing of studs
The spacing of the studs within the framework is governed largely by the size of the sheet material used to cover the partition. Most partitions would, these days, be covered with gypsum plasterboard, either 9.5 mm or 12.7 mm thick, and 600 mm, 900 mm or 1,200 mm in width. Where 12.7 mm plasterboard is used, studs spaced at 600 mm centres would be in order — indicating the use of boards 600 mm or 1,200 mm wide. However, 9.5 mm plasterboard would require more support and the studs would be better spaced at 400 mm or 450 mm centres to suit 1,200 mm and 900 mm wide boards respectively.
Spacing of horizontal noggings
This is governed by similar factors. In a normal, domestic partition, one central row of noggings would suffice where 12.7 mm plasterboard is used, whilst two rows would be better for boards 9.5 mm thick.
Although the actual fixing and finishing of the plasterboard is generally regarded as the plasterer's work, the carpenter must realise that unless he makes proper provision for the covering skin when he constructs the partition framework, he is bound to be decidedly unpopular with the plasterer when he comes to carry out his part of the job.
Joints used in stud partitions
The joints used in framing up a stud partition may vary considerably according to the quality (and thus the cost) of the work involved. Methods of construction also tend to vary from one building contractor to another, but it is always worthwhile for the carpenter to bear in mind that whilst the framework of a partition is ultimately hidden from sight, it must be strongly and sensibly constructed since any tendency of the timbers to bend, distort or otherwise move, is bound to result in bulging, cracking or unevenness of the plasterboard skin.
Mortice and tenon
Figure 1.2(a) shows a mortice and tenon joint which can be used to connect the stud to the head — or sole piece. This joint gives a strong, stable junction between the members, and is perhaps the ideal joint to use where the studding framework is pre-fabricated in the workshop. It will be appreciated that it is impossible to position the head on the studs with the framework in situ — it becomes necessary to assemble the studding on the floor and then raise it into position for fixing.
Fig. 1.2. Stud partition joints.
Obviously, the framework must be made somewhat smaller than the overall size of the opening, the gaps left at ceiling and walls being blocked out with packing pieces of the required thickness.
Housedjoint
Figure 1.2(b) shows an alt...