In Advanced Visual Effects Compositing: Techniques for Working with Problematic Footage, learn to tackle difficult visual effect composites in layer-based and node-based compositing programs.
In this book, industry veteran and compositing expert Lee Lanier offers tips, tricks, techniques, and workflows for difficult visual effects shots, including poorly shot green screen, moving shots with no visible motion tracking marks, shots requiring three-dimensional (3D) elements that lack 3D renders, poor-quality stock footage, and incorrectly lit shots. Lanier details the common problems of visual effects shots and offers practical solutions using examples from Adobe After Effects and Blackmagic Design Fusion. An accompanying eResource (www.routledge.com/9781138668348) features video image sequences, 3D renders, and other tutorial materials, allowing you to practice the discussed techniques.
The visual effects challenges covered in this book include:
Green screen, when well lit and well shot, can be a joy to work with. More often than not, however, green screen footage suffers from wrinkles, shadows, incomplete coverage, camera noise, and spill. Regardless, there is always a way to make the key work with common effects and tools available in layer-based and node-based compositing systems.
This chapter includes the following critical information:
• Chroma key terminology
• Common green screen problems and solutions
• Keying the foreground core and edge separately
• Keying without a green screen
Chroma Keying Overview
Chroma keying is the process by which a targeted color is converted to alpha transparency. The transparency allows the foreground to be placed over a new background. When discussing chroma keying, the background is the area you want to remove (by making it transparent) and the foreground is the area you want to keep (by making it opaque). Keying refers to the general process of chroma keying. A key is the end result of the keying process. Pulling a key is the process of keying. A key color is the background color you are targeting when keying. It’s also possible to target a specific non-RGB channel, such as hue (identifiable color separated from brightness), saturation (contrast between color channels), or luminance (gamma-adjusted brightness). Note that brightness and intensity are interchangeable when discussing compositing. A keyer is an effect or tool that offers one means to generate an alpha matte. An alpha matte is a grayscale representation of transparency and opaqueness within an alpha channel. A successful key allows you to avoid masking or rotoscoping, which is the manual definition of an alpha matte through the interactive creation of a spline shape.
Chroma keying was first developed for motion picture film, where elements were combined through optical printing. Due to the technical nature of film stock, blue was usually selected as a key color. With the advent of digital video, the color blue has been supplanted by the color green (which offers various technical advantages when processing digital video). That said, a key color can be any color. For example, if you are keying a blue and green peacock on a stage, you may make the key color red to make the key easier to pull. Nevertheless, when I refer to green screen in this book, I’m referring to the key color added to the location or set for the purpose of chroma keying.
Spill is the key color that has bounced onto the foreground (an undesired but common event). The interior or body or core of the foreground is the area up to, but not including, the foreground edge.
The State of Chroma Keying
In the near future, it’s quite possible that chroma key approaches using green screen, blue screen, and other key colors will no longer be necessary. For example, light field cameras, which capture light intensity and light direction, allow a compositor to remove background elements based on their distance from the camera at the time of capture. In addition, neural network image detection systems may advance to the point that foregrounds may be identified automatically with the system producing excellent edge fidelity.
Green Screen Problems and Solutions
Table 1.1 lists common problems encountered with green screen footage and potential solutions for creating a successful key.
Table 1.1
Problem
Solution
Tracking marks Motion tracking tape marks are placed on the green screen.
• Depending on the color of the tracking marks, you may be able to key the marks with a separate keying effect/tool.
• If an additional key is not practical, rotoscoping is necessary.
Troubled green screen
• Insufficient green screen coverage (key color only covers part of background)
• Heavy wrinkles in green screen fabric
• Unwanted shadows on green screen
• Unwanted lighting or rigging equipment in front of green screen
Limit the area the key is operating on by adding a mask, either through rotoscoping or an internal matting process offered by the keying effect/tool.
Spill Spill color exists in the foreground.
• Employ the spill suppression built into the keying effect/tool.
• Add an additional, specialized spill suppression effect/tool.
• Color grade the resulting foreground with color correction effects/tools to minimize the spill color.
Noise or grain Heavy noise or grain interferes with the success keying tools.
• Pre-process the plate to reduce the noise or grain before applying the keyers. For example, add a blur or a noise reduction effect/tool. Some keyers , such as Keylight, carry built-in pre-processed softening options.
• Apply different keyers or different keyer settings to different channels. For example, the blue channel may carry the heaviest amount of grain and may require slightly different settings.
Tricky foreground Foreground objects include glass, smoke, or sheer fabric.
• Apply a secondary keyer. Programs generally include secondary keyers that are not good for general keying but may have specialized workflows that sometimes prove superior with tricky foregrounds.
Technology limitations Older video systems or current consumer video systems suffer from reduced resolution or artifacts such as edge bleeding.
• Apply the approaches discussed for tricky foregrounds or complex foregrounds (see the following page).
Complex foreground Foregrounds with heavy motion blur, light-colors that carry heavy spill, or soft edges that disappear into the background.
• Use additional matte effects/tools to fine-tune the matte edge after the application of the keyer. You can use the additional effect/tool to erode or soften the matte. You can also color grade the alpha channel.
• Break the green screen into several parts using rotoscoping. For example, separate the head from the body and apply separate keying effects/tools to each part or apply separate keyer settings to each part.
• Separate the foreground edge from the foreground core by rotoscoping or using an internal matting process offered by the keying effect/tool.
No green screen On occasion, it may be necessary to separate a foreground object even though no green screen or similar key color has been added to the background.
• Rotoscoping is the standard solution. Although rotoscoping tools have become quite advanced, they may still require a tremendous amount of manual labor.
• Depending on the footage, it may be possible to apply or create keyers by attacking background colors or special channels such as luminance.
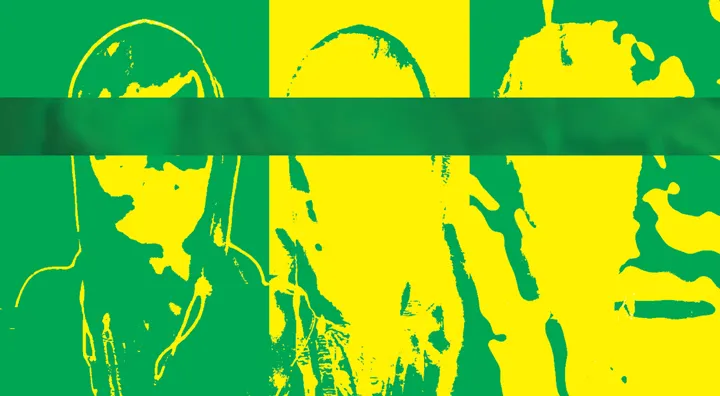
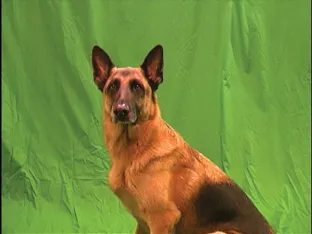
Keying Challenge A
Figure 1.1 shows a frame from the Dog.##.png image sequence. Table 1.2 describes the strengths and weaknesses of the footage in the context of chroma keying.
Figure 1.1 A green screen is placed behind a dog. Image sequence adapted from “Stock Footage – For the Dogs – Chroma Key Original 1” by Ivan Bridgewater and is licensed under Creative Commons Attribution 3.0 Unported (CC BY 3.0).
Table 1.2
Strengths
Weaknesses
Green screen covers entire background. The green is not overexposed.
The green screen carries numerous wrinkles, which cause value variations in the green. There are two black lines at the left and right edge due to limitations of the camera.
The color contrast between the green of the green screen and the red fur of the dog makes the keying process easier. There is green spill along the dog’s belly, back, and ears but it’s not overly heavy.
The...
Table of contents
Cover
Half Title
Title Page
Copyright Page
Table of Contents
Introduction
Chapter 1: Keying Difficult Green Screen
Chapter 2: Motion Tracking Elusive Patterns
Chapter 3: Relighting in the Composite
Chapter 4: Fixing and Repairing Plates
Chapter 5: Replicating Artifacts
Chapter 6: Adding Depth to Flat Scenes
Chapter 7: Using Imperfect FX Elements
Chapter 8: Tackling a Complex VFX Shot
Appendix A: Introduction to After Effects and Fusion
Appendix B: Source File Information
Index
Frequently asked questions
Yes, you can cancel anytime from the Subscription tab in your account settings on the Perlego website. Your subscription will stay active until the end of your current billing period. Learn how to cancel your subscription
No, books cannot be downloaded as external files, such as PDFs, for use outside of Perlego. However, you can download books within the Perlego app for offline reading on mobile or tablet. Learn how to download books offline
Perlego offers two plans: Essential and Complete
Essential is ideal for learners and professionals who enjoy exploring a wide range of subjects. Access the Essential Library with 800,000+ trusted titles and best-sellers across business, personal growth, and the humanities. Includes unlimited reading time and Standard Read Aloud voice.
Complete: Perfect for advanced learners and researchers needing full, unrestricted access. Unlock 1.4M+ books across hundreds of subjects, including academic and specialized titles. The Complete Plan also includes advanced features like Premium Read Aloud and Research Assistant.
Both plans are available with monthly, semester, or annual billing cycles.
We are an online textbook subscription service, where you can get access to an entire online library for less than the price of a single book per month. With over 1 million books across 990+ topics, we’ve got you covered! Learn about our mission
Look out for the read-aloud symbol on your next book to see if you can listen to it. The read-aloud tool reads text aloud for you, highlighting the text as it is being read. You can pause it, speed it up and slow it down. Learn more about Read Aloud
Yes! You can use the Perlego app on both iOS and Android devices to read anytime, anywhere — even offline. Perfect for commutes or when you’re on the go. Please note we cannot support devices running on iOS 13 and Android 7 or earlier. Learn more about using the app
Yes, you can access Advanced Visual Effects Compositing by Lee Lanier in PDF and/or ePUB format, as well as other popular books in Media & Performing Arts & Film & Video. We have over one million books available in our catalogue for you to explore.