3D Origami Art
eBook - ePub

3D Origami Art

  1. 114 pages
  2. English
  3. ePUB (mobile friendly)
  4. Available on iOS & Android
eBook - ePub

3D Origami Art

Book details
Book preview
Table of contents
Citations

About This Book

Easily Create Origami with Curved Folds and Surfaces

Origamiā€”making shapes only through foldingā€”reveals a fascinating area of geometry woven with a variety of representations. The world of origami has progressed dramatically since the advent of computer programs to perform the necessary computations for origami design.

3D Origami Art presents the design methods underlying 3D creations derived from computation. It includes numerous photos and design drawings called crease patterns, which are available for download on the author's website. Through the book's clear figures and descriptions, readers can easily create geometric 3D structures out of a set of lines and curves drawn on a 2D plane.

The author uses various shapes of sheets such as rectangles and regular polygons, instead of square paper, to create the origami. Many of the origami creations have a 3D structure composed of curved surfaces, and some of them have complicated forms. However, the background theory underlying all the creations is very simple. The author shows how different origami forms are designed from a common theory.

Frequently asked questions

Simply head over to the account section in settings and click on ā€œCancel Subscriptionā€ - itā€™s as simple as that. After you cancel, your membership will stay active for the remainder of the time youā€™ve paid for. Learn more here.
At the moment all of our mobile-responsive ePub books are available to download via the app. Most of our PDFs are also available to download and we're working on making the final remaining ones downloadable now. Learn more here.
Both plans give you full access to the library and all of Perlegoā€™s features. The only differences are the price and subscription period: With the annual plan youā€™ll save around 30% compared to 12 months on the monthly plan.
We are an online textbook subscription service, where you can get access to an entire online library for less than the price of a single book per month. With over 1 million books across 1000+ topics, weā€™ve got you covered! Learn more here.
Look out for the read-aloud symbol on your next book to see if you can listen to it. The read-aloud tool reads text aloud for you, highlighting the text as it is being read. You can pause it, speed it up and slow it down. Learn more here.
Yes, you can access 3D Origami Art by Jun Mitani in PDF and/or ePUB format, as well as other popular books in Mathematics & Mathematics General. We have over one million books available in our catalogue for you to explore.

Information

Year
2017
ISBN
9781315350400
Edition
1

1 Axisymmetric 3D Origami

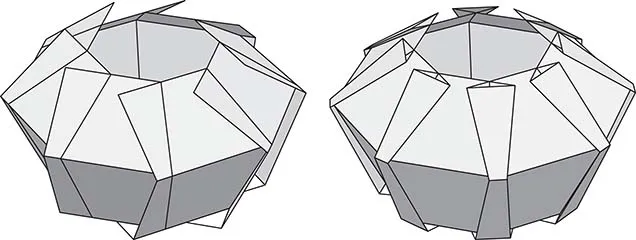
This chapter introduces you to the design techniques for axisymmetric three- dimensional (3D) origami shapes such as those in Figure 1.1. Some look as if wrapping a solid and others partly sticking to a solid, both with external projections. The following explains four types combined with two solid wrapping types and two external projection types.

1.1 Four Basic Types

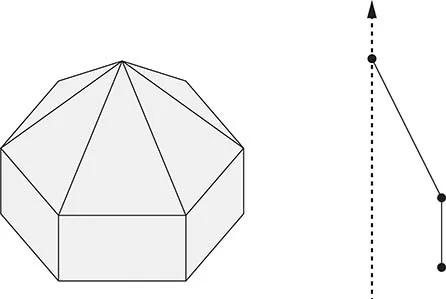
The polyhedron on the left in Figure 1.2 is formed by rotating the polygonal line on the right (called the section line) around the vertical dash-dot axis at 60-degree intervals and connecting the vertices. In computational geometry (CG) and computer-aided design (CAD), this polyhedron is generated with a method called rotational sweep (the base is intentionally excluded in Figure 1.2). This chapter targets origami shapes having a structure that appears as if it wraps an axisymmetric polyhedron like in Figure 1.1 with one sheet.
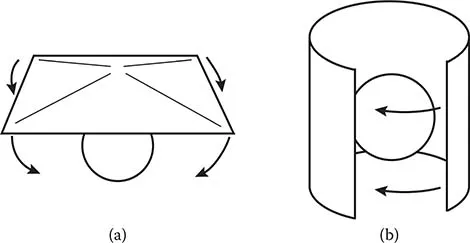
There are various ways of wrapping a solid. We are looking at two methods in Figure 1.3: (a) overlaying ("cone type") and (b) cylindrical, surrounding from outside ("cylinder type"). Each type corresponds to the candy wrapping method in the Prologue, Figure P.13. The solid does not have to be completely wrapped and can have its top and
bottom left open. Use a regular polygonal sheet for the cone type and a rectangular sheet for the cylinder type.
The solid can have two types of external projections: a thin pleat called a flat pleat, and a thick solid pleat (triangular cross section) called a 3D pleat (Figure 1.4).

1.2 Basic Crease Patterns

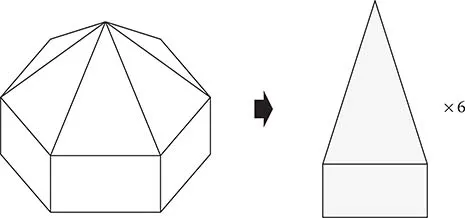
As content common to the four different types of 3D origami, let's look at a rotationally swept solid and its crease pattern. In Figure 1.5, the solid on the left can be made by putting six of the parts on the right together.
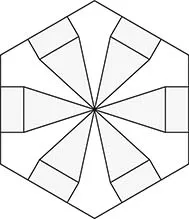
For the cone type, the crease pattern components are placed on radially on a plane around the center as in Figure 1.6. The sheet used will be a regular polygon. Pleats are made from the margins outside the parts.
For the cylinder type, the crease pattern components are aligned at equal intervals as in Figure 1.7. The sheet used will be a rectangle. Pleats are made from the margins outside the parts.
Pleats are formed by adding new fold lines in the margins on the pattern. The way of adding fold lines varies depending on whether the pleat shape is flat or a triangular cross-sectional solid.
The following sections explain the four 3D origami types varying with the combination of pleat and wrapping types.
Images
Figure 1.1 Axisymmetric 3D origami shapes presented in this chapter, from the left, flat-pleat cone type, flat-pleat cylinder type, 3D-pleat cone type, and 3D-pleat cylinder type.
Images
Figure 1.2 Rotationally swept axisymmetric solid (left) and polygonal line (right) used for making the solid.
Images
Figure 1.3 Two ways of wrapping a solid: cone type (a) and cylinder type (b).
Images
Figure 1.4 Two pleat types: flat pleat (left) and 3D pleat (right).
Images
Figure 1.5 Rotationally swept solid and its components.
Images
Figure 1.6 Components placed radially.
Images
Figure 1.7 Components placed horizontally at equal intervals.

1.3 Flat-Pleat Cone Type

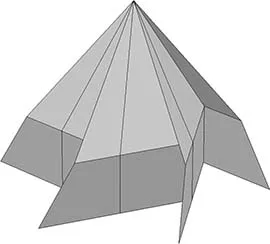
Shapes of this type have external flat pleats and look as if they are covering a solid from the top (Figure 1.8).
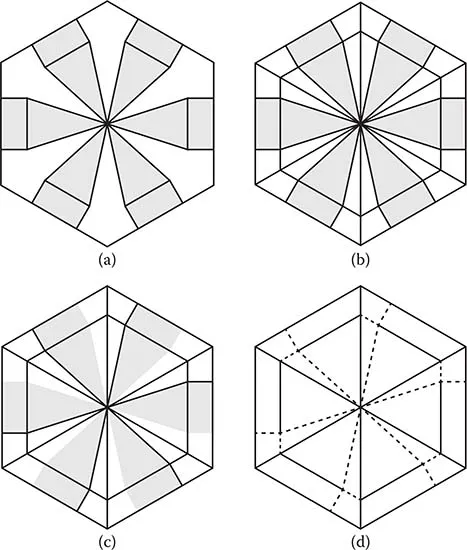
The crease pattern for this type can be created as follows. First, place the crease pattern components at equal intervals radially with their tips at the center as in Figure 1.9a. Second, add fold lines in the margins as in Figure 1.9b, so as to connect each vertex of the outer regular polygon to its center and to extend each part's horizontal line segment. Third, as in Figure 1.9c, erase the polygonal contour lines from each component (left-side polygonal lines are erased in the example). Last, assign mountains and valleys as in Figure 1.9d. A mountain fold line (solid) makes a convex when viewed from outside and a valley fold line (dashed) a concave.
Images
Figure 1.8 Flat-pleat cone-type solid shape.
Through the above sequence, the flat-pleat cone-type crease pattern can be created for various axisymmetric solids.
Images
Figure 1.9 Flat-pleat cone-type crease pattern structure.

1.4 Flat-Pleat Cylinder Type

Shapes of this type have external flat pleats and look a...

Table of contents

  1. Cover Page
  2. Half title
  3. Title Page
  4. Copyright
  5. Preface
  6. Prologue: Origami Basics
  7. Author
  8. 1 Axisymmetric 3D Origami
  9. 2 Extension of Axisymmetric 3D Origami
  10. 3 Connecting Axisymmetric 3D Origami Shapes
  11. 4 Making Use of Mirror Inversion
  12. 5 Application of Mirror Inversion
  13. 6 Voronoi Origami
  14. 7 Various Origami Designs
  15. 8 Conclusion
  16. Afterword
  17. Index