eBook - ePub
Clinical Ultrasound
A How-To Guide
- 150 pages
- English
- ePUB (mobile friendly)
- Available on iOS & Android
eBook - ePub
About this book
Clinical Ultrasound: A How-To Guide is targeted at the novice to intermediate clinician sonographer. The book's easy-to-follow style and visually appealing chapter layout facilitates the quick recall of knowledge and skills needed to use clinical ultrasound in everyday practice. Authored by experts in emergency medicine clinical ultrasound from acr
Trusted by 375,005 students
Access to over 1.5 million titles for a fair monthly price.
Study more efficiently using our study tools.
Information
Topic
Medicine1 | Trauma |
INDICATIONS
• Evaluate blunt or penetrating trauma to torso for intra-abdominal or intrathoracic bleeding
• Perform serial abdominal exams for new or progressive bleeding
• Assess for pneumothorax of any etiology
IMAGE ACQUISITION AND INTERPRETATION
EQUIPMENT
• Phased array or curvilinear 2.5–5 MHz transducer
PREPARATION
• Perform prior to Foley placement to utilize the bladder as an acoustic window.
• Place the patient supine or in slight Trendelenburg when possible to increase the amount of dependent fluid in the hepatorenal fossa (Morison’s pouch).
RECOMMENDED VIEWS
Order determined by clinical context.
1. Subxiphoid
2. Right upper quadrant
3. Left upper quadrant
4. Pelvis
5. Thorax
SUBXIPHOID VIEW
TRANSDUCER PLACEMENT
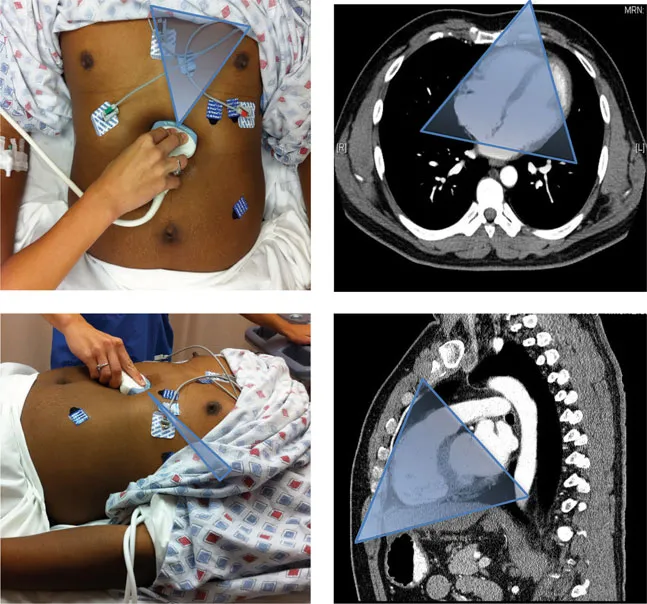
• To visualize the pericardium, place the transducer in the transverse scanning plane just to the right of the xiphoid process aiming toward the left scapula with the indicator toward the patient’s right.
• With inadequate visualization, increase your depth and ask the patient to take a breath and hold in to bring the mediastinum toward the transducer.
• If view obscured by stomach gas, slide the transducer to patient’s right slightly, to use more of the liver as an acoustic window.
• A minority of patients require a parasternal long view.
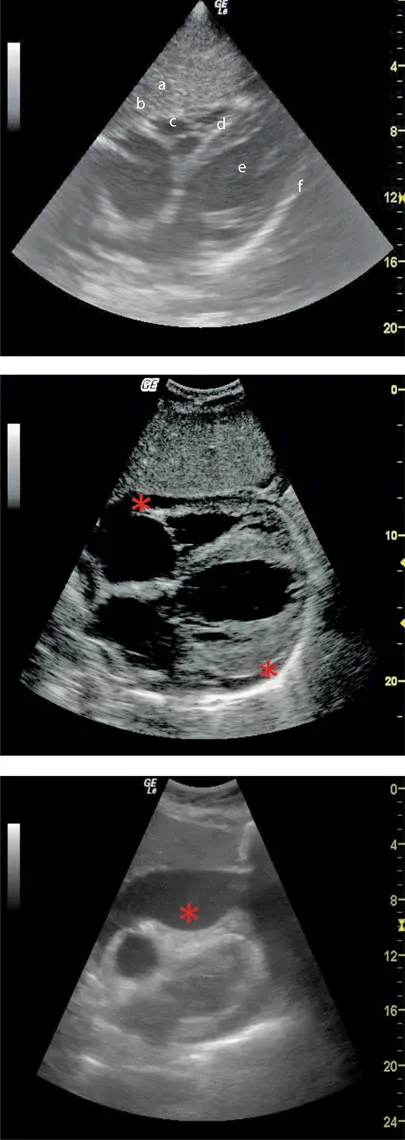
NORMAL ANATOMY
Top of image to bottom:
a. Left lobe of the liver
b. Anterior pericardium
c. Right ventricle
d. Septum
e. Left ventricle
f. Posterior pericardium
PATHOLOGY
• Acute bleeding is visualized as an anechoic fluid collection within the pericardial sac, between the visceral and parietal anterior and posterior pericardium (*).
• With increasing bleeding, fluid surrounds the heart, becoming visible in the anterior pericardium.
• With time, clotting results with mixed echogenicity.
• The noncompliant pericardial sac may quickly tamponade venous return, visualized as diastolic right heart collapse (*), especially in the hypovolemic patient.
• A benign anterior pericardial fat pad will have a mixed echogenicity, not seen posteriorly or changing on repeat exam.
RIGHT UPPER QUADRANT VIEW
TRANSDUCER POSITION
• To visualize Morison’s pouch, place the transducer in the mid-axillary line in the coronal scanning plane, in the 9th to 11th intercostal space, aiming obliquely toward the retroperitoneum with the indicator pointing toward the patient’s head.
• Avoid rib shadows by slightly rotating indicator toward the bed in an oblique plane.
• To better visualize the subphrenic space and right thorax, slide the transducer up an intercostal space, or ask the patient to take a deep breath in and hold for 5 seconds. Alternatively, slide the transducer more anteriorly toward the axillary line at the 8th to 9th intercostal space, again fanning toward the retroperitoneum.
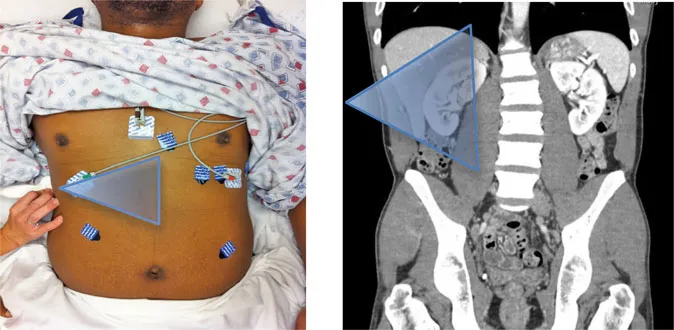
NORMAL ANATOMY
Left to right of image:
a. Thorax
b. Diaphragm
c. Liver
d. Morison’s pouch
e. Right kidney

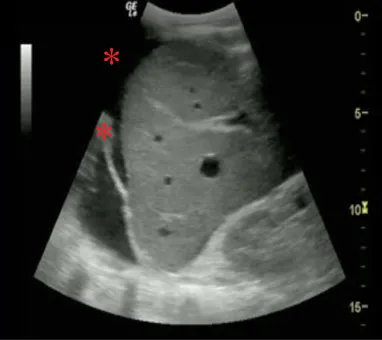
PATHOLOGY
• Acute bleeding will fill the pelvis, then spill over the right paracolic gutter into Morison’s pouch, the most dependent portion of the abdomen above the pelvis.
• Fluid (*) will appear as an anechoic fluid collection below the diaphragm (*).
• Anechoic fluid may represent acute bleeding, urine from a bladder rupture, or pre-existing ascites. Serial exams and other tests will clarify.
LEFT UPPER QUADRANT VIEW
TRANSDUCER POSITION
• To visualize the splenorenal space, place the transducer in the posterior axillary line in the coronal scanning plane, in the 8th to 10th intercostal space, aiming obliquely toward the retroperitoneum with the indicator pointing toward the patient’s head. The probe should be more superior and posterior than in the right upper quadrant view.
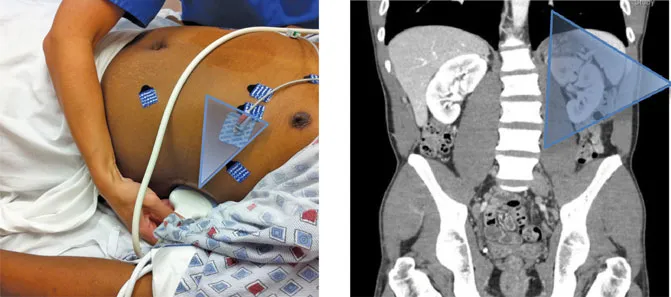
NORMAL ANATOMY
Left to...
Table of contents
- Cover
- Half Title
- Title Page
- Copyright Page
- Table of Contents
- Preface
- Introduction
- The Editors
- Contributing Authors
- Chapter 1 Trauma
- Chapter 2 Echo and IVC
- Chapter 3 Lung
- Chapter 4 Abdominal Aorta
- Chapter 5 Renal and Bladder
- Chapter 6 Biliary
- Chapter 7 First Trimester Pregnancy
- Chapter 8 Appendicitis
- Chapter 9 Ocular Ultrasound
- Chapter 10 Soft Tissue Procedures
- Chapter 11 Musculoskeletal
- Chapter 12 Lower Extremity Deep Vein Thrombosis
- Chapter 13 Vascular Access
- Chapter 14 Pediatric
- Chapter 15 Abdominal Procedures
- Chapter 16 Pericardiocentesis
- Chapter 17 Thoracentesis
- Chapter 18 US-Guided Peripheral Nerve Blocks
- Chapter 19 Lumbar Puncture
- Further Learning
Frequently asked questions
Yes, you can cancel anytime from the Subscription tab in your account settings on the Perlego website. Your subscription will stay active until the end of your current billing period. Learn how to cancel your subscription
No, books cannot be downloaded as external files, such as PDFs, for use outside of Perlego. However, you can download books within the Perlego app for offline reading on mobile or tablet. Learn how to download books offline
Perlego offers two plans: Essential and Complete
- Essential is ideal for learners and professionals who enjoy exploring a wide range of subjects. Access the Essential Library with 800,000+ trusted titles and best-sellers across business, personal growth, and the humanities. Includes unlimited reading time and Standard Read Aloud voice.
- Complete: Perfect for advanced learners and researchers needing full, unrestricted access. Unlock 1.5M+ books across hundreds of subjects, including academic and specialized titles. The Complete Plan also includes advanced features like Premium Read Aloud and Research Assistant.
We are an online textbook subscription service, where you can get access to an entire online library for less than the price of a single book per month. With over 1.5 million books across 990+ topics, we’ve got you covered! Learn about our mission
Look out for the read-aloud symbol on your next book to see if you can listen to it. The read-aloud tool reads text aloud for you, highlighting the text as it is being read. You can pause it, speed it up and slow it down. Learn more about Read Aloud
Yes! You can use the Perlego app on both iOS and Android devices to read anytime, anywhere — even offline. Perfect for commutes or when you’re on the go.
Please note we cannot support devices running on iOS 13 and Android 7 or earlier. Learn more about using the app
Please note we cannot support devices running on iOS 13 and Android 7 or earlier. Learn more about using the app
Yes, you can access Clinical Ultrasound by Tarina Lee Kang, John Bailitz, Tarina Lee Kang,John Bailitz in PDF and/or ePUB format, as well as other popular books in Medicine & Emergency Medicine & Critical Care. We have over 1.5 million books available in our catalogue for you to explore.