eBook - ePub
Pop-up Paper Engineering
Cross-curricular Activities in Design Engineering Technology, English and Art
- 128 pages
- English
- ePUB (mobile friendly)
- Available on iOS & Android
eBook - ePub
Pop-up Paper Engineering
Cross-curricular Activities in Design Engineering Technology, English and Art
About this book
The techniques of creating pop-up forms are demonstrated in a series of practical lessons. The book also suggests ways in which pop-up forms can be used to enrich the study of English and art, and contains illustrations of childrens work.
Tools to learn more effectively

Saving Books

Keyword Search

Annotating Text

Listen to it instead
Information
POP-UP PAPER ENGINEERING
What tools do I need?
Before beginning, have ready a pile of (preferably discarded) A4 duplicating paper. As no glue is needed in single sheet engineering, the process of trial and error is simplified. In the early stages of experimentation you will fill the floor with discarded pop-up attempts. Good. This shows that you are really involved in the learning process. Keep sticky paper by you to join mistaken incisions, and, when you feel the time is right, graduate from duplicating to cartridge paper and larger (A3) formats.
The only piece of equipment you need initially is a pair of scissors, but later a cutter will be essential. A cutter is a piece of equipment no design technologist can survive without, for it not only reaches those parts of paper that scissors cannot reach, but also enhances the design process. A cutting mat is also recommended, for it produces a clean, sharp edge to cut paper. Finally, a steel safety rulerwill be useful, especially when longer, accurate cutting is required.
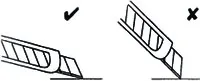
‘A cutter reaches those parts of paper that scissors cannot reach…’
1
THE BASIC BOX
‘The ability to design is likely to exist already within our pupils, even though it may be largely intuitive and un-organized. They will have ideas for the use of materials and a desire to use them. The vital question is how this can be built upon to bring them to a point where they are able to express their own ides and interests in satisfying creative and competent technical term.’
Schools Council Design and Craft Education Project.
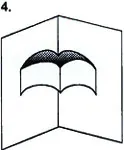
The Basic Box pop-up is one of the simplest forms in the 90 degree paper engineering workshop.
Stage 1: The Basic Box

1. Fold a sheet of A4 paper in half.

2. Make two incisions through the folded edge.
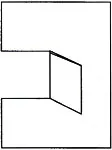
3. Fold the middle section outwards.
4. Push the middle section inside.
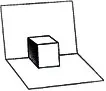
5. Open the paper to a 90° position.
6. Experiment with the basic form by changing the shape or angle of the cut.
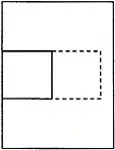
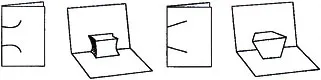
Stage 2: The Four-Fold Base
As experiments develop it will become necessary to adopt a more sophisticated approach to preparing the pop-up page: the four-fold base. The double folded page used in this method is stronger than the single folded page, and therefore more likely to stand up than a single sheet.. It has the added advantage that the blank area behind the negative space of the pop-up can contain artwork. Many people find the final presentation of a four-fold pop-up more aesthetically satisfying because there are no gaping holes.
1. First, fold the paper into four equal sections and reopen.
2&3. Fold in half along the vertical. Cut pop-up on the bottom panels. Drop the top panels down behind the bottom panels.
4. Open the inside of the double fold and project the pop-up form.
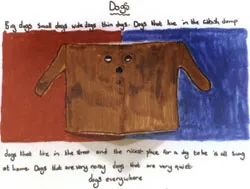
Dogs
Rose (aged 8)
Rose (aged 8)
‘Big dogs, small dogs, wide dogs, thin dogs. Dogs that live in the rubbish dump, dogs that live in the street and the nicest place for a dog to live is all snug at home.’
The two orientations of the 90 degree mode.
90 degree forms are capable of being projected in both vertical and horizontal orientations. As you progress you will see that each orientation influences the inherent imagery contained in the form. Thus, a pop-up image conceived in the horizontal will differ from that of the vertical.
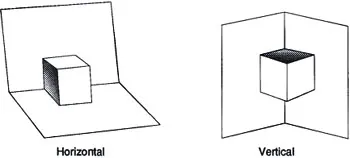
‘…each orientation influences the inherent imagery contained in the form.’
Points to Remember
Cut lines must always cross the central fold (spine) if designs are to pop up, so the paper must be hinged to the left and right of the told. If you find yourself cutting a vertical line you are probably making a mistake! Engineering must never be more than halfway across the folded page. If it does, the resulting pop-up will protrude beyond the edge of the page.
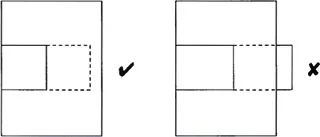
‘…the pop-up never protrudes beyond the edge of the closed book.’
1
CURRICULUM PROJECT
Activity 1
|
simulate the Basic Box
|
brainstorm horizontal & vertical themes
|
image and scenario artwork
|
develop storymaking & storywriting
|
simulate the Basic Box
|
brainstorm horizontal & vertical themes
|
image and scenario artwork
|
develop storymaking & storywriting
The Box
Experimenting with the basic box technique is a good way for children to begin because a wide spectrum of engineering possibilities are variations of this fundamental form.
Activity 1:
A) Simply follow stage one described in Chapter 1, developing your measuring and scissor cutting skills. If you have to do the cutting for pupils try to include them in the process. It is important that they watch your demonstration (possibly several times) before embarking on the process themselves.
B) Brainstorm themes resulting from the box-making activity. ‘If this was a shape in a pop-up book what would the story be about?’
One group of eight-year-olds produced the following ideas:
| Horizontal Box | Vertical Box |
| Treasure chest | House |
| Present in a box | Refrigerator |
| Brick | Tin for holding things |
| Loaf of bread | Present in a box |
| House | Garden shed |
While most objects relate to only one mode of projection some are conceived in both, for example, the House.
C) Having determined the image, encourage pupils to pictorialize the form with artwork. Apart from the visual and design skills developed, this task involves children in amplifying the identity of the image. There are two parts to this task: i) artwork appropriate to the image itself; ii) artwork appropriate to the accompanying scenario. This enlarging of the image’s concept to include the environment prepares the narrational element of the story-making activity.
D) Story making. This might...
Table of contents
- Cover
- Halftitle
- Dedication
- Title
- Copyright
- Contents
- Introduction
- Part 1: 90 Degree Engineering Workshop
- Part 2: 180 Degree Engineering Workshop
- Conclusion
- Bibliography
- Note on Author
Frequently asked questions
Yes, you can cancel anytime from the Subscription tab in your account settings on the Perlego website. Your subscription will stay active until the end of your current billing period. Learn how to cancel your subscription
No, books cannot be downloaded as external files, such as PDFs, for use outside of Perlego. However, you can download books within the Perlego app for offline reading on mobile or tablet. Learn how to download books offline
Perlego offers two plans: Essential and Complete
- Essential is ideal for learners and professionals who enjoy exploring a wide range of subjects. Access the Essential Library with 800,000+ trusted titles and best-sellers across business, personal growth, and the humanities. Includes unlimited reading time and Standard Read Aloud voice.
- Complete: Perfect for advanced learners and researchers needing full, unrestricted access. Unlock 1.4M+ books across hundreds of subjects, including academic and specialized titles. The Complete Plan also includes advanced features like Premium Read Aloud and Research Assistant.
We are an online textbook subscription service, where you can get access to an entire online library for less than the price of a single book per month. With over 1 million books across 990+ topics, we’ve got you covered! Learn about our mission
Look out for the read-aloud symbol on your next book to see if you can listen to it. The read-aloud tool reads text aloud for you, highlighting the text as it is being read. You can pause it, speed it up and slow it down. Learn more about Read Aloud
Yes! You can use the Perlego app on both iOS and Android devices to read anytime, anywhere — even offline. Perfect for commutes or when you’re on the go.
Please note we cannot support devices running on iOS 13 and Android 7 or earlier. Learn more about using the app
Please note we cannot support devices running on iOS 13 and Android 7 or earlier. Learn more about using the app
Yes, you can access Pop-up Paper Engineering by Paul Johnson in PDF and/or ePUB format, as well as other popular books in Education & Education General. We have over one million books available in our catalogue for you to explore.