You've found your Muse; now learn how to create with it
Creative Web Design with Adobe Muse is a step-by-step guide to creating fully-featured websites using Adobe Muse. Adobe Muse can be a complicated program, and web design itself is no easy task, although your clients might think so. This book takes you from the initial design and layout stage right up to helping you publish your beautifully designed and richly developed site. Each chapter covers a different section of the website and, in turn, introduces the tools and features of the program, accompanied by useful tips and tricks that help you speed up your workflow. Follow along as a website is created from concept to execution and rich content such as slideshows, galleries, and social media are incorporated. See how each aspect of a website is created with Muse; watch as it's published; and visit the final version after learning how it was made. If seeing a website created start to finish wasn't enough, this book also features:
Tips on how to incorporate Photoshop into Muse
A companion website that was created with Muse where you can get up-to-the-minute coverage on Muse and other tutorials to help you design the perfect website
Through this perfect blend of instruction and inspiration, you'll be up and running with Adobe Muse in no time.
efore we jump in and start building our websites we’ll need to familiarize ourselves with Muse and its features. Much of the interface and toolset will be recognizable to you if you’ve used any of Adobe’s applications before. There are a few differences, of course. In this chapter we’ll take an overview of the application’s features.
1
6
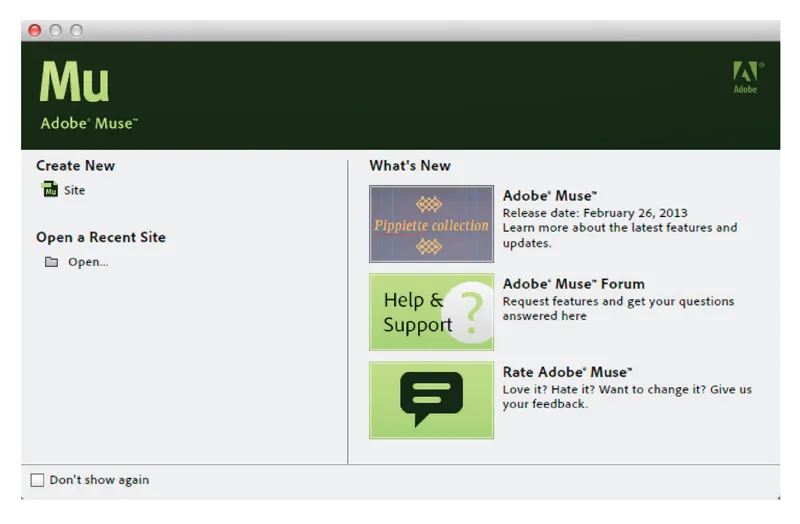
The Welcome Screen
As with most of the Creative Cloud appli- cations, when we first launch Muse, the first thing we see is the Welcome screen.
On the left we have the options to create a new site and also to open any recent sites we have been working on, this is empty at the moment, as we’re yet to create any.
On the right are links to online learning
resources and to interact with the Muse community. These all require an active Internet connection; as this is a web-design program, it’s highly likely you already have one of those, of course!
We can also choose to prevent the dialog from opening each time by checking the box in the bottom-left corner.
The dialog will remain visible until we choose an action but will no longer show when Muse is launched. This is personal preference, of course; I prefer not to have it showing. If you later decide you do want it showing, it can be toggled in the program preferences. It’s also possible to start new sites and open recent ones from the menus.
We’ll be approaching the program as though it has only just beeninstalled. This way we start at the same level,regardless of your previous experience. It’s well worth following from the beginning,even if you have used the program before; there’s always something that you might have missed.
Creating a new site
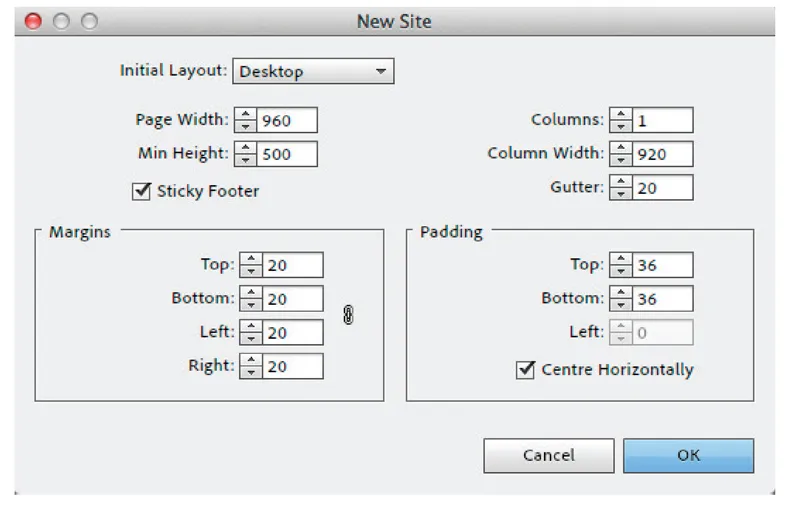
The next step is to start off our new site project. To do this we can click the CreateNew > Site button. This opens the New Site dialog; we can also invoke this by choosing Create New > Site if we opted to not display the welcome dialog.
Here we can choose the initial layout type
from Desktop, Tablet or Phone. Each pre- set has a default set of values based on the standard sizes for their respective devices. These can also be set manually, of course and will not be overridden when reselect- ing the preset.
We would generally have an idea of the
layout beforehand and could set the values
up now. For the purposes of this chapter, however, we’ll leave the dialog at its defaults; they can be edited at any time once we are in the main working area. Clicking OK takes us into the Plan mode.
It’s also possible to bypass the dialog altogether by holding Opt/Alt when clicking the option to start a new site on the wel- come dialog.
Introducing Adobe Muse
Features at a glance
The dimensions and layout of the site can be set initially using the New Site dialog.
7
Creative web design with Adobe Muse
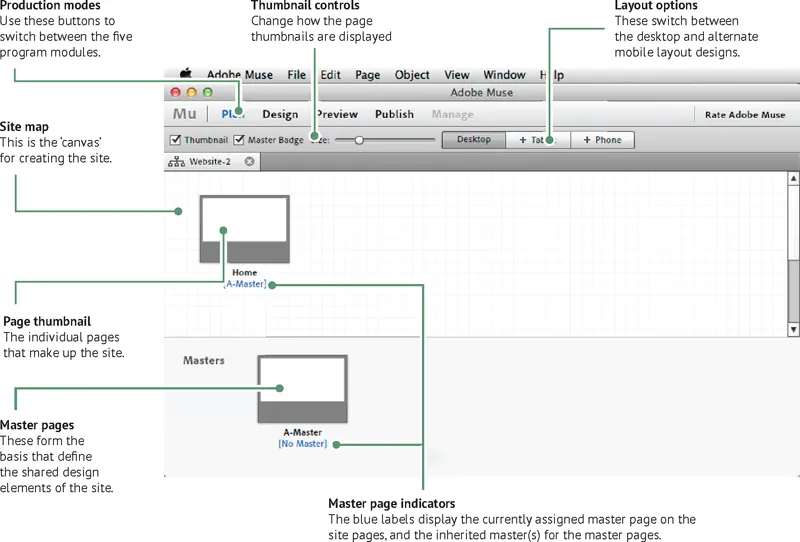
Working in Plan mode
Plan mode is where the layout of the site is created and controlled. This has two sections, the site map at the top and the master page view at the bottom. When we create a new site, we always start with a Home page and a Master page (named A-Master by default). If you’ve worked with Adobe InDesign, the concept of master pages will be familiar; these generally contain the site assets that are going to be consistent across the site. These will oft en be the header and footer components, site navigation and background color or pattern. Many sites will only need one master, whereas others may have several, depending on the design. It’s also possible to create master pages that inherit only certain traits of their peers, such as the footer elements, giving us more design options, whilst keeping the overall theme and ease of use.
We can open several sites at once, they appear as tabs at the top of the workspace. This can be useful if we want to copy previously used elements from one site to another. Do bear in mind that this may decrease the performance of the program.
Once we start creating pages, we can choose the order in which they appear, add and remove pages and also organize the pages at diff erent levels to create a hierarchy; Muse can automatically generate the site navigation based on this layout. All this will become clear as we progress through the chapters.
8
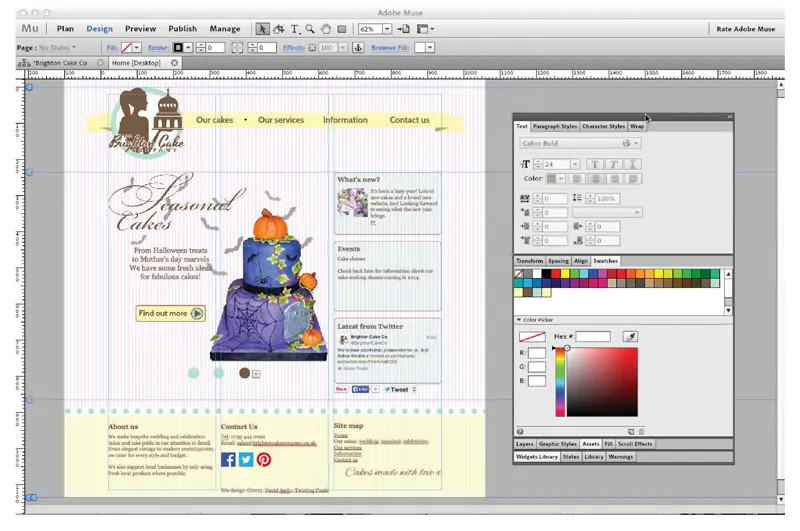
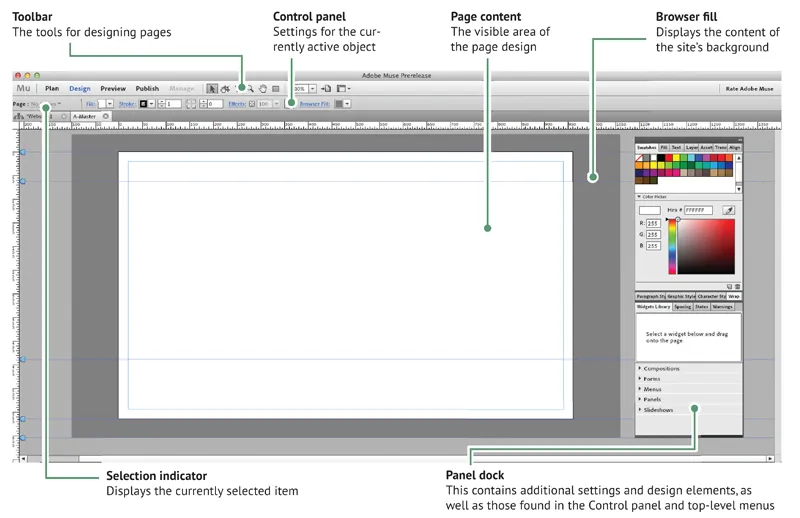
Design mode
Design mode is where the page building happens. All text, images and special content (Photoshop buttons, rectan- gles, widgets, and embedded HTML) is created here. To open a page into this view, we double-click its thumbnail in the Plan mode. The screenshot below shows a master page in the workspace.
Unlike other Creative Cloud programs, the toolset in Muse is minimal and resides at the top of the window, rather than being within the workspace itself. Below the toolbar is the Control panel. This displays the settings and options relating to the currently selected object in the design.
Just below the Control Panel is the tab area. As with the Plan mode, we can have several pages open at once, each being represented by a tab with the page title. In Muse, windows cannot be separated from the tab bar, as they can in other applications.
The main workspace has three areas. The lighter gray area is the application background. The darker gray repre- sents the browser fill: the area around the page content that stretches to fill the window when the page is viewed in the web browser. The white area is the page or master page content.
Around the workspace are the rulers, the measurements are in pixels. The ru...
Table of contents
Cover
Title
Copyright
Contents
Acknowledgements
Introduction
1 Introducing Adobe Muse
2 Designing the Master Page
3 Creating the Site Content
4 Designing for Mobile Devices
5 Search Engine Optimization
6 Launching the Live Site
7 The left-overs
Index
Frequently asked questions
Yes, you can cancel anytime from the Subscription tab in your account settings on the Perlego website. Your subscription will stay active until the end of your current billing period. Learn how to cancel your subscription
No, books cannot be downloaded as external files, such as PDFs, for use outside of Perlego. However, you can download books within the Perlego app for offline reading on mobile or tablet. Learn how to download books offline
Perlego offers two plans: Essential and Complete
Essential is ideal for learners and professionals who enjoy exploring a wide range of subjects. Access the Essential Library with 800,000+ trusted titles and best-sellers across business, personal growth, and the humanities. Includes unlimited reading time and Standard Read Aloud voice.
Complete: Perfect for advanced learners and researchers needing full, unrestricted access. Unlock 1.4M+ books across hundreds of subjects, including academic and specialized titles. The Complete Plan also includes advanced features like Premium Read Aloud and Research Assistant.
Both plans are available with monthly, semester, or annual billing cycles.
We are an online textbook subscription service, where you can get access to an entire online library for less than the price of a single book per month. With over 1 million books across 990+ topics, we’ve got you covered! Learn about our mission
Look out for the read-aloud symbol on your next book to see if you can listen to it. The read-aloud tool reads text aloud for you, highlighting the text as it is being read. You can pause it, speed it up and slow it down. Learn more about Read Aloud
Yes! You can use the Perlego app on both iOS and Android devices to read anytime, anywhere — even offline. Perfect for commutes or when you’re on the go. Please note we cannot support devices running on iOS 13 and Android 7 or earlier. Learn more about using the app
Yes, you can access Creative Web Design with Adobe Muse by David Asch in PDF and/or ePUB format, as well as other popular books in Computer Science & Programming Games. We have over one million books available in our catalogue for you to explore.