
- 392 pages
- English
- ePUB (mobile friendly)
- Available on iOS & Android
eBook - ePub
About this book
Pro Tools LE and M-Powered is an authoritative guide to Digidesign's entry-level hardware and software systems. Illustrated throughout with color screen grabs, the book starts by giving you useful overviews and advice about the hardware options available. Subsequent chapters are packed with easy-to-follow instructions, valuable hints and time-saving tips on how to use the software.
Includes:
* Full coverage of all new features in version 7
* Information on tempos, clicks and grooves
* Two chapters on MIDI
* Useful tutorials on using Reason, Live and SampleTank
* Recommendations on backups and transfers
* Guidance on the DV Toolkit for post production
For troubleshooting technical problems, advice on purchasing decisions or inspiration for new ideas, keep this book by your side as a vital reference point.
Tools to learn more effectively

Saving Books

Keyword Search

Annotating Text

Listen to it instead
Information
1
Hardware Options for Pro Tools LE and M-Powered Systems
Pro Tools LE software requires you to connect a suitable Digidesign hardware interface to your computer before it will run. Digidesign hardware for LE systems includes the Digi 001, the Mbox, the Mbox 2, the Digi 002, and the Digi 002 Rack. The Command | 8 hardware controller also works with LE systems.
The Mboxes are very affordable and ideal for use with laptops but only offer two channels of analogue and two channels of digital input and output. The Digi 002 Rack is more expensive, but supports multi-channel operation. The Digi 002, covered in the next chapter, incorporates a hardware control surface along with the same interfacing features as the Digi 002 Rack. The Command |8, also covered in the next chapter, is similar to the Digi 002 Rack, incorporating a MIDI interface and basic audio monitoring, but without the multi-channel audio input and output interface capabilities.
Let’s take a look at the discontinued Digi 001 first, as this was the first serious multi-port interface for Pro Tools LE systems and there are still many of these in use today.
Digi 001
The Digi 001 system includes a PCI card that you install in your computer; an I/O interface with a range of input and output connectors; and the Pro Tools LE software. The PCI card has a connector to link to the Digi 001 interface and also has a pair of ADAT optical connectors for multi-channel digital input and output (I/O). Each optical connector can carry 8 channels of 24-bit digital audio or can be switched using the software for use as an additional 2-channel S/PDIF interface.
The I/O interface provides 8 analogue audio inputs and outputs with 24-bit converters, S/PDIF digital audio input and output, a stereo headphone jack socket, a footswitch jack socket, and a pair of MIDI In and Out sockets. The total number of audio inputs and outputs is 18 – counting the 8 ADAT digital channels, the 2 S/PDIF digital channels, and the 8 analogue channels.
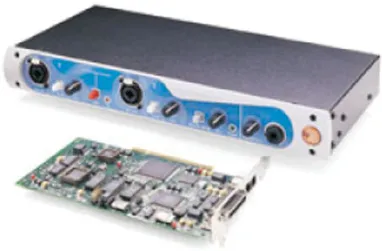
Fig. 1.1 – Digi 001: no longer manufactured.
The MIDI in and out connectors let you use the Digi 001 as a basic 16-channel MIDI interface for Mac or PC. The headphone jack socket lets you connect a pair of stereo headphones to monitor whatever audio you have routed to analogue outputs 1 and 2 using the Pro Tools LE software. The footswitch jack lets you connect a footswitch to control the QuickPunch and MIDI punch-in and punch-out recording features.
The 001’s microphone preamps will accept a wide range of microphone types, including high-quality ‘condenser’ models that require ‘phantom’ power. Dynamic microphones (such as the popular Shure SM58) don’t need power, but professional studio models (such as the AKG C414) need 48 volts which the preamplifier can send via the microphone cables into the microphone, rather than via separate power cables – hence the name ‘phantom’ power.

Fig. 1.2 – Digi 001 front panel.
The pair of analogue audio inputs provided on the front panel of the interface can accept either Mic-level or Line-level signals. The input sockets are combined XLR and 1/4″ jack types, so you can plug either of these commonly used connectors into the Digi 001. The ‘pad’ switches provided for each input reduce the input sensitivity by 26 dB when you want to use line-level signals instead of microphones. The phantom power switches are labelled ‘48 V’ which is the voltage supplied to power the microphones. A pair of Input Gain controls is also provided. Gain controls for the line inputs, 3–8 on the back of the Digi 001 interface, are provided in software so you can use these with mixers, preamps, keyboards, or other line-level sources.

Fig. 1.3 – Digi 001 rear panel.
A pair of Monitor Outputs is provided on the back panel. These carry the same audio signals that are routed to analogue outputs 1 and 2. The difference is that they are intended to let you listen to your main mix by hooking up a pair of powered speakers or a stereo power amplifier and speakers. A Monitor Volume control is provided on the front panel of the Digi 001 interface to control the listening level.
The Main Analogue outputs, 1 and 2, can be used to connect to a tape recorder when you are mixing down, although they may be connected to an external mixer. These outputs are balanced, +4 dBu line level. Analog Outputs 3–8 are unbalanced, −10 dBu line level, and can be used as sends to outboard gear or as outputs to an external mixer.
Another option for mixdown is to connect the S/PDIF outputs to a DAT or other digital recorder. By default, whatever is routed to outputs 1 and 2 is also sent to the S/PDIF outputs. You can disable this S/PDIF ‘mirroring’ (as it is referred to in the manual) so that you can use the S/PDIF connections to hook up an external digital effects unit, for example.
Low Latency Monitoring on the Digi 001
The Digi 001 supports Pro Tools LE’s special Low Latency Monitoring feature. This lets you record and monitor the 8 analogue and 8 ADAT digital inputs directly via outputs 1 and 2 with very low latency. When you select Low Latency Monitoring from Pro Tools LE’s Options menu, the audio entering the hardware interface is not passed through the host computer’s processor – it is routed directly to the main outputs instead.
There is a slight amount of latency involved here due to the A/D and D/A conversions and the internal routing within the hardware. From the information I was able to gather, the total delay is roughly 164 samples. This may not sound that low, but it’s a lot better than the 1024 samples that would have been in there had the Low Latency feature not been implemented.
There are some limitations with this method – any plug-ins and sends assigned to record-enabled tracks will be bypassed, for example – but at least you can get around the problem reasonably well.
One particular situation always requires a workaround. If you are using a plug-in to create a metronome click, you are going to lose your click in Low Latency mode.
One solution is to use an external MIDI device such as a drum machine to play the click. Another, partial, solution is to bus the output of the track containing the plug-in to an audio track and record this to your hard disk first. Then you can dispense with the plug-in track and simply replay the audio click track.
The problem with this, of course, is that you lose the ability to hear the click during count-off bars. If your session starts at Bar 1, Beat 1, for example, this can make it practically impossible to cue a musician to overdub starting at Bar 1, Beat 1.
A solution here is to make sure that you leave one or more bars empty at the start of your session so that you can record the click as audio into these ‘startup’ bars and use this to cue the musicians.
Monitoring latency and MIDI
To monitor a MIDI device through the audio inputs on the Digi 001, you need to route each input to a track and record-enable that track before you will hear any output. This is another reason why it is useful to use a separate external mixer with the Digi 001 – so you can always hear your synths, drum machines, and samplers without setting up routings in the Pro Tools software.
Also, when you are monitoring the audio coming into the Digi 001 from an external synthesizer, what you hear will have an audio delay equivalent to the number of samples specified in your Hardware Buffer settings – the latency delay. This delay will be very apparent if you have existing audio tracks, as these will be heard first and the MIDI devices will be heard a little later. If you don’t have an external mixer you will have to accept this latency while recording MIDI.
But there is a way around this for playback – use the Global MIDI Playback Offset feature in Pro Tools LE’s MIDI Preferences to trigger your MIDI data early to compensate for the latency. This offset is made in such a way that it just affects the playback – not the way the MIDI data is displayed in the Edit window. You are given the choice of offsetting the MIDI tracks either globally (all by the same amount) or individually. To compensate for audio monitoring latency you will need to enter a negative offset that causes the MIDI data to be played back earlier by a number of samples equivalent to the latency in samples. The best way to work out which latency value to use is to record the audio from your MIDI device into Pro Tools, then simply look at the exact position in samples where the audio starts compared to where the MIDI note is placed. This way you can read off the delay between these exactly in samples.
tip
You can also set up Individual MIDI Track Offsets in Pro Tools LE. This can be useful when you want to compensate for the time it takes for a particular synth or sampler to respond to an incoming MIDI message. This can amount to several milliseconds and this can be enough to make supposedly simultaneous percussive instruments sound like they are ‘flamming’. This is typically the ...
Table of contents
- Cover
- Halftitle
- Title
- Copyright
- Contents
- About the Author
- Acknowledgements
- The Intro
- Chapter 1 – Hardware Options for Pro Tools LE and M-Powered Systems
- Chapter 2 – The Digi 002 and the Command | 8
- Chapter 3 – Getting to know the Pro Tools LE Software
- Chapter 4 – Getting Started
- Chapter 5 – Tempos & Grooves
- Chapter 6 – Recording MIDI and using Virtual Instruments
- Chapter 7 – Editing MIDI
- Chapter 8 – Recording Audio
- Chapter 9 – Editing Audio
- Chapter 10 – Mixing
- Appendix 1 – Backups and Transfers
- Appendix 2 – DV Toolkit for LE
- More Info
- Index
Frequently asked questions
Yes, you can cancel anytime from the Subscription tab in your account settings on the Perlego website. Your subscription will stay active until the end of your current billing period. Learn how to cancel your subscription
No, books cannot be downloaded as external files, such as PDFs, for use outside of Perlego. However, you can download books within the Perlego app for offline reading on mobile or tablet. Learn how to download books offline
Perlego offers two plans: Essential and Complete
- Essential is ideal for learners and professionals who enjoy exploring a wide range of subjects. Access the Essential Library with 800,000+ trusted titles and best-sellers across business, personal growth, and the humanities. Includes unlimited reading time and Standard Read Aloud voice.
- Complete: Perfect for advanced learners and researchers needing full, unrestricted access. Unlock 1.4M+ books across hundreds of subjects, including academic and specialized titles. The Complete Plan also includes advanced features like Premium Read Aloud and Research Assistant.
We are an online textbook subscription service, where you can get access to an entire online library for less than the price of a single book per month. With over 1 million books across 990+ topics, we’ve got you covered! Learn about our mission
Look out for the read-aloud symbol on your next book to see if you can listen to it. The read-aloud tool reads text aloud for you, highlighting the text as it is being read. You can pause it, speed it up and slow it down. Learn more about Read Aloud
Yes! You can use the Perlego app on both iOS and Android devices to read anytime, anywhere — even offline. Perfect for commutes or when you’re on the go.
Please note we cannot support devices running on iOS 13 and Android 7 or earlier. Learn more about using the app
Please note we cannot support devices running on iOS 13 and Android 7 or earlier. Learn more about using the app
Yes, you can access Pro Tools LE and M-Powered by Mike Collins in PDF and/or ePUB format, as well as other popular books in Technology & Engineering & Acoustical Engineering. We have over one million books available in our catalogue for you to explore.