![]()
Chapter 1:
Tools of the Film Editor
Several years ago I was asked to consult on a “problem” film. It was a low-budget independent film (an indie) being cut in Los Angeles. The editor was very competent at cutting video, but had no idea how to cut film. The producer of the film knew that this particular editor was very competent at working with NLEs (nonlinear editing systems), but had no idea about his editor’s film experience. In other words, the editor was in over his head.
Despite what you might think about this editor’s judgment, he was only doing what video editors have done for years. New video equipment is introduced all the time. For the savvy editor, it takes a short time to master new equipment. But in this case, the “new equipment” was film. Knowing the “say no once and you’ll never work again” mindset of Los Angeles producers, when asked about his skill level with film, of course the editor said he could do it! In this case, the editor was trying to learn how to cut film as he went. As a result, the project was set up incorrectly from the start.
The film was cut digitally at thirty frames per second (30 fps), with no method of matching back to the original film frames (matchback) enabled on the NLE, which was an Avid. The lab, according to the producers, had not recorded key numbers and starting time code numbers for the beginning of each cam roll, so going back to the lab and autoconforming the film according to the time code EDL on an Excalibur was out of the question. To complicate matters even further, there was no burn-in video time code or film key numbers on the videotape transfers, and the telecine house had absolutely no database records, again, according to the producer.
So, I was asked, what’s the next step?
Disaster has a uniquely slow pace. On the Titanic, people continued drinking and dancing after their ship had hit an iceberg, unaware that they were slowly sinking into the frozen waters of the North Sea. They weren’t going to survive longer than a couple more hours. When it became apparent that there was trouble, all hell broke loose and everyone abandoned ship. In this case, my editor was about to abandon ship as well.
It troubles me greatly that such a foolish mistake could be made, that in haste someone would actually decide to cut a project and then try to figure out how to piece it back together. In this case, the last moments of cutting a poorly planned project seemed more like an I Love Lucy skit than a professional post production project.
Another example of lack of care happened more recently, again with a low-budget indie. I don’t mean to pick on low-budget indies, but they are far more familiar to me. Similar mistakes have happened in my experience with filmed sitcoms and higher budget films, but it is usually the low-budget films, on which less-experienced people work, that have the biggest problems.
In this case, the film was cut. The project was complete, with a database intact and everything organized. There was only one small issue that the editor had to resolve. The key numbers displayed above picture from the NLE were not matching the key numbers on his burn-in video. The editor wondered, “would this be a problem?”
The answer, of course, was yes.
Somewhere along the line — we eventually pinpointed the problem to the telecine transfer (the process of transferring the film to videotape) — the numbers in the log had been converted from a 35mm project to 16mm gauging. As a result, the NLE was giving him frame counts up to 19, running on a base 20 scale used for 16mm instead of 16 frames per number, which is used for 35mm. Any list created by the NLE at that point would have been no good.
It’s easy to become too comfortable with technology and not careful enough. In this case, the whole problem could have been avoided by looking at the telecine log, checking the numbers on the first clip to see that both NLE and videotape burn-ins matched and making sure that the proper gauge of film was noted on the log. The editor claimed that he didn’t have the budget to hire an assistant, who could have checked those numbers.
“Too bad,” I said. “Now you’re responsible.”
It is for these reasons that I wrote this book. Film editing, a relatively easy subject to comprehend, is replete with small details and potential pitfalls.
Film editing has been around much longer than video. But unlike video, it has changed very little. The methods used for traditional film editing are pretty much the same as they were in the 1940s. The tools are certainly the same. In fact, many of those tools remain in use today, and they are just as accurate and useful as they ever were.
In the 1980s, equipment manufacturers were making steady attempts at uniting two very different groups of people: film editors and video editors. In those days, video editors tended to be more gadget savvy and technocratic. Film editors, on the other hand, were very hard to impress and preferred to be left to their own devices. Although a number of interim solutions were introduced in the mid and late 1980s, it wasn’t until the 1990s that nonlinear editors or NLEs made an impact. The predecessors of the modern NLE were ruled out as either “too technical” or “not sophisticated enough.”
In hindsight and through my own experience, I understand what made film editors standoffish when it came to new technology. Their methods were better. The thought of having to create anything in a linear manner was unthinkable.
Linear editing is like building a brick wall. It starts at the bottom and works its way up. If, when halfway through, the builder discovers that one of the bricks on the bottom is too short, he or she will have to tear down the whole wall and start over again. I can attest to this, having been through many recuts and trace edits during my tenure in television.
Film is different. The nonlinear method of cutting film is more akin to building a sand castle. It starts out by creating a basic shape that doesn’t even have to look like a castle. Then, through slow trimming and sculpting of the sand, it eventually becomes a magnificent sculpture, assuming that the creator has the knack for sculpting.
Another problem for film editors was the missing element of hands-on control of the film. While they used machines to edit, film editors didn’t have to trust machines to tell them which scene they were cutting or what frame they were on. They used their own eyes, hands, and good judgment for that fundamental information. As a result, the individuality of the editors seemed diminished when they were forced to use machines to tell them what they could not see: an edge number beside a frame or a grease pencil mark.
But in the early to mid 1990s, two companies began to make solid gains toward converting film and video editors toward the same type of editing equipment. Avid and Lightworks had both developed nonlinear editing machines using a means that combined the nonlinear elements of filmmaking with the technological prowess of digital video.
With the advent of NLEs, there has been a lot of crossing of traditional lines. “On line” and “Off line,” terms that video editors used, became vague. Higher resolutions used with NLEs allowed creative off line editing to be completed on line. All types of editors — film, off line, and on line video—had to learn each other’s trade.
But today there is still a learning gap when a video editor makes the jump to film. That gap is primarily due to a lack of understanding of how films work. In this chapter, we’ll look at some of the tools and methods of traditional film editing. Later, we’ll examine how they are still integrated today in even the most technical films.
A Tour of the Film Cutting Room
To a modern NLE editor, the film cutting room might seem more like a museum than a work space. Nonetheless, it has served, and continues to serve, a purpose. If a director wants to see his or her film projected before the final negative is cut, the editor must come here to conform workprint and mag stock, the visual and aural elements used in film, using lists created by an NLE.
Nowadays these rooms are used less, but they’re no less important. Conforming a workprint from an NLE cut list has to be done on an edit bench. It can be checked on a Moviola upright or a KEM flatbed. But the assembly of film begins here, and no matter how high tech the rest of the digital world may be, the only way to project a film is to cut film.
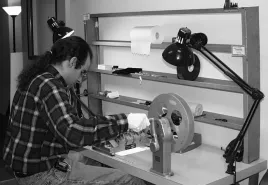
The survey of film editing tools begins with the traditional film cutting room. Most film cutting rooms are the same. There is always a workbench or edit bench with reel rewinds on either end, where the film is cut, synched, and conformed. The work bench has a synchronizer, also known as synch blocks or a gang sync, in between the two rewinds. Here the workprint and mag stock are synched together. There is usually a backlit portion of the table top for viewing frames. A loupe, used for looking closely at frames, is an absolute necessity. And some overhead lights are good, too. Most editors use metal long-armed clamp-on incandescent lights. These make the bench look absolutely hideous, but editors find themselves redirecting these lights all the time, so they’re a must.
Figure 1.1 A typical film editing bench
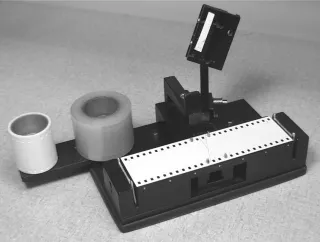
And what would be the purpose of an edit bench without a splicer? Most benches have a Rivas (also called “butt”) splicer on hand. Some use a guillotine splicer. Guillotine splicers are especially efficient for 16mm films. Lisa Day, the editor of many Hal Ashby films, introduced me to a roller splicer made in Canada. The circular blade rolls across the film when it cuts. I like this splicer, mostly because I’m left-handed and have a tendency to reach across the Rivas, which results in splicing more than just film. Splicers are equipped with rolls of splicing tape. Clear tape is used for picture, white tape for sound. The splicer is adjustable to create diagonal cuts for mag stock and straight cuts for film. Diagonal cuts are more durable and less likely to break. But a diagonal cut across a frame of film would be objectionable.
Figure 1.2 A Cinetrim roller splicer
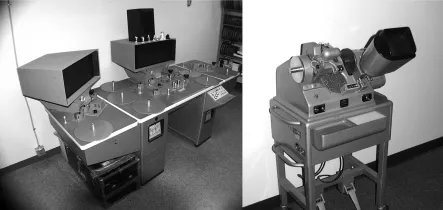
There is always a viewing device. Different editors prefer different devices. There are two different types of devices: uprights and flatbeds. I think uprights are a lot easier to use for most purposes, but they’re also very hard on workprint. As the film goes through the gate of an upright, it brushes against the bottom of the hard metal surface. I’ve seen a number of homemade devices that prevent the film from scratching on an upright. The most popular seems to be a velvet cloth taped to the bottom near where the film enters the gate. For smaller formats like 16mm, I prefer a flatbed, which is not only kinder and gentler on film, but also quieter than the rattle and hum of an upright.