- 288 pages
- English
- ePUB (mobile friendly)
- Available on iOS & Android
eBook - ePub
Sound, Lighting and Video: A Resource for Worship
About this book
Lights, Camera,Worship! is a manual for all of your technical needs. To draw people into your church with incredible worship experiences, you need to learn more about how to get the most from your lighting, sound, video, and projection systems. This is your one stop resource!
Written by an experienced professional and consultant, this book will show you how to successfully run the major components that, done correctly, will make your church presentation the absolute best it can be and will draw more people in! This is packed with information that will not only show you how to use the technology, but how to troubleshoot and problem-solve in the areas you need it most from running a new control board to uniting your lighting and audio visual systems as one integrated unit. This won't just show you how to operate your systems - it will make your production go from OK to WOW!
Trusted by 375,005 students
Access to over 1.5 million titles for a fair monthly price.
Study more efficiently using our study tools.
Information
Subtopic
TheatrePART 1
SOUND
CHAPTER 1
Anatomy of a Sound System
THE HEART OF EACH SOUND SYSTEM IS THE SAME
A modern-day House of Worship sound system can be as complicated as the day is long. Many systems today have integrated digital signal processing (DSP), digital mixing consoles, automixers, complicated matrix systems, complex delay systems, and more! However, when you get down to it, every sound system is ultimately the same.
Think of a professional sound system as if it were an automobile. You have your basic entry-level vehicle – it often has no air conditioning and is simply a motor, a transmission, a steering wheel, four tires, and a few seats. Getting to 60 miles per hour takes forever and is celebrated when it happens. But this vehicle gets you from point A to point B and doesn’t cost much.
Conversely, you have the high-end luxury car. Leather interior, biometric recognition systems, integrated GPS, super sound-dampening materials for an enjoyable ride, a motor, a transmission, a steering wheel, four tires, and a few seats. This car gets to 60 miles per hour in the blink of an eye – often exceeding 100 miles per hour without the driver knowing it. It cruises down the road – its occupants in complete comfort – and gets from point A to point B – however, at a premium price.
One vehicle definitely performs better than the other – there is no question. But, at the heart – both vehicles ultimately work the same. There is a motor, a transmission, four tires, and a few seats. If you can drive one, you can drive the other. Perhaps you don’t know how to work some of the high-end features such as the integrated GPS, right off the bat, but you can crank the car, put it in drive, and get from point A to point B. Likewise, if you commonly drive the high-end vehicle, you can get in the entry-level car, crank it, and get where you are going (although you might have to rely on some old-school methods such as reading a map).
A sound system is no different. Despite their size and design, ultimately they are all operated the same way. If you can operate one sound system, you can operate any of them. Perhaps you won’t be able to use all the extra equipment tethered to it, but you will be able to fire up a microphone or CD player and get sound out of the speakers. You will be able to perform a rudimentary mix and get through the event.
A GOOD SOUND ENGINEER MAKES OR BREAKS THE
SOUND SYSTEM — NOT THE OTHER WAY AROUND
SOUND SYSTEM — NOT THE OTHER WAY AROUND
A sound system is only as good as its operator. I’d say that at least 75 percent of the churches I visit could get much more effectiveness out of their sound system if only the operator knew the fundamentals of sound and mixed accordingly. Most of the problems we encounter in church sound systems are not the direct result of a poorly designed sound system, but the result of poorly trained operators. Solid and consistent training of the basics of sound is absolutely critical to the success of the modern-day House of Worship. A bad sound system design can still achieve quite a bit in the hands of a qualified and well-trained operator.
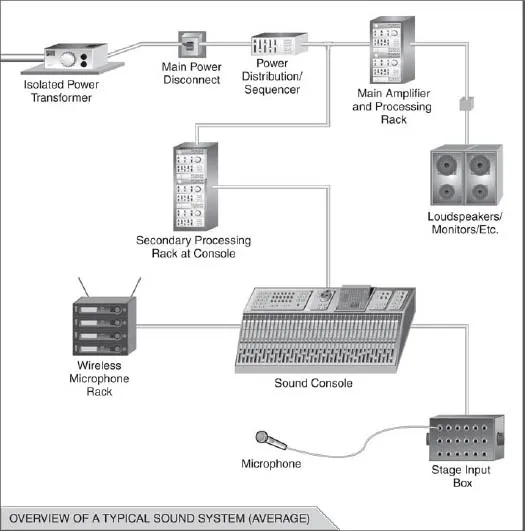
FIGURE 1.1 Overview of an average sound system layout.
You Do Get What You Pay For
While training is important so that your sound engineer can perform optimally it’s obvious that a well-designed sound system will allow that person to truly excel. Going back to the car analogy, it might be possible for a highly skilled driver to perform well at the races with an old clunker, but a finely tuned sports car, in the same hands, will far exceed the results of the clunker. Keep in mind, when planning a sound system, that you get what you pay for. But, perhaps more importantly, your sound system is only as good as the weakest link.
TIP
A preamp is an amplifier that boosts the sound signal prior to it entering the signal path in the console. A cheaper preamp will often alter the true sound and can adversely alter the reproduction of the sound.
You can spend all the money in the world on speakers and amplifiers but cheap out on the console (sound mixing board) and your system will not perform as it should. The console will prevent the signal from being the best it can be. Usually, due to cheap preamps, the signal coming into the board will suffer, because as it passes through the signal path it will continue to pick up excess noise, and this noise floor will be present in the system. The result will be a less – than-adequate reproduction of sound.
Time after time churches upgrade their old analog console for a new digital console – and they are blown away. They have better gain control, the signal is cleaner, and the system is performing better than ever. Often, they are astonished. This is true in all aspects of your sound system – not just the sound console. So pay close attention to every piece of equipment (and cable) that you choose.
In all your media systems, don’t go cheap on the components that are difficult or impossible to change once the system is installed. Make sure to spend the money where it counts (cables, patch panels, connectors, power, etc.). These are the things that can’t easily be changed down the road. Other items, such as consoles, microphones, and stage monitors are a little easier to upgrade later on and might be bargaining chips for your “value” engineer if need be. But I urge you – STAND STRONG. Nothing is worse than not having the tools you need to do ministry because you lost (or worse yet, didn’t fight) at the “value” engineering meetings.
Are You Grounded?
Often overlooked, and rarely understood, it’s important for a sound system to be on its own circuits with its own isolated ground. Done properly, the power for the sound system will run back to an isolated transformer specifically for the sound system.
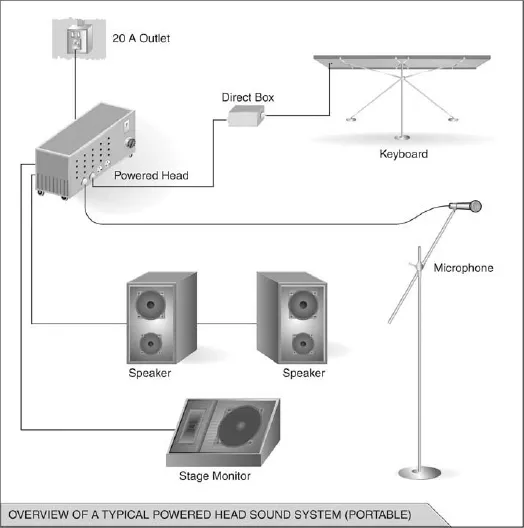
FIGURE 1.2 Overview of a small portable sound system.
This is the single most important thing you can do to reduce hum and interference noises.
Once you get this isolated ground – protect it! Don’t plug a moving light, orchestra light, or other non-sound-related device into the sound power. These devices can add noise through the power line that can cause operational problems and poor sound quality. Likewise, don’t go plugging your guitar amps or other sound devices into building power. The second you do, you defeat the whole process.
COMPONENTS OF A BASIC SOUND SYSTEM
The Mixing Console
At the heart of every sound system is the mixing console. This is the centerpiece of any sound system. Most likely, when someone says “sound system” you think of the large console on the floor of an arena with a confident-looking person (often dressed in black) standing behind it. The mixing console is the central heart of any sound system.
Realizing that at the time of this writing, over 80 percent of churches in America are comprised of 100 people or less, most of the sound systems encountered are very rudimentary. Often the mixing console will be a powered mixer (in other words the primary mix controls, system equalization, effects processing and amplification will all be built together as one unit). However, larger congregations will have need for a larger mixing console. Many of these congregations will turn to digital mixers and many will also use submixers.
When you first approach any typical mixing console, it’s common to be a little intimidated. At first glance, all you see are rows upon rows of different-color knobs and controls. It looks like a beast – and that’s when you stand behind a small mixer! When you find yourself in front of a 48- or 52-channel console, or, heaven forbid, a large-format digital mixer, you might just want to dive for cover!
Relax. That’s a standard feeling. But here’s the secret: if you learn about 16 button/knob functions you can run almost any console out there! That’s right – all those buttons and knobs and controls that look so intimidating are really duplicating the same function per channel. And regardless of the type or size of the console, just like with the automobile example, they all work pretty much the same. With the knowledge of a handful of controls you can operate almost any console out there!
So, take a breath, grab a cup of coffee, and let’s explore the typical mixing console.
Lets start off by taking a typical console and breaking it into two primary sections – the input section and the output section.
The input section is where you manipulate your various input sources (microphones, playback devices, effects returns, etc.). The output section is where you route the various signals to the different outboard components of the sound system (processing, amplification, powered speakers, stage monitors, etc.).
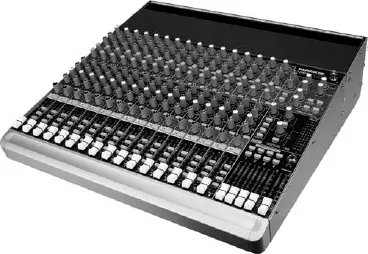
FIGURE 1.3 A typical mixing console for an averagesized church. Mackie 1604VLZ shown here. Photo courtesy of Mackie Designs Inc. All rights reserved.
Input Section
Let’s look first at the input section. Often, this is where the first wave of intimidation comes for newer users. Don’t despair. The input section is easy. Each channel will consist of an intermediate volume control (usually a fader, but in some cases it will be a knob). This control is almost always located at the bottom of the channel strip. Above this strip will be a section of knobs that control the equalization of the channel’s inputs, and another section of knobs that control the auxiliary sends for the channel. Finally, at the very top of the channel you will usually find a GAIN control (sometimes called TRIM). This is the master volume control for the channel.
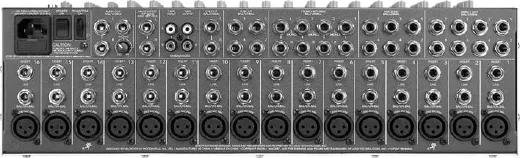
FIGURE 1.4 Rear Connections of a Mackie 1604 Mixing Console. Photo courtesy of Mackie Designs, Inc. All rights reserved.
The controls on one channel duplicate across the entire input section! So, if you look at Figure 1.5a of a typical channel strip, you will see the volume fader, auxiliary, equalization, and gain controls. Now, when you look at the channel in more detail, you’ll notice the Auxiliary knobs all do the same job and the equalization knobs work like you’d expect. See – this is already getting simpler. Let’s take a look at each control and discuss how it works.
GAIN CONTROL
As mentioned earlier, the Gain (sometimes referred to as Trim) is almost always going to be located at the top of the channel strip. For practical purposes, you can think of this as the master volume control on the channel. This is the knob that the old saying is very true of: “A little bit will do you.” The Gain control is actually affecting the gain of the preamp.
I like to explain volume structure for a sound system much like a water supply system. When you visualize how water works – you have different control stations. Think about the main water cut-off to the house. If you turn it a little bit, water gushes out. Likewise, if you turn the faucet to the kitchen sink on the same amount, water trickles in comparison.
Now, think of that example when you consider your Gain control. The Gain control acts like the main water cut-off – turn it a little bit, and you get a lot of volume proportionally. Your fader or volume control on the channel acts more like your kitchen faucet – move it the same amount as the Gain control and you get much less volume proportionally.
Another function (usually located near the Gain control) is the PAD control. This is a great feature for certain input devices (such as CD players). Some signals come into the console at a higher db level – you know you are experiencing this when the GAIN is all the wa...
Table of contents
- Front Cover
- Half Title
- Title Page
- Copyright
- Contents
- FOREWORD
- SPECIAL ACKNOWLEDGMENTS & THANKS
- INTRODUCTION
- PART 1 • Sound Systems for Worship
- PART 2 • Lighting Systems for Worship
- PART 3 • Video Systems for Worship
- CONCLUSION
- APPENDIXES
- INDEX
Frequently asked questions
Yes, you can cancel anytime from the Subscription tab in your account settings on the Perlego website. Your subscription will stay active until the end of your current billing period. Learn how to cancel your subscription
No, books cannot be downloaded as external files, such as PDFs, for use outside of Perlego. However, you can download books within the Perlego app for offline reading on mobile or tablet. Learn how to download books offline
We are an online textbook subscription service, where you can get access to an entire online library for less than the price of a single book per month. With over 1.5 million books across 990+ topics, we’ve got you covered! Learn about our mission
Look out for the read-aloud symbol on your next book to see if you can listen to it. The read-aloud tool reads text aloud for you, highlighting the text as it is being read. You can pause it, speed it up and slow it down. Learn more about Read Aloud
Yes! You can use the Perlego app on both iOS and Android devices to read anytime, anywhere — even offline. Perfect for commutes or when you’re on the go.
Please note we cannot support devices running on iOS 13 and Android 7 or earlier. Learn more about using the app
Please note we cannot support devices running on iOS 13 and Android 7 or earlier. Learn more about using the app
Yes, you can access Sound, Lighting and Video: A Resource for Worship by Brad Herring in PDF and/or ePUB format, as well as other popular books in Media & Performing Arts & Theatre. We have over 1.5 million books available in our catalogue for you to explore.