Primitive Photography considers the hand-made photographic process in its entirety, showing the reader how to make box-cameras, lenses, paper negatives and salt prints, using inexpensive tools and materials found in most hardware and art-supply stores. Step-by-step procedures are presented alongside theoretical explanations and historical background. Streamlined calotype procedures are demonstrated, featuring different paper negative processes and overlooked, developing-out printing methods.
Primitive Photography combines the simplicity of pinhole photography, the handmade quality of alternative processes, and the precision of large-format. For those seeking alternatives to commercially prepared material as well as digital photography, it provides the instructions for creating the entire photographic process from the ground up. Given its scope and treatment of the photographic process as a whole, this may be the first book of its kind to appear in over a century.
- 240 pages
- English
- ePUB (mobile friendly)
- Available on iOS & Android
eBook - ePub
About this book
Trusted by 375,005 students
Access to over 1.5 million titles for a fair monthly price.
Study more efficiently using our study tools.
Information
Subtopic
Digital Media❶
The Film-Holder
This chapter addresses the construction of film-holders for use with the calotype or paper-negative process. It begins with a survey of mid-nineteenth-century format possibilities drawn from original sources. This is followed by procedural demonstrations that show you how to build two types of film-holder designed to fit into the cameras presented in chapter 2. The first is a double-glass film-holder, intended for negatives sensitized by the wet-paper process; the second is a lighter, travel film-holder, intended for negatives sensitized by the dry, waxed-paper process (see chapter 4 for more on making negatives). Both types of film-holder are constructed using inexpensive hand-tools and materials, which are found in most hardware and art supply stores. They are designed to carry two sensitized negatives back-to-back and are easily modified to serve as focusing screens. They can also be used with modern-sheet films and photographic paper.
Before moving further, it is necessary to explain why a film-holder should be built in the first place, since modern film-holders are available in a variety of format sizes. The main reason is because modern film-holders are constructed with a metal plate, which acts as a separating barrier between the negatives. When one uses hand-coated paper negatives with modern film-holders, the silver nitrate on the negative inevitably migrates to the metal plate behind it. This residual silver nitrate combines with the metal in the film-holder and eventually causes staining problems with subsequent negatives loaded into the film-holder (see Figure 1.1). A film-holder with glass instead of metal eliminates this problem. Another reason for building one’s own film-holder pertains to the wet-paper process described in chapter 4. By sandwiching the sensitized negatives between sheets of glass, the film-holder creates an effective barrier against evaporation, allowing the sensitized negatives to remain in a dampened state for an extended period of time. Yet another reason is that it is difficult to obtain film-holders in format dimensions exceeding 8″ × 10″ or in custom sizes.
Figure 1.1 Why use a custom-built film-holder? In the sensitizing of this paper negative, a small amount of sensitizing solution accidentally leaked onto the backside. The sensitized negative was then loaded into a conventional 8″ × 10″ film-holder, whereupon the metal in the barrier of the film-holder reacted with the silver nitrate on the backside of this negative, causing the linear stain. Had the barrier been made of glass, which is inert (chemically unreactive), the stain would have been hardly noticeable.

DETERMINING THE FORMAT
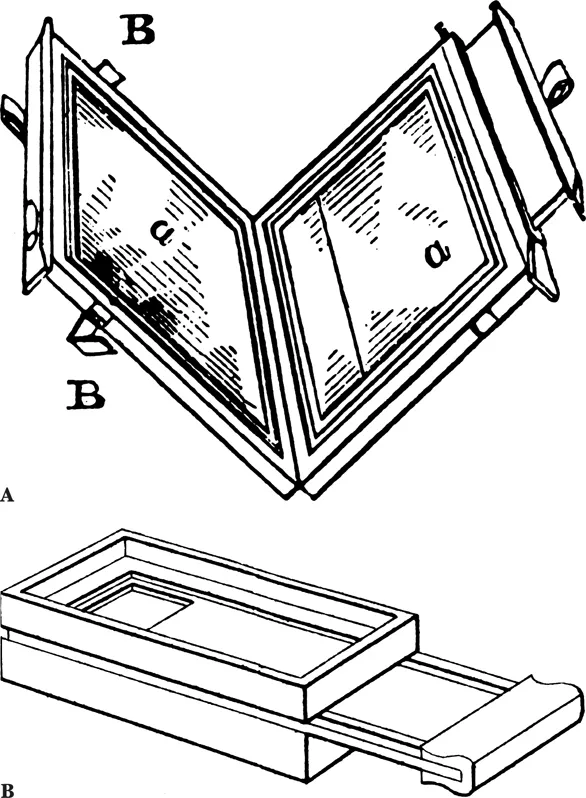
In order to build a film-holder, you must decide upon the format, or two-dimensional surface area, of the photograph you wish to make. This decision is important because all other equipment is to be affected by it, from the size of the camera to the focal length of the lens. Since you will be making contact-prints rather than enlargements, the size of your negatives will have to be the same size as the image you intend to make. Far from being limited in this regard, you have the potential to realize any format size imaginable. Perhaps it is a circular or square image format you want to make rather than a rectangle; paper negatives allow you to cut them down to any size or shape. As such freedom may lead to confusion, it is better to lay down a few guidelines first, based upon historical precedents (see Figure 1.2).
Figure 1.2A and B Two mid-nineteenth-century film-holders. (A) Reprinted from W. [Marcus] Sparling, Theory and Practice of the Photographic Art (1853; reprint, New York, 1973), 45, fig. 55. (B) Reprinted from E. de Valicourt, Nouveau manuel complet de photographie, (Paris, 1862), v.1, fig. 20.
Given that calotype formats were essentially customized, with no two image sizes remaining the same, it may be asked why I feel it necessary to establish a set of format standards from the start. There are a number of reasons for this decision:
• It is helpful to have a clear-cut format in mind when viewing a scene or composing an image.
• The dimensions of the cameras (discussed in chapter 2) are determined by a combination of the negative format, film-holder size, and lens focal length.
• The angle of view and focal length of the lenses (discussed in chapter 3) are determined by the diagonal measurement of the format used.
• Apart from the earliest calotype practitioners (such as Talbot, Bayard, and Channing), there is every reason to suppose that later calotypists were making negatives in relation to the prevailing daguerreotype and collodion formats of the day.
These reasons being given, it remains my intention that the formats considered below be taken in a flexible sense. Once a negative has been made, do not hesitate to depart from the original format if you think it will improve the image. Remove as much negative information as you deem necessary, cutting it down roughly with scissors or painstakingly with a sharp utility knife and straight-edge, or, if necessary, tearing it with your bare hands. On the other hand, leaving marginal stains, rough edges, and torn corners may enhance the quality of a photograph. In such cases, you might reconsider automatically trimming them away.
Calotype Format Standards
Let us briefly survey the historical evolution of calotype formats, from the dawn of the calotype era in the 1830s to its close in the early 1860s. Calotype photography is often associated with its inventor, William Henry Fox Talbot, a British scientist who began experimenting with light-sensitized paper in the 1830s.1 As evinced from his earliest photographs, Talbot was in the practice of cutting his negatives with a pair of scissors or a dull knife in order to remove unwanted chemical stains and torn corners. At times, this led to rather irregular shapes and rough edges, very different from the perfectly rectangular images we associate with the photographic image today. Since Talbot had no established precedent or industry standard to draw from, his negative formats tended to be unique, based upon whatever wooden box and lens combinations he happened to have on hand, which were more or less obtained from local cabinetmakers and his friends, who were scientists using microscopes and telescopes. Untrained as a visual artist, he thought nothing of aiming his camera up at an acute angle to photograph an architectural detail.2 Today, we have come to accept this point of view, but in Talbot’s day it was to depart from one of the cardinal rules governing the theory of perspective, which insisted that all the vertical lines in a scene be represented as running parallel to the picture frame.
By the early to mid-1840s, Talbot’s imagery appears to have changed.3 Gone are the wild formats and ragged cuts of earlier years. Vertical perspective lines are running parallel and all torn corners are neatly trimmed. The images are much more formal. Perhaps this was due to his continued experience with the process or to his resultant associations with people who had formal artistic training. Perhaps this was also due to the competing example of the daguerreotype, to which the calotype remained more or less an anomaly. There also was his desire to make the calotype an industrialized printing process in its own right. For whatever reason, a standard, perhaps only of precision, was starting to evolve in his work by the early to mid-1840s. By the late 1840s, his interests appear to have moved away from the calotype.
It is worth noting that Talbot’s departure from the calotype coincides with its large-scale adoption by the French. Starting in 1847, with treatises on the paper-negative process being published by Louis-Désiré Blanquart-Évrard and A. Guillot-Saguez, and culminating in 1851, with the publication of the dry, waxed-paper process by Gustave Le Gray, French practitioners introduced a number of changes to Talbot’s original techniques.4 One such change involved a more standardized approach to the formatting of paper negatives. I believe that this was due to the widespread prevalence of daguerreotype photography, which quickly had evolved to an industrialized level, necessitating the standardization of equipment and format sizes.5
Rather than invent the calotype process all over again, French practitioners approached it with a pre-existent knowledge of the daguerrean process, using and modifying available daguerrean equipment and formats, which they cited as points of reference. Examples of this can be found as early as 1847 in the technical literature; Guillot-Saguez made the following remarks concerning his preliminary negative-making techniques: “The sheet of paper having been trimmed two centimeters longer than the ground-glass of the camera is plunged for a minute in the solution….”6 Continuing his description, he added that a tablespoon’s worth of sensitizing solution was enough “… for a sheet of paper that does not surpass what is called whole-plate.”7 Also noteworthy is that Guillot-Saguez listed himself in a Parisian trade dictionary as a daguerreotypist, specializing in portrait daguerreotypes on paper.8
References to daguerrean plate formats on the part of French calotypists are not confined to Guillot-Saguez alone. For example, they can be found in the remarks of Le Gray. Describing the necessary lenses to be used with his modifications of the calotype process, he wrote, “With a whole-plate lens for monuments and a half-plate lens for portraits, the amateur has all that he needs.”9 About a modification of a simple lens designed for whole-plates, to which he added a second lens element, he remarked, “… I obtai...
Table of contents
- Cover
- Halftitle
- Title
- Copyright
- Contents
- Preface
- Acknowledgments
- 1. The Film-Holder
- 2. The Camera Body
- 3. The Lens
- 4. Calotype Paper Negatives
- 5. Salt Prints by Development
- Appendix. Sources of Supplies
- Bibliography
- Index
Frequently asked questions
Yes, you can cancel anytime from the Subscription tab in your account settings on the Perlego website. Your subscription will stay active until the end of your current billing period. Learn how to cancel your subscription
No, books cannot be downloaded as external files, such as PDFs, for use outside of Perlego. However, you can download books within the Perlego app for offline reading on mobile or tablet. Learn how to download books offline
Perlego offers two plans: Essential and Complete
- Essential is ideal for learners and professionals who enjoy exploring a wide range of subjects. Access the Essential Library with 800,000+ trusted titles and best-sellers across business, personal growth, and the humanities. Includes unlimited reading time and Standard Read Aloud voice.
- Complete: Perfect for advanced learners and researchers needing full, unrestricted access. Unlock 1.5M+ books across hundreds of subjects, including academic and specialized titles. The Complete Plan also includes advanced features like Premium Read Aloud and Research Assistant.
We are an online textbook subscription service, where you can get access to an entire online library for less than the price of a single book per month. With over 1.5 million books across 990+ topics, we’ve got you covered! Learn about our mission
Look out for the read-aloud symbol on your next book to see if you can listen to it. The read-aloud tool reads text aloud for you, highlighting the text as it is being read. You can pause it, speed it up and slow it down. Learn more about Read Aloud
Yes! You can use the Perlego app on both iOS and Android devices to read anytime, anywhere — even offline. Perfect for commutes or when you’re on the go.
Please note we cannot support devices running on iOS 13 and Android 7 or earlier. Learn more about using the app
Please note we cannot support devices running on iOS 13 and Android 7 or earlier. Learn more about using the app
Yes, you can access Primitive Photography by Alan Greene in PDF and/or ePUB format, as well as other popular books in Media & Performing Arts & Digital Media. We have over 1.5 million books available in our catalogue for you to explore.