The minimally invasive philosophy underpinning periodontal and peri-implant microsurgery respects biologic principles, preserves healthy tissues, enhances patient well-being, and maximizes soft tissue esthetics. Distributed into nine carefully sequenced chapters, this book first presents the minimally invasive philosophy before demonstrating the protocols necessary for the development of new skills for the surgeon, walking the reader through each phase of learning and practice required to advance to the next. Once this training is complete, the book reviews the basics of ergonomics, magnification, and subepithelial connective tissue grafting before moving on to the hallmark chapter on microsurgical techniques. This chapter comprises half the book and systemically presents each microsurgical technique, illustrating it step by step and then showcasing its use in multiple clinical case examples. Digital planning and suturing are emphasized, as well as esthetic microsurgery and the correlation of these techniques with implantology. The authors' end goal is to equip clinicians to perform increasingly conservative, biologic, and predictable procedures with the greatest precision possible.
eBook - ePub
Periodontal and Peri-implant Plastic Microsurgery
Minimally Invasive Techniques with Maximum Precision
- 368 pages
- English
- ePUB (mobile friendly)
- Available on iOS & Android
eBook - ePub
Periodontal and Peri-implant Plastic Microsurgery
Minimally Invasive Techniques with Maximum Precision
About this book
Trusted by 375,005 students
Access to over 1.5 million titles for a fair monthly price.
Study more efficiently using our study tools.
Information
1
Minimally Invasive Surgery
Clinical outcomes are enhanced when the most accurate surgical approaches are performed using magnification systems, precise instruments, and microsurgical materials.
Reconstructive Vascular Microsurgery
Microsurgical techniques have a long history, but the broad application of vascular microsurgery in different medical specialties is a relatively recent phenomenon. The history of microsurgery is directly related to the development of optical magnification of the operatory field and the refinement of microinstruments.1
The first techniques to use the microscope were developed for research purposes. Carrel’s work on vascularized organ transplantation in 1902 seems to be the first record of the application of microsurgical techniques.2 Otorhinolaryngology was the first specialty to consider the benefits of microsurgery, and eye and ear microsurgery led to the development of more sophisticated operative microscopes, equipment, and techniques.
Otorhinolaryngology was the first specialty to consider the benefits of microsurgery
Jacobson et al were the first to publish on the use of microsurgery for small blood vessel anastomosis,3 and since then the use of magnifying glasses and microscopes has grown and developed widely. Today, more complicated procedures are possible both in animal models and clinically in patients. The most advanced techniques are initially developed and trained in animal models and then transferred to clinical use. Magnifying loupes are used for lower magnification levels (2× to 8×), while operative microscopes work at 9× to 40× magnification.
Microsurgery did not develop as a subspecialty of medicine. On the contrary, microsurgical techniques have been incorporated by a wide variety of specialties, such as pediatric surgery, neurosurgery, plastic surgery, and vascular surgery, being an essential element in the outcome of many surgeries and treatments.4
Learning microvascular techniques in the microsurgery laboratory is the first step for surgeons who wish to adhere to this treatment philosophy. Successful training in microvascular techniques requires excellent concentration and persistence, which may lead to frustration at first. The training environment should be calm and preferably without distractions of any kind. In order to maximize training and lessen the physiologic tremor that almost everyone experiences to some degree, appendicular muscle impact exercises, caffeine, and nicotine should be avoided 24 hours before any training. Also, the activity should be interrupted for 5 minutes every hour of training in order to reduce fatigue.
The instruments used for microvascular anastomosis include jeweler’s micro pliers, microscissors, microclips, a 10-mL syringe with 90-degree angled blunt insulin needle, clip holder, no. 11 scalpel, retractors, and monofilament sutures. The suture size should be 11-0 for vessels with 0.5-mm diameter, 10-0 for vessels with 1-mm diameter, and 9-0 for vessels with 2-mm diameter.
Surgeons must know how to work the operative microscope lens system and should opt for the appropriate magnification for the work to be performed. Binocular vision and work in the center of the field are also crucial for proper technique.
Once microsurgery trainees know the technical environment, they can begin to acquire and develop the skills for the microsuture technique. Initially, the training for this technique is practiced on nonanimal models prepared especially for this procedure. Suturing a rubber model is a training step that precedes suturing living and delicate structures and uses a wooden board with a hollow center covered with a rubber or latex strip. Several cuts in different shapes and sizes should be made in the rubber strip to simulate the edges of the structures that will be sutured, offering varying degrees of difficulty.5,6
Microsutures are made by following some basic concepts. The point of entry of the needle must be perpendicular to the entry plane; otherwise, the edge will be inverted. The distance from its entry to the edge should be three times the diameter of the needle. If this distance is not respected, the edges will overlap. The needle exit on the other side should also be perpendicular to the cut in the rubber. As the surgeon’s confidence and skill improve, the diameter of the suture should decrease, and the microscope should be zoomed in progressively.5,6
Following initial training on rubber models, practice should begin on animal models. Wistar rats are the ideal animals to practice vascular microsurgical techniques in the laboratory. The rats have a suitable vascular network with many easily accessible vessels and nerves of appropriate gauge for different types of sutures. As a basis for comparison, a 300-g rat, considered the ideal size, has a 1-mm-diameter femoral artery, a 2-mm aorta, and a 1.5-mm carotid artery. The anesthetic techniques must provide an adequate chemical containment, hypnosis, and analgesia for pain to allow for a fast and smooth recovery from the anesthesia.
The most favorable areas for training in a rat model are the inguinal region (femoral artery and vein) and the cervical region (carotid artery and jugular vein). The most commonly used techniques are end-to-end and end-to-side anastomosis. After preparation and proper anesthesia of the animal, delicate subcutaneous dissection is performed, and retractors are placed on the incision margins. The vessels used in training are identified and dissected with the microscissors, individualizing them. The difference between arteries and veins is observed by three main characteristics: arteries cross over veins, have a smaller gauge, and have a thicker vascular wall. Despite the smaller size, the arteries offer easier manipulation and have more resistant walls. For this reason, they are the vessel of choice for initiating microvascular anastomosis training. Handling should be minimal to avoid spasm and injury to the vascular wall, and the vessel’s outermost coat (ie, tunica adventitia) should be used to mobilize it (Fig 1-1a).
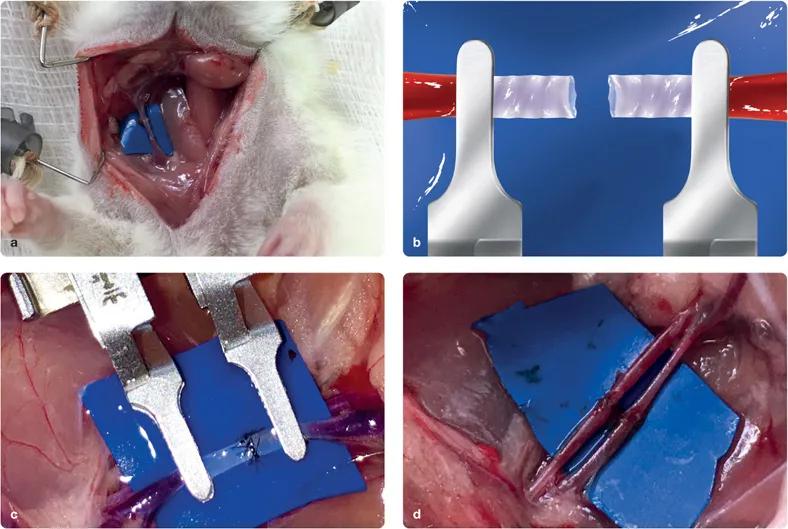
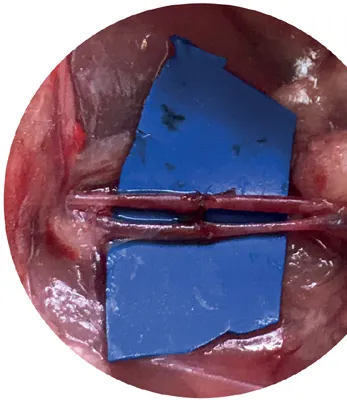
Fig 1-1 (a) Wistar rat prepared for laboratory training of microvascular anastomosis. (b) Microclip with the two stumps of the vessel stabilized for the first microsutures at positions 6 and 12 o’clock. (c) Exercise of microvascular anastomosis in the femoral artery finalized before removal of microclip. (d) The finalized femoral artery and vein microvascular anastomoses after microclip removal. Observe hemostasis achieved after microsutures.
To begin the microvascular anastomosis technique, the distal and proximal microclips are placed, followed by a complete transverse incision of the vessel using microscissors. Heparinized saline solution is used to irrigate the interior of the vessel in both stumps. The anastomosis is performed with the first two sutures placed on the upper and lower poles at 12 o’clock and 6 o’clock, respectively (Fig 1-1b). A long suture termination is left for later traction in order to visualize the position of the vessel edges and obtain a symmetric suture. The next suture sites to be performed with single stitches are those corresponding to 9 o’clock, 7:30, and 10:30 (eg, the posterior wall of the vessel). In order to achieve this, the clips are rotated 10 degrees to expose this wall. The next step is to undo the rotation of the vessel and suture its anterior wall with simple stitches at 3 o’clock, 1:30, and 4:30 (Fig 1-1c). Finally, the microclips are removed, and the region of the vessel with blood inside is drained toward the anastomosis. At this point, the patency of the vessel and the possible leakage of ...
Table of contents
- Cover
- Half Title
- Title Page
- Copyright Page
- Tribute to Dr Dennis Shanelec
- Contents
- Foreword by Sérgio Kahn
- Foreword by Sascha A. Jovanovic
- Preface
- Acknowledgments
- About the Authors
- Contributors
- 1 Minimally Invasive Surgery
- 2 Periodontal Microsurgery, Leonard S. Tibbetts and Dennis A. Shanelec
- 3 How to Develop New Skills with Preclinical Practice
- 4 Ergonomics and Magnification, J. David Cross
- 5 Subepithelial Connective Tissue Grafting: The Microsurgical Approach
- 6 Microsurgical Techniques
- 7 Digital Smile Design (DSD) and Esthetic Crown Lengthening Microsurgery: Precision from Planning to Execution, Christian Coachman, Cláudio Julio Lopes, Felipe Miguel Saliba, and Konstantinos D. Valavanis
- 8 Implant Microsurgery: The SMILE Technique, Dennis A. Shanelec and Leonard S. Tibbetts
- 9 Periodontal Plastic Microsurgery and Immediate Dentoalveolar Restoration, José Carlos Martins da Rosa and Glécio Vaz de Campos
- Index
- Back Cover
Frequently asked questions
Yes, you can cancel anytime from the Subscription tab in your account settings on the Perlego website. Your subscription will stay active until the end of your current billing period. Learn how to cancel your subscription
No, books cannot be downloaded as external files, such as PDFs, for use outside of Perlego. However, you can download books within the Perlego app for offline reading on mobile or tablet. Learn how to download books offline
Perlego offers two plans: Essential and Complete
- Essential is ideal for learners and professionals who enjoy exploring a wide range of subjects. Access the Essential Library with 800,000+ trusted titles and best-sellers across business, personal growth, and the humanities. Includes unlimited reading time and Standard Read Aloud voice.
- Complete: Perfect for advanced learners and researchers needing full, unrestricted access. Unlock 1.5M+ books across hundreds of subjects, including academic and specialized titles. The Complete Plan also includes advanced features like Premium Read Aloud and Research Assistant.
We are an online textbook subscription service, where you can get access to an entire online library for less than the price of a single book per month. With over 1.5 million books across 990+ topics, we’ve got you covered! Learn about our mission
Look out for the read-aloud symbol on your next book to see if you can listen to it. The read-aloud tool reads text aloud for you, highlighting the text as it is being read. You can pause it, speed it up and slow it down. Learn more about Read Aloud
Yes! You can use the Perlego app on both iOS and Android devices to read anytime, anywhere — even offline. Perfect for commutes or when you’re on the go.
Please note we cannot support devices running on iOS 13 and Android 7 or earlier. Learn more about using the app
Please note we cannot support devices running on iOS 13 and Android 7 or earlier. Learn more about using the app
Yes, you can access Periodontal and Peri-implant Plastic Microsurgery by Glécio Vaz de Campos,Cláudio Julio Lopes in PDF and/or ePUB format, as well as other popular books in Medicine & Dentistry. We have over 1.5 million books available in our catalogue for you to explore.