![]()
CHAPTER ONE
Through the seasons
The traditional idea of a greenhouse is that it should be chock-full of hot-weather plants, particularly tomatoes, to ‘put on a really good show’ in the summer. Towards autumn this generates a glut that is largely given away to friends and neighbours, either as ripe fruit or as chutney. Finally, at the end of the season, the plants are stripped out and the whole structure scrubbed down for winter, when it is used as a storage area for gardening equipment, children’s toys and perhaps a few overwintering containers from the patio.
This routine is typical, simply because it fits within the constraints of a small green house. Thankfully, the increased possibilities of a larger growing space mean that we can – and should – throw this approach out of the window. Poly tunnels are far more useful, and with just a few basic changes you can produce harvests to be proud of right through the year. This means taking a more balanced approach, rather than growing for a single season: being prepared to take some crops out earlier than you otherwise might, and to start some plants in containers that you might ordinarily sow straight into the soil.
There is a certain rhythm to this kind of gardening, which the month-by-month photographs in the second colour section will help you to appreciate.
Spring (mid-February to early April)
Polytunnel spring begins long before any activity can be detected outdoors. The salad crops, which have been standing fresh but inactive through the depths of winter, tend to be the first to take advantage of the light by slowly accelerating into growth. If you can make space, plant a few first early seed potatoes (always use certified stock in the polytunnel to avoid the risk of blight), which will be ready well before the outdoor harvest.
As light levels increase, some plants will bolt (run to flower) almost immediately. This is the cue to begin new sowings of crisp salad leaves and staples such as baby carrots, radishes and kohlrabi, all of which grow very rapidly once established. It’s also time to start eating up most of the remaining standing crops such as turnips and fully grown carrots, as they too will bolt soon and become woody.
The most critical parameter in the tunnel in the early spring is not heat but light. Polythene film transmits slightly less light than glass even when it is new, and the transmission falls off a little each year as the film becomes more porous. While this is insignificant at other times of year, in early spring a cold frame or small greenhouse is very valuable. Even if heat is provided, without adequate light seedlings will quickly become leggy and feeble, so if you are unable to provide a bright environment elsewhere it is usually better to wait for a few weeks until the light level improves.
As spring continues the potting benches in the tunnel gradually fill up, both with hot-weather seedlings for the polytunnel and with early starts for the outdoor plot. A capillary bed (see Chapter 6, page 49) will prove invaluable because it provides water from the roots upward, saving time on watering and reducing losses from damping off (a fungal infection, common in warm, crowded and wet conditions, that wipes out whole trays of seedlings with astonishing speed). As seedlings become ready to plant in the outdoor garden, plant a few of them in the tunnel as space permits, to stretch the harvesting season. Broad beans, for example, will be ready three weeks earlier in the tunnel than the same seedlings planted outside, and will be a very welcome addition to your diet during the hungry gap.
Summer (mid-April to late September)
Hot-weather crops grow fast once the weather is warm and will need training. This year’s harvests will begin very quickly, starting with salads and ‘first early’ potatoes and followed by broad beans, kohlrabi and strawberries. Even after chillies and tomatoes have been planted out and potted on, the potting bench will remain crowded with seedlings for outdoor use, safe from predators and late frosts. Cucumbers should finally make it into the tunnel beds some time in June and will grow strongly after a couple of weeks’ settling in. Once they get going they will need almost daily attention to keep them from sprawling away from the supports.
By July things will be in full swing and the harvests of tomatoes, chillies, cucumbers and peppers should have begun, even in indifferent summers, and flowers will appear on the melons. The tunnel should feature some visible flowers to help attract pollinating insects such as hoverflies (which are likely to snack on aphids while visiting), and with luck they will be followed by a toad or two to help keep slug numbers under control.
In August the first melons will be ready (although in colder years these may be a little delayed), but it is now, at the peak of the gardening year, that some plants should be taken out. This is to make room for the next phase of planting in preparation for winter and the hungry gap.
As the outdoor summer comes to a close, the tunnel will be a great place to dry and cure onions. A suspended bench or shelf is ideal, as it is dry and genuinely mouse-free. Melons will be ripening and when cut (by the end of September) are likely to be the envy of neighbouring growers. The beds will now begin to empty in earnest, leaving space free for plantings for the hungry gap and quick-maturing catch crops for autumn and winter.
Autumn (October to November)
As the growing season winds down and the remaining hot-weather crops are stripped out, the tunnel will suddenly look much more spacious and calm, and this is a golden opportunity for a general tidy-up. Any remaining tender plants, such as celery and fennel, that were grown outdoors may be heeled into the tunnel beds to prolong their usefulness, and will keep fresh that way for a couple of months.
Autumn can be an anxious time for tunnel gardeners, as variable weather will decide whether those vital hungry-gap plantings have been timed just right – established, but not too far along. Too warm, and the harvest may start while there is still plenty of stored produce; too cold, and you may be tempted to eat them young – and while this means they won’t be available later, they will be so delicious that it’s unlikely to be too much of a disappointment.
Winter (December to early February)
As the days become shorter, activity in the polytunnel slows down for the winter and practically stops in the depths of the season. Some of the beds will be empty in preparation for sowing early in spring, some will have relatively hardy crops ready for harvest, and others will be full of established young plants that will grow away as the days lengthen, providing a great start to the gardening year.
In winter the polytunnel will have a dual role, as a ‘holding area’ for hungry-gap plantings established, but not yet fully grown, and as a walk-in larder for fresh produce through the winter. Your part in all this will simply be to prevent as much damage from frosts as possible by getting the moisture and ventilation levels just right, to protect plants that need it, and to watch for signs of fungal infection. In addition, even in mid-January the simple coat-and-sweater approach of having a cold frame or cloche within the tunnel will provide enough warmth to germinate lettuce, rocket, carrot, beetroot and a variety of other salad vegetables.
Provided you have chosen your plants and varieties sensibly, and especially if you put a fleece cloche in place for particularly hard frosts, your tunnel will shrug off even very cold weather with a minimum of damage, leaving you free to enjoy a much wider variety of fresh food through the winter than if you were growing in an outdoor garden alone. Don’t be tempted to clear away slug-nibbled leaves that you wouldn’t put on a plate, as you might at other times of the year, because the plants will need every possible bit of leaf area to catch what little light there is. Now all that remains is to watch the faster-growing plants for the first signs of spring, when the whole cycle starts again.
Planning your plants
Planning is important in any vegetable garden, but in the polytunnel, where you may be juggling summer harvests with plants for the winter and hungry gap, it is even more vital. Whether or not you decide to follow a formal rotation, rough plans of how you want your tunnel to look as the seasons progress will help you to make the most of your protected space. The tunnel may look big when it is empty, but as soon as you start to make full use of it you will almost certainly wish it was just a bit larger.
Tip
Plan in terms of meals
As outdoor gardeners we’re all conditioned to think in terms of providing worthwhile amounts of whatever we plant. When you use a tunnel crop to supplement an outdoor one, however, the rules are slightly different. To help get yourself away from thinking in rows and half-rows, ask yourself how many actual meals the harvest has to provide and sow accordingly. If you’re just extending the season by a few weeks, you may need only enough to provide a meal or two – just a square metre will be enough space for most crops.
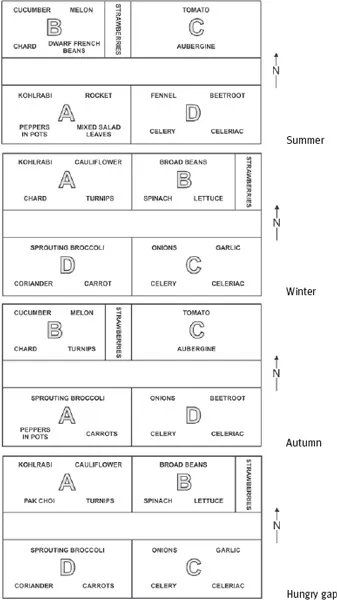
Overleaf are four versions of the same simplified tunnel layout, one for each season, based on the sowing and harvesting times given in Chapter 8 and summarised in the chart on pages 63 and pages 64. In reality, of course, things are much more complex than these plans suggest. Quick crops are sown in gaps anywhere and everywhere, seedlings are planted under the canopy of larger plants soon to be removed, and pots on staging or shelving take things – literally – to a new level. You will notice that the layouts lead up to the next hungry gap, since this is the time of year that needs planning the furthest ahead, but nothing is written in stone: if your plans change, your sketches can too.
As well as the sowing and harvest times, it is important to remember the growth habit of the plant concerned. For example, cucumbers are tall and cast deep shade, so you should avoid putting them along the south side of a bed.
Don’t be a slave to the idea of a perfect rotation (see Chapter 8, page 66). As you can see, the overwintering aspect of tunnel growing means that by the time a plant
matures it may be growing in the ‘wrong’ bed – but in fact this doesn’t matter. Just make sure that long-occupancy plants (most particularly the brassicas) are moved to new ground once a year, to avoid the build-up of soil pests such as club root. And above all, have fun! Experimentation is the essence of gardening, and there is nowhere you can grow that will give you more leeway than your polytunnel.
![]()
CHAPTER TWO
The tunnel’s first year
The best time to put up a new tunnel is on a calm, sunny day in early spring, because the cover will be warm and flexible, letting you get a really tight fit (more on this overleaf). But the moment you finally put the cover on is a little strange, because all of a sudden the tunnel just appears, impossibly clean and somehow looking a lot larger than the uncovered frame did. The temperature inside rockets immediately, and before the doors are even on you begin to realise just what the word ‘microclimate’ really means.
If you have done your homework, the tunnel will be primed and ready to go, and you have the whole growing season ahead of you. You prepared the soil beds before your helpers arrived to put on the cover, you have a source of water no more than a few steps away, and there are trays of seedlings on a sunny windowsill somewhere, waiting to be moved into the tunnel. Within a few short weeks the place will be bursting with plants, and you’ll be eating your first harvests before you know it.
The initial impact of moving to tunnel gardening is hard to overstate, and it catches you by surprise in unexpected ways. Take spring seedlings, for example. These can be brought out of the house much sooner than if you were planting outside. It’s harder to thin them out as they grow because so few of them are weak, and you have to learn to be ruthless about it – and perhaps to sow fewer next time. This subtle learning curve continues throughout the year, and even things you may have read about – such as harvesting tomatoes in October – take a bit of getting used to.
There may be a few unpleasant surprises, such as the attention of local animals, and you’ll have to work out how to deal with these too. But in many respects your first polytunnel season can be regarded as a ‘golden’ year. You will be using an absolutely clean tunnel, and if you are fortunate you will be working in brand-new beds, with no serious fertility issues or mineral shortages. You can expect few problems from pests and diseases, and all this is just as well – because you have a lot to learn.
Why install in the spring?
When covering a tunnel it is important to get a really tight fit so that the cover lasts as long as possible. The polythene is at its most stretchy when it is warm, and installing in cold conditions would mean that everything would have to be re-tensioned in summer. Although this can be done easily enough, the fit is never quite as good as it might have been. For the best results, the tunnel cover should be as tight as a drum in its first year.
That rules out winter, and summer is simply too late to get your hot-weather plants started. It is tempting to consider an autumn installation, but this leaves little time to really get things going before winter sets in. Your polytunnel would just stand there, being battered by the elements while being comparatively unproductive. Given that a tunnel cover has to be replaced every five winters or so, this is just not worth it. So, wait until spring. Spend your winter getting ready for your first tunnel season, because there are quite a few things to do.
Get the beds ready
As soon as the tunnel’s hoops are in place, you can not only plan exactly where you want the beds to go, but you can actually go ahead and prepare them. It will be far easier to do this before the cover is in place because you can work from any angle, and because you can move things around in a wheelbarrow without having to negotiate the doorways.
Most of the work involved in actually putting the tunnel cover on happens outside the footprint of the structure, but some things need you to be inside, so care must be taken not to trample the new beds. Treading directly on the soil compacts it, excluding air and reducing drainage, and this presents a major challenge to plant growth. Any time you have to step on the beds, use a short plank or board to spread your weight. This limits the damage so that any affected areas can be quite easily fluffed up again with a fork after the tunnel is up.
From ...