Hands-On Geometry
Constructions With a Straightedge and Compass (Grades 4-6)
- 84 pages
- English
- ePUB (mobile friendly)
- Available on iOS & Android
About this book
Put compasses into your students' hands and behold the results! Hands-On Geometry teaches students to draw accurate constructions of equilateral triangles, squares, and regular hexagons, octagons, and dodecagons; to construct kites and use their diagonals to construct altitudes, angle bisectors, perpendicular bisectors, and the inscribed and circumscribed circles of any triangle; to construct perpendicular lines and rectangles, parallel lines, and parallelograms; and to construct a regular pentagon and a golden rectangle.
Students will enjoy fulfilling high standards of precision with these hands-on activities. Hands-On Geometry provides the background students need to become exceptionally well prepared for a formal geometry class. The book provides an easy way to differentiate instruction: Because the lessons are self-explanatory, students can proceed at their own pace, and the finished constructions can be assessed at a glance.
Grades 4-6
Tools to learn more effectively

Saving Books

Keyword Search

Annotating Text

Listen to it instead
Information
Chapter 1:
Lines and Arcs
Introduction: The Straightedge and Compass Tools
Lesson 1.1
Construct a Circle by Center and Point
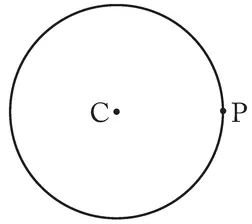
- Put the sharp point of the compass onto C and hold it there.
- Adjust the compass radius so that the pencil point rests gently on the point P.
- Hold the compass at its top, not by the pencil
- Lean the compass slightly in the direction you want to draw
- Start drawing the circle through P; if the curve doesn't go exactly through the center of point P, adjust the radius and start again.
- Lightly draw the circle with your compass.

Lesson 1.2
Construct a Line and an Equilateral Triangle

- Place your straightedge just under the two points P and Q below. Hold it steady.
- As you pull your pencil along the straightedge, make sure that the pencil tip goes through the center of each point. If not, change the angle of your pencil, or adjust your straightedge. Be precise! Make sure your pencil is sharp.
- Draw an arrowhead at each end of your line.


- Use your straightedge to construct the line segment

- Construct a circle with center A and passing through B,
- Construct another circle with center B and passing through A.
- Locate a point where the two circles intersect and label it C. (You don't need to draw a dot because the location where two circles cross is a point.)
- Use your straightedge to construct segments and
 . You now have equilateral △ ABC!


Lesson 1.3
Draw an Arc and Copy a Segment
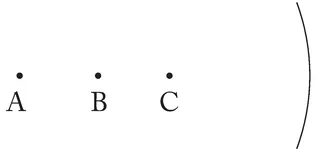


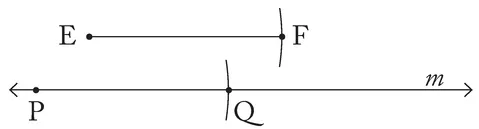

- Anywhere on the line m, mark a tiny dot and label it P.
- Put the sharp point of your compass on E, and adjust the radius so you can draw a short arc through F.
- Don't change the radius, but move the sharp point to P and draw a short ...
Table of contents
- Cover
- Half Title
- Title Page
- Copyright Page
- Dedication
- Contents
- Acknowledgements
- Introduction
- Chapter 1: Lines and Arcs
- Chapter 2: Kites and Basic Constructions
- Chapter 3: Centers of a Triangle
- Chapter 4: Perpendiculars and Rectangles
- Chapter 5: Parallels and Parallelograms
- Chapter 6: Constructing Triangles
- Chapter 7: The Infinitesimal and the Golden Ratio
- Answers
- Common Core State Standards Alignment
Frequently asked questions
- Essential is ideal for learners and professionals who enjoy exploring a wide range of subjects. Access the Essential Library with 800,000+ trusted titles and best-sellers across business, personal growth, and the humanities. Includes unlimited reading time and Standard Read Aloud voice.
- Complete: Perfect for advanced learners and researchers needing full, unrestricted access. Unlock 1.4M+ books across hundreds of subjects, including academic and specialized titles. The Complete Plan also includes advanced features like Premium Read Aloud and Research Assistant.
Please note we cannot support devices running on iOS 13 and Android 7 or earlier. Learn more about using the app