- 262 pages
- English
- ePUB (mobile friendly)
- Available on iOS & Android
Drupal 8 Blueprints
About this book
A project-based guide that will show you how to create 7 professional Drupal sitesAbout This Book• Create and design your own customized website effortlessly and efficiently• This up-to-date guide on Drupal 8 will show you how you can leverage the latest Drupal 8 features• This hands-on guide will turn you into a professional grade Drupal 8 developer through 7 unique and engaging web sitesWho This Book Is ForThis book is ideal for web developers who are looking to create professional web applications using Drupal 8. You should have some previous experience with Drupal and must have a basic knowledge of web application development in general. If you are looking to create fluent professional websites that will take you to the next level, then this book is for you.What You Will Learn• Find out how to use the Drupal 8 core functionality to build great websites• Discover how to better manage content using custom blocks and views• Display content in multiple ways, taking advantage of display modes• Using the new TWIG theme engine for Drupal• Easily manage and filter content• Understanding best practices for building great Drupal sites• Move beyond Drupal to build headless websites using RESTful services and JavaScript frameworksIn DetailDrupal is an open source content management framework that can be used for developing websites and simplifying online management of content for users.This book is a must-have for web developers who are looking to create professional-grade websites using Drupal 8. While building 7 different Drupal websites, we will focus on implementing the out of the box features that come with Drupal 8 and see how we can make some complex sites with minimal custom code.Focusing completely on Drupal 8, this book will help you leverage the new Drupal 8 features such as creating a different types and layouts of content using configuration to build in core with its built-in web services facilities, and effortless authoring using the new CKEditor with an effortless and efficient industry standard approach.The book starts with getting started with the development environment of Drupal. Each chapter will start with a brief overview of the site to be built and the required features. Then, we will proceed to create customized modules and themes and integrate third-party plugins. Lastly, you will learn about "headless" Drupal that uses RESTful services that would help you to display content outside of DrupalBy the end of the book, you will be able to implement the knowledge gained to build your own custom websites using Drupal 8.Style and approachThis unique, project-based resource on Drupal 8 website development will show you how to leverage Drupal 8's features to create customized, professional-grade applications efficiently and effectively.
Tools to learn more effectively

Saving Books

Keyword Search

Annotating Text

Listen to it instead
Information
Telling Your Own Story with Drupal
- Creating a new content type
- Creating taxonomy terms and associating them to news posts
- Using custom views to display the listing and individual news pages
- Enabling a comment field to allow user comments
- Referencing other news articles on the site
- Setting up restricted articles
- Understanding permissions and roles
- Configuring the editor experience
Creating the Post content type
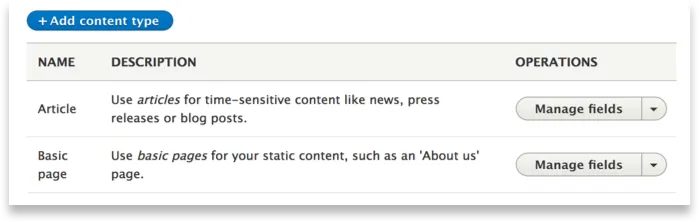

- Name: Post
- Description: Create a new post to display
- Menu settings: Uncheck all available menus
- Edit: This allows for the settings we just added to be modified; however, you cannot change the machine name once the content type is created.
- Manage fields: This allows us to add/edit/remove fields from the content type. In the previous versions of Drupal, you could move the fields up and down to order how they appear on the form. This is no longer the case and appears under the Manage form display tab.
- Manage form display: This allows for the fields to be reordered and the formats to be amended for this page. This won't affect the Manage display tab. It will only be visible to any user who has permission to add, edit, or delete.
- Manage display: This allows the fields to be reordered for how they will appear on the display. It will affect the output of how the fields are displayed on the page.
Creating our fields
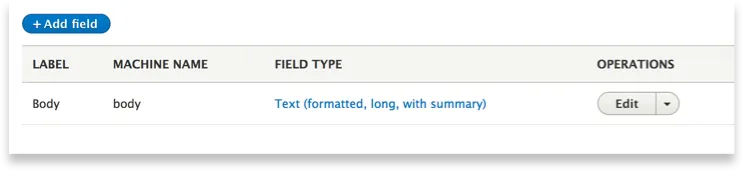
- LABEL: This is our user-friendly label; when we enter our label, this generates the machine name.
- MACHINE NAME: This is the unique name for the field; fields can be reused throughout Drupal, but only one per content type. If we create a field called subtitle, it will generate the machine name as field_subtitle; we can, however, override this to name it how we want.
- FIELD TYPE: There are various types of fields (text, list, autocomplete, and so on), which are created by plugins, but for now these are the ones we have in Drupal core.
- OPERATIONS: These are the features of the field.
- Edit: This allows us to edit the basic settings for the field, including label, help text, default value, and any other configuration that is required for the field.
- Storage settings (Field settings): This allows us to set the number of fields we require for this field.
Adding our fields
Table of contents
- Title Page
- Copyright
- Credits
- About the Author
- About the Reviewer
- www.Packtpub.com
- Customer Feedback
- Preface
- Introduction and Getting Set Up
- Telling Your Own Story with Drupal
- Get Fundraising with Drupal
- Recruit Using Drupal
- List Properties with Drupal
- Express Your Event with Drupal
- Get Teaching with Drupal
- Go Static with Drupal
Frequently asked questions
- Essential is ideal for learners and professionals who enjoy exploring a wide range of subjects. Access the Essential Library with 800,000+ trusted titles and best-sellers across business, personal growth, and the humanities. Includes unlimited reading time and Standard Read Aloud voice.
- Complete: Perfect for advanced learners and researchers needing full, unrestricted access. Unlock 1.4M+ books across hundreds of subjects, including academic and specialized titles. The Complete Plan also includes advanced features like Premium Read Aloud and Research Assistant.
Please note we cannot support devices running on iOS 13 and Android 7 or earlier. Learn more about using the app