- 116 pages
- English
- ePUB (mobile friendly)
- Available on iOS & Android
eBook - ePub
Blacksmithing
About this book
"Blacksmithing" is vintage guide to metalworking, with a special focus on farm-related work. Originally written for "farmers and farmers' sons", it contains instructions for making a variety of things necessary for the farm, including tools, horse shoes, wagon and plough components, etc. This volume contains much information that is still relevant today and is highly recommend for modern farmers and blacksmiths. Contents include: "Iron and Steel", "The Farm Shop", "The Forge Fire", "Forging Iron and Steel", "Simple Exercises in Blacksmithing", "Forging and Tempering Steel Tools", "Plow Work", "Wagon Work", "Horseshoeing", "Soldering and Brazing", etc. Many vintage books such as this are increasingly scarce and expensive. It is with this in mind that we are republishing this volume now in an affordable, modern, high-quality edition complete with a specially-commissioned new introduction on metal work.
Tools to learn more effectively

Saving Books

Keyword Search

Annotating Text

Listen to it instead
Information

V
SIMPLE EXERCISES IN BLACKSMITHING
ASSUMING that the beginner has the necessary tools and equipment described in Chapter II, and that he has a fire properly built in the forge, he is ready to begin actual work. The best plan is to start with simple things and to lead by gradual steps to the more difficult jobs that require more practice and experience.
A FIRE POKER
As a first exercise, the poker, which has been mentioned as one of the necessary tools, furnishes a good example. It brings into use the three processes of heating, bending and flattening. About 2 feet of round half-inch iron should be used. About 4 inches of one end should be heated to a light yellow heat and bent into the shape of a round eye. At his first trial the beginner will have trouble in trying to make the eye round instead of oval unless he has been told that in starting the bend he should make a right angle bend between the shank of the poker and the part that is to be the eye; then bend the extreme end before closing up the circle. If the middle of the hot part is bent first, as a beginner is likely to do, there is left no handy way to make the bends in the end and next the shank, and an oval instead of a round eye results. After the eye end has been finished and cooled, the opposite end of the rod is heated and flattened out until it is about 3/4 of an inch wide, then curved slightly as shown at A in Figure 12.
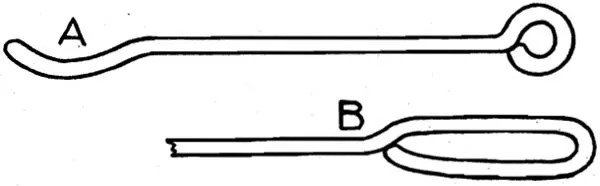
FIG. 12. A FIRE POKER
If a longer handle to the poker is preferred, it is an easy matter to form an oblong eye instead of a round one, as shown at B in the cut, but in this case it will be necessary to start with a rod about 6 inches longer than the one first described.
A STAPLE PULLER
In these days of wire fences, one of the handiest tools on the farm is a staple puller such as is pictured in Figure 13. When the writer was a young farm boy he thought he had the champion staple puller. It was simply a long punch with a tapering end drawn to a fine point. This point he would drive under a staple and then pry it out. Sometimes in doing the driving he hit his knuckles with the hammer. When a neighbor showed him one like the tool here pictured, he immediately made one from a piece of old horse-rake tooth, tempered it blue, and liked it better than his old one. The best size stock for making one of these pullers is 1/2-inch tool steel. The point is made rather short and bent at a right angle, and tempered the same as a cold chisel as explained on page 56. The handle end should be about 8 inches long.
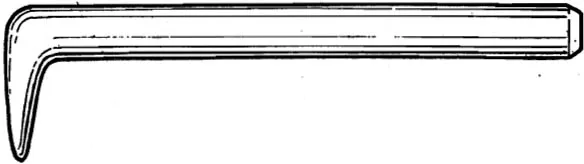
FIG. 13. A STAPLE PULLER
HOOK AND STAPLE
Another simple exercise in blacksmithing is the forging of a hook for a gate or a barn door, and the staple with which to fasten it in place. This exercise involves drawing, squaring, rounding, pointing, turning a round eye, and twisting.
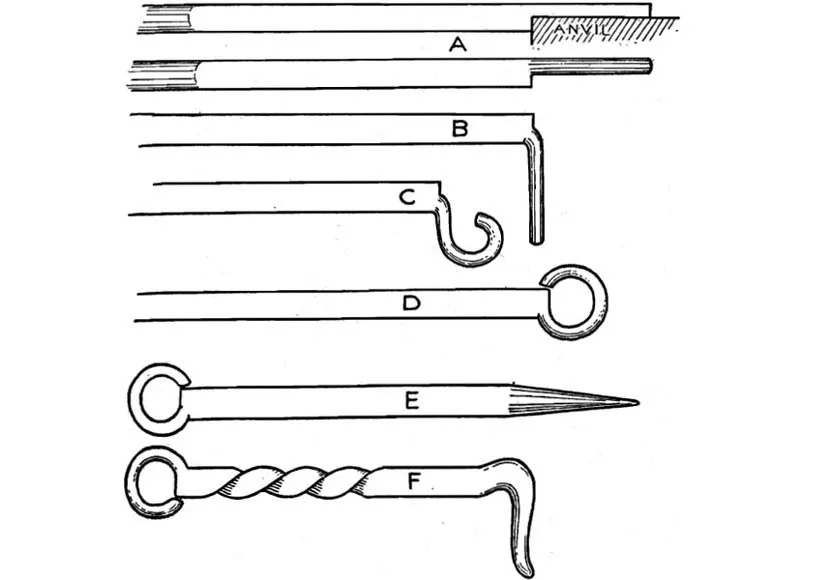
FIG. 14. STEPS IN MAKING A HOOK
For an ordinary barn door hook, a piece of 3/8-inch round iron is a convenient size to use. One end should be heated to a light yellow and drawn out square so that the corners come out sharp. (See what is said about drawing on page 22.) The end of this square part should next be heated and about 5/8 inch of it drawn down to half the size of the square part, then made round by hammering down the corners. In starting to draw out this last part, the iron should be held over the edge of the anvil as shown at A in Figure 14, so that when struck a flat blow by the hammer, the edge of the anvil will form a decided shoulder between the large square part and the part that is being drawn smaller. The small end is next to be made round and turned to form a round eye. To do this, it is best to start by bending at a right angle from the main part, as shown at B, then bending the extreme end as much as it needs to be bent in the finished eye (C). It is then a simple matter to close the ring so as to form a perfect circle as shown at D. The hook is now to be cut from the original bar at a point that will make it the right length when the point is drawn out to form the hook end. This end should first be drawn out square, then rounded as shown at E, and the hook formed in the end as shown at F.
The twist shown at F is put in the middle of the hook by first heating to a yellow heat, then grasping with two pairs of tongs and turning through one complete revolution, so that the eye and the hook end are in the same relative position as before.
To make a staple for a hook of the size mentioned above requires a piece of 1/4-inch iron. One end should be drawn out and rounded, then bent as shown at A and B in Figure 15. It should then be cut off at a point which will make the second leg the right length after it is drawn to a point. A pair of chain tongs should be used to hold the piece while the second leg is being drawn out as shown at C. The bend is completed by grasping the middle of the bent part with the chain tongs, as at D, and holding it over the horn or the rounded corner of the anvil, regulating the bend with light blows of the hammer.
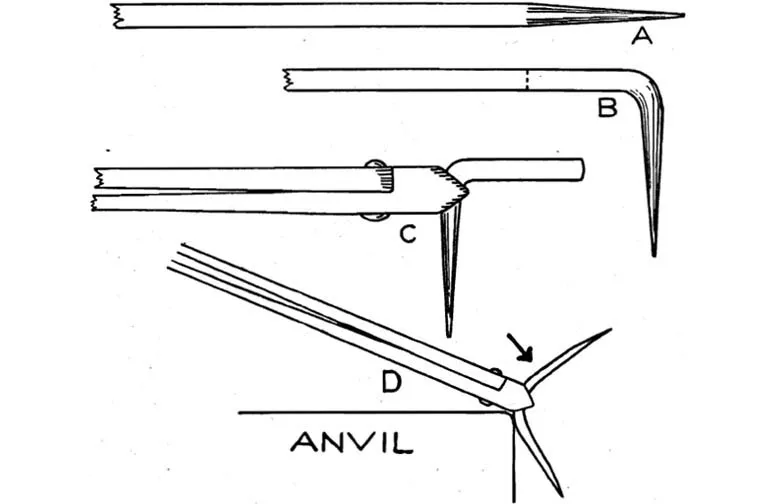
FIG. 15. STEPS IN MAKING A STAPLE
CHAIN LINKS
One of the jobs which the farm smith will often be called upon to do is to mend broken chains. The right way to do the job of mending, if time will permit, is to make a new link with which to join the broken parts. For temporary repairs there should be a supply of what are called cold-shut links which may be substituted for broken links without any loss of time.
To make a new link, take a piece of round rod of the same size as that used in making the chain, and bend it into the form of a capital letter U as shown at A in Figure 16; then, holding the bent part with a pair of chain tongs, heat the two ends to a yellow heat and scarf the inside corner of each end by holding it at an angle on ...
Table of contents
- Cover
- Title
- Preface
- Contents
- I. Iron and Steel
- II. The Farm Shop
- III. The Forge Fire
- IV. Forging Iron and Steel
- V. Simple Exercises in Blacksmithing
- VI. Forging and Tempering Steel Tools
- VII. Plow Work
- VIII. Wagon Work
- IX. Horseshoeing
- X. Soldering and Brazing
- Appendix
- Index
Frequently asked questions
Yes, you can cancel anytime from the Subscription tab in your account settings on the Perlego website. Your subscription will stay active until the end of your current billing period. Learn how to cancel your subscription
No, books cannot be downloaded as external files, such as PDFs, for use outside of Perlego. However, you can download books within the Perlego app for offline reading on mobile or tablet. Learn how to download books offline
Perlego offers two plans: Essential and Complete
- Essential is ideal for learners and professionals who enjoy exploring a wide range of subjects. Access the Essential Library with 800,000+ trusted titles and best-sellers across business, personal growth, and the humanities. Includes unlimited reading time and Standard Read Aloud voice.
- Complete: Perfect for advanced learners and researchers needing full, unrestricted access. Unlock 1.4M+ books across hundreds of subjects, including academic and specialized titles. The Complete Plan also includes advanced features like Premium Read Aloud and Research Assistant.
We are an online textbook subscription service, where you can get access to an entire online library for less than the price of a single book per month. With over 1 million books across 990+ topics, we’ve got you covered! Learn about our mission
Look out for the read-aloud symbol on your next book to see if you can listen to it. The read-aloud tool reads text aloud for you, highlighting the text as it is being read. You can pause it, speed it up and slow it down. Learn more about Read Aloud
Yes! You can use the Perlego app on both iOS and Android devices to read anytime, anywhere — even offline. Perfect for commutes or when you’re on the go.
Please note we cannot support devices running on iOS 13 and Android 7 or earlier. Learn more about using the app
Please note we cannot support devices running on iOS 13 and Android 7 or earlier. Learn more about using the app
Yes, you can access Blacksmithing by James M. Drew in PDF and/or ePUB format, as well as other popular books in Technology & Engineering & Mining Engineering. We have over one million books available in our catalogue for you to explore.