- English
- ePUB (mobile friendly)
- Available on iOS & Android
eBook - ePub
The Duffer's Guide to Painting Watercolour Landscapes
Trusted by 375,005 students
Access to over 1.5 million titles for a fair monthly price.
Study more efficiently using our study tools.
Information
WINTER LANDSCAPES
Painting winter scenes can be rewarding for many reasons. The trees are so much more interesting than in summer because you can see more of their structure and the sky is often dark and brooding, offering excellent opportunities to practise heavy graduated washes. The lower sun casts longer shadows and these can be used to emphasize the contours and convey the undulations of the land – in particular, the furrows and small clods of earth on a ploughed field or a rutted farm track.
Even a light dusting of snow can transform a dreary landscape and give it a magical quality. It is often difficult to paint on location in cold or wet weather, so photographs or quick sketches can provide the references you need to paint the scene in comfort at home. I often paint familiar views as imaginary snow scenes and this is an excellent way to expand your repertoire.

ALMOST HOME
38 × 56 cm (15 × 22 in)
The curving snow-covered track leads the eye to the two figures who provide added interest and a sense of scale to this winter scene. The lighter area in the lower part of the sky helps the darker colours of the building to stand out.
Distant trees
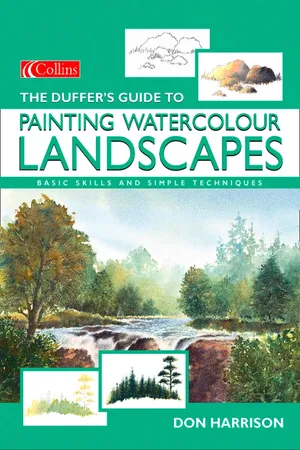
Distant trees are seen through layers of dust in the atmosphere, so colours appear pale and muted – usually light blue/green or blue/violet. They can be painted in various ways, so use whichever method you find easier. Remember not to make them too dark in tone.
exercise
- Using a pale, but not too watery, mix of Cobalt Blue, lay a medium round brush on its side really flat to the paper so the sides of the bristles are in contact with the surface. Without lifting the brush away from the paper, and with an up and down movement, paint a ragged line of distant trees. It is important to vary the height and shape of the tree clusters.
- Next, use a fairly dry pale blue/green mix of French Ultramarine and Lemon Yellow and a flat brush. Remove surplus paint on a piece of scrap paper and, holding the brush at an angle, use the corner of the bristles, pulling downwards in a dabbing motion to create a ragged top edge and baseline to the clusters.
- Once again a flat brush is used with a pale blue mix of French Ultramarine. Wipe the bristles back and forth across the palette to flatten the brush, which forms a chisel edge to the bristles. Then hold it fairly flat to the paper surface. Press it onto the horizon line, then pull it briskly up onto the dry paper, lifting at the same time to form a ragged edge to the tops of the trees. Do not work over the area more than once or you may lift off the first layer.
Using the sides of the bristles leaves rough painted edges for foliage.
Vertical dabs with the corner of the bristles produce random effects.
Brisk upward strokes leave a ragged top edge.
As these three examples show, different brushes can be used in different ways to achieve the same effect – in this instance, ragged edges for distant trees.
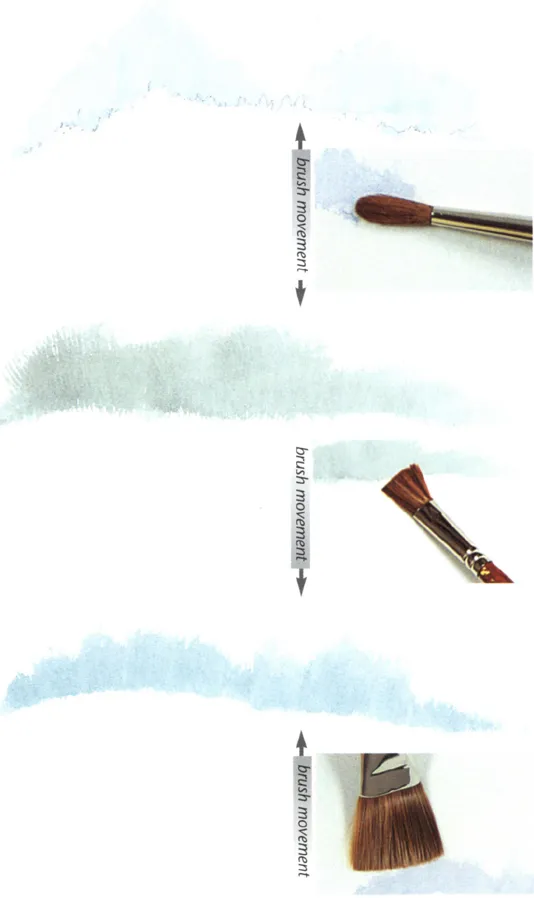
Mid-distance trees and hedgerows
Paint trees and hedgerows together, using wet-in-wet technique and working from light to dark. Vary the height of the tree line and leave the tops of hedgerows light in colour and the base dark and ragged – remember they are not neatly trimmed garden hedges.
exercise
- Start with a light underwash of Lemon Yellow mixed with Raw Sienna. Apply the colour with a flat brush pulled upwards onto dry paper, leaving a ragged edge along the top of the tree line.
- Before the paint dries, blend in a touch of Alizarin Crimson in places. When this is almost dry mix Cobalt Blue with the Crimson to make a dulled violet and use this to add shadow areas and to suggest trunks and branches.
- Add French Ultramarine and a touch of Burnt Umber to the mix and, with a medium round brush, use this stronger blue/grey for darker trees, branches and hedges. Add more of each colour to paint darker areas and shadows. For the hedgerows the paint mixture should be very dry. Paint them with a flat brush, using short vertical strokes.
- Use a rigger to suggest finer branches and a palette knife to scratch out light trunks and branches from almost dry paint.
- For the light foliage clinging to the branches use a pale yellow/brown mix of Raw Sienna with a touch of French Ultramarine and Alizarin Crimson added. Apply this with an up and down movement, using a medium round brush on its side, flat to the paper.
Build the colours up layer by layer, light to dark, to achieve the effect of varied foliage. Leave some of the lighter colours to show through in places.
Drawing winter trees
The branches of most trees zig-zag upwards and outwards towards the light in a series of slightly curved lines, repeatedly changing direction and getting progressively thinner. A common mistake is to make the upper branches thicker than the lower ones.
exercise
- Mark the overall height of the tree. Indicate the ground level, using a ragged line. Draw the trunk a third of the total height, ensuring it is in proportion – not too wide for the height of the tree, not too thin and straight and not tapering in at the top. Draw a faint ragged guideline to suggest the outer shape of the tree. Avoid making it too even in shape. Now draw two rough ‘V’ shaped guidelines from the top of the trunk to show the position of the main branches. Divide the width of the trunk at the top into two and extend the two halves of the trunk upwards and outwards as two thick branches, rather like the ‘Y’ shape formed by extending your forefinger and thumb. Make the inner part of each slightly longer than the other and do not splay them out too far.
- Divide each branch into two again and extend further branches in the form of ‘Y’ shapes from them. The extended branches will be half the thickness of the previous branches each time, with the longer branch nearest to the centre of the tree.
- C...
Table of contents
- Title Page
- Copyright
- Contents
- Introduction
- Materials and Equipment
- Using Colour
- First Steps in Watercolour
- Simple Skies
- Winter Landscapes
- Summer Landscapes
- Seascapes and Boats
- Mountains and Headlands
- Buildings in the Landscape
- About the Publisher
Frequently asked questions
Yes, you can cancel anytime from the Subscription tab in your account settings on the Perlego website. Your subscription will stay active until the end of your current billing period. Learn how to cancel your subscription
No, books cannot be downloaded as external files, such as PDFs, for use outside of Perlego. However, you can download books within the Perlego app for offline reading on mobile or tablet. Learn how to download books offline
Perlego offers two plans: Essential and Complete
- Essential is ideal for learners and professionals who enjoy exploring a wide range of subjects. Access the Essential Library with 800,000+ trusted titles and best-sellers across business, personal growth, and the humanities. Includes unlimited reading time and Standard Read Aloud voice.
- Complete: Perfect for advanced learners and researchers needing full, unrestricted access. Unlock 1.5M+ books across hundreds of subjects, including academic and specialized titles. The Complete Plan also includes advanced features like Premium Read Aloud and Research Assistant.
We are an online textbook subscription service, where you can get access to an entire online library for less than the price of a single book per month. With over 1.5 million books across 990+ topics, we’ve got you covered! Learn about our mission
Look out for the read-aloud symbol on your next book to see if you can listen to it. The read-aloud tool reads text aloud for you, highlighting the text as it is being read. You can pause it, speed it up and slow it down. Learn more about Read Aloud
Yes! You can use the Perlego app on both iOS and Android devices to read anytime, anywhere — even offline. Perfect for commutes or when you’re on the go.
Please note we cannot support devices running on iOS 13 and Android 7 or earlier. Learn more about using the app
Please note we cannot support devices running on iOS 13 and Android 7 or earlier. Learn more about using the app
Yes, you can access The Duffer's Guide to Painting Watercolour Landscapes by Don Harrison in PDF and/or ePUB format, as well as other popular books in Politics & International Relations & Art General. We have over 1.5 million books available in our catalogue for you to explore.