Forensic photography plays a vitally important part in the investigation of crime and the subsequent administration of justice. Written by a practitioner with many years professional experience, this book provides an overview of the most common forensic photography techniques in use today for those readers who may not have a detailed understanding of camera techniques and who need to get to grips with the use of light and other key scientific aspects of the job. It covers image capture issues, file handling and relevant equipment, such as lasers and UV lights, and explores how they work.
The predominance of the digital camera has resulted in an increasing trend for police forces across the world to use untrained camera users, rather than expert photographers. Therefore, this book will prove invaluable for those practitioners who need to produce accurate and clear photographic evidence, above and beyond the point and shoot mode on their cameras.
In the past there was only one choice of recording medium, ‘Film’. It was available in a number of sizes normally 10′′ × 8′′ and 5′′ × 4′′ sheet film, 120 and 220 roll film and of course 35 mm. This was then available in a various emulsions: colour negative, reversal, black and white and in a number of speeds (sensitivity). Although limited film stocks are still available in small numbers, film no longer has a mass-market appeal and more importantly, is no longer be used by law enforcement agencies.
Today the advent of the digital sensor has made all these ‘film’ choices and more, available at the touch of a few buttons. Yet it could be argued that instead of making the task easier, it has made the choice harder. For example, todays camera manufacturers not only produce various size sensors, but each has its own particular sensor design and its own in-house post production software.
As a forensic photographer the question is how we decide which system is fit for purpose and to answer that question, we must have an understanding of the very heart of modern camera technology, the sensor and the digital process.
I shall start with definitions of the digital image and an explanation of digital image acquisition; then I will discuss some simple examples of things we commonly do to images that might not be thought of as image processing, which will introduce the fundamental concepts of what image processing is about. I'll consider both the reactive and proactive uses of image processing – put another way, examples of restoration processes and enhancement processes – and along the way we'll encounter analysis processes and synthesis processes. All these terms will be defined, but it may be more understandable if their explanation comes after some practical examples.
Image processing is a term that covers a very large number of operations that may be performed on an image, some of which the photographer will have control of, some of which a technician may have control of, and some of which will be dictated by the equipment therefore in practice, may be out of the control of those using it. Image processing occurs at every stage between exposing a photograph and finally presenting it to the end user. It is, therefore, unavoidable. At the very least a basic understanding of image processing is essential, even if only to assist with choosing from the many settings in a digital camera's set up and shooting menus. Many users may not even consider the latter as image processing, as the term is more commonly applied to the treatment of images once they have been captured. With some relatively simple processes astonishing results may be achieved from photographs that may initially appear of limited use. An advanced knowledge of image processing options may even revolutionise how you approach photography from the outset. Although the broad term image processing also applies to analogue photography (for example various different film developers may be chosen for different effects, such as high contrast or high acutance (sharpness)) we will only consider digital image processing here. In a small volume such as this, we can only scratch the surface of this vast subject with its myriad options. I will introduce the fundamental concepts common to all digital imaging: the digital image, the imaging chain, the classes of operations and examples of where in the imaging chain they may be encountered. In the forensic context the integrity and reliability of images is of the utmost importance, particularly when images provide primary evidence. So we must consider ways to ensure integrity and prove reliability: I will discuss the concepts of workflow, the audit trail, archiving and storage and direct you to published best practice guidelines and further reading. When discussing post-capture software I will most often refer to Adobe Photoshop because it is the most widely used application, but the principles apply to all image processing software.
1.2 The digital image
What is a digital image? It's a question I often ask photographers. The replies are many and varied but rarely do I receive a response similar to ‘it's a set of binary numbers representing a scene’, because that's not how people perceive images. We can see images, can't we? A set of binary data is altogether more abstract. But for the digital image on your memory card, or on your hard drive, or in the ether between your wireless devices: can you see it? No, you'll need a monitor or a printer to display it first. The camera's optics project a pattern of light onto an array of electronic sensors; the electronics convert the response signals into a set of binary data and, in the simplest concept, a monitor's electronics will convert the binary data into electrical signals, which are then sent to an array of, say, light emitting diodes (LEDs) to display as a pattern of light. The result will be a likeness of the thing photographed, a representation of the scene. Once it is accepted that the digital image is data and that we can't see data and therefore need some device in order to see the image, I suggest we can consider two important concepts: one, we can free ourselves of presumptions that an image appearing on one device, say, ‘computer screen A’, is any truer a representation than its appearance on another device, say, ‘computer screen B’, (unless both screens are calibrated to some independent standard), and two, the necessity for image processing, or data manipulation1 becomes apparent.
1.3 Image acquisition
Although the digital camera is the most common device for acquiring a digital image, digital images may originate from other devices such as scanners, frame-grabbers from analogue video, and so on. Scanners, whether specialist film scanners or flat-bed desk-top scanners, are regularly used to digitise photographic negatives and prints in a hybrid workflow. Whatever the device, the fundamental processes of digital image acquisition are similar.
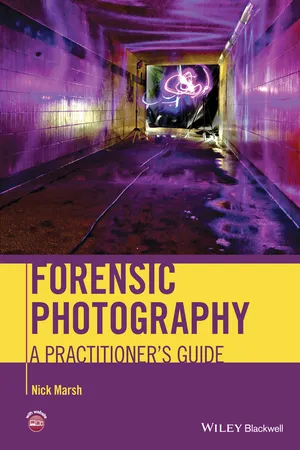
All processes of digital image acquisition involve two basic operations: sampling (measuring light intensity) and quantisation (assigning a discrete value to that measurement) (Figure 1.1). The number of locations at which light intensity can be measured (sampled) is set by the number of pixels a device has, which is usually stated as the pixel count. The convention is for cameras to be specified as, for example, 4000 × 3000 pixels, or ‘12 megapixels’, where a megapixel is one million pixels. For scanners, the figure is stated as pixels per inch, both horizontally and vertically. The number of pixels largely defines the spatial resolution of the resulting image (other factors include the optics employed in the formation of the image).
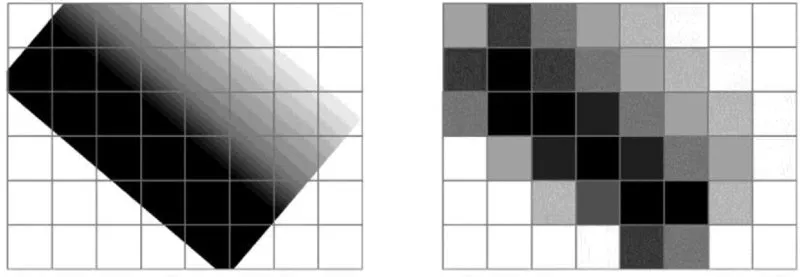
The number of values used to represent the light intensity at each location is limited by the bit depth of the device. Bit is an abbreviation of binary digit; the number of possible values will be a power of two. A 1-bit image can have only two possible pixel values: 0 or 1, that is black or white and nothing in between (Figure 1.2).
Figure 1.1 Left: Image of object (smooth edges, continuous tone) projected onto array of square pixels. Right: digitised image after sampling and quantisation. Sampling leads to ‘blocky’ edges; quantisation produces discrete levels of grey and leads to blurred edges because the resulting grey level is a function of the average intensity at each pixel.
Figure 1.2 Images of finger mark, recorded with bit depths of (left) 8, (middle) 2, and (right) 1, giving 256, 4 and 2 grey levels respectively. In order for us to perceive a monochrome image as having continuous tone, 8-bits are required, allowing 28, that is 256, discrete values or grey levels. I will discuss file formats later in the chapter but it is worth noting here that different file formats may have, or allow, different bit depths. It is common for raw formats to utilise 10, 12 or 14 bits; TIFF may allow 8 or 16 bits, whilst JPEG is limited to 8 bits. Are extra bits necessary if we can't perceive the difference between several different values? Maybe (more on this later).
1.4 Colour images
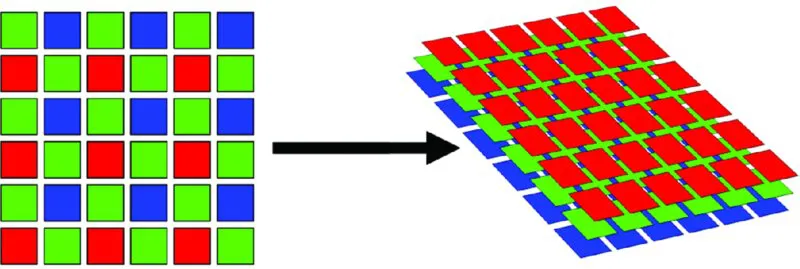
In practice most of us use colour cameras. Pixels can't inherently ‘see’ colour. To record colour information individual pixels are overlaid with coloured filters, most commonly the three additive primary colours: red, green and blue (RGB), the filters being arranged in a regular mosaic pattern or colour filter array (CFA). Each individual pixel is therefore only able to respond to part of the colour spectrum. But when we look closely at the resulting image we find each pixel has values for each of the three primaries. The process of deriving the ‘missing’ two colour values for each pixel is called demosaicing2 and is one of the first instances of image processing in the imaging chain. The result is, in effect, three overlaid monochrome images. Therefore colour images require 3 × 8 (24) bits, or 3 × 16 (48) bits, and so on (Figure 1.3). To add to the confusion, 24-bit colour images are often referred to as ‘8-bit’; 48-bit colour images ‘16-bit’, and so on.
Figure 1.3 A typical Bayer col...
Table of contents
Cover
Title Page
Copyright
Foreword
Preface
Acknowledgements
About the Companion Website
Chapter 1: Image Processing
Chapter 2: Cameras and Lenses
Chapter 3: The Use of Flash
Chapter 4: Crime Scene Photography
Chapter 5: Light as a Forensic Photographer's Tool
Chapter 6: The Photography of Injuries
Chapter 7: Finger and Shoe Mark Photography
Chapter 8: The Proactive Use of Light in Forensic Photography
Chapter 9: Specialist Equipment and Techniques
Chapter 10: Panoramic (Immersive or 360°) and Elevated imaging
Appendix 1: Tripods and Camera Supports
Index
End User License Agreement
Frequently asked questions
Yes, you can cancel anytime from the Subscription tab in your account settings on the Perlego website. Your subscription will stay active until the end of your current billing period. Learn how to cancel your subscription
No, books cannot be downloaded as external files, such as PDFs, for use outside of Perlego. However, you can download books within the Perlego app for offline reading on mobile or tablet. Learn how to download books offline
Perlego offers two plans: Essential and Complete
Essential is ideal for learners and professionals who enjoy exploring a wide range of subjects. Access the Essential Library with 800,000+ trusted titles and best-sellers across business, personal growth, and the humanities. Includes unlimited reading time and Standard Read Aloud voice.
Complete: Perfect for advanced learners and researchers needing full, unrestricted access. Unlock 1.4M+ books across hundreds of subjects, including academic and specialized titles. The Complete Plan also includes advanced features like Premium Read Aloud and Research Assistant.
Both plans are available with monthly, semester, or annual billing cycles.
We are an online textbook subscription service, where you can get access to an entire online library for less than the price of a single book per month. With over 1 million books across 990+ topics, we’ve got you covered! Learn about our mission
Look out for the read-aloud symbol on your next book to see if you can listen to it. The read-aloud tool reads text aloud for you, highlighting the text as it is being read. You can pause it, speed it up and slow it down. Learn more about Read Aloud
Yes! You can use the Perlego app on both iOS and Android devices to read anytime, anywhere — even offline. Perfect for commutes or when you’re on the go. Please note we cannot support devices running on iOS 13 and Android 7 or earlier. Learn more about using the app
Yes, you can access Forensic Photography by Nick Marsh in PDF and/or ePUB format, as well as other popular books in Law & Forensic Science. We have over one million books available in our catalogue for you to explore.